
|
|
|
|
|
|
Below are screen shots & instructions on how to customize your PC computer. Above are links to go directly to an item. Please email me if you have any questions. This is how I help my customers when they have trouble on their computers. I create screen shots & email them instructions on how to fix issues on their computers. I give FREE email support to my customers.
![]()
The taskbar is the bar at the bottom of the window. It holds the Start menu in the bottom left & the Notification area with date & time in the bottom right. It is also a great place to place shortcuts to the programs that you use everyday.
Click here to return to top.
 Taskbar Moved: What to do when the Taskbar is in the wrong position.
Click & hold the taskbar then drag & drop it to the bottom window. Then
right click on the taskbar & left click on the option to Lock the taskbar.
Taskbar Moved: What to do when the Taskbar is in the wrong position.
Click & hold the taskbar then drag & drop it to the bottom window. Then
right click on the taskbar & left click on the option to Lock the taskbar.
Click here to return to top.
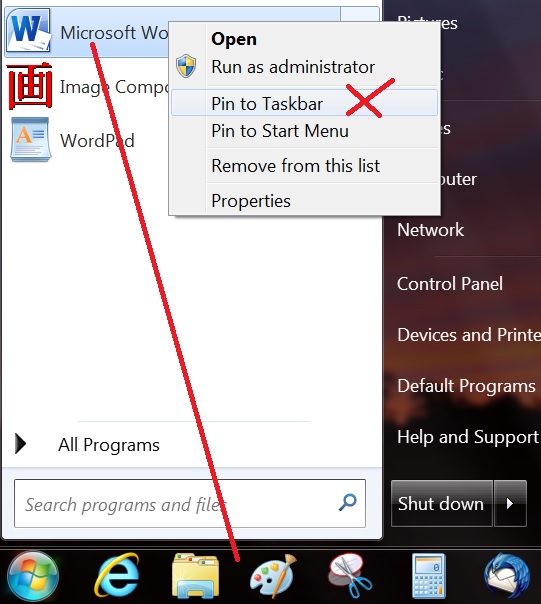
Right click on an icon in the Start menu the left click on Pin to Taskbar.
Click here to return to top.
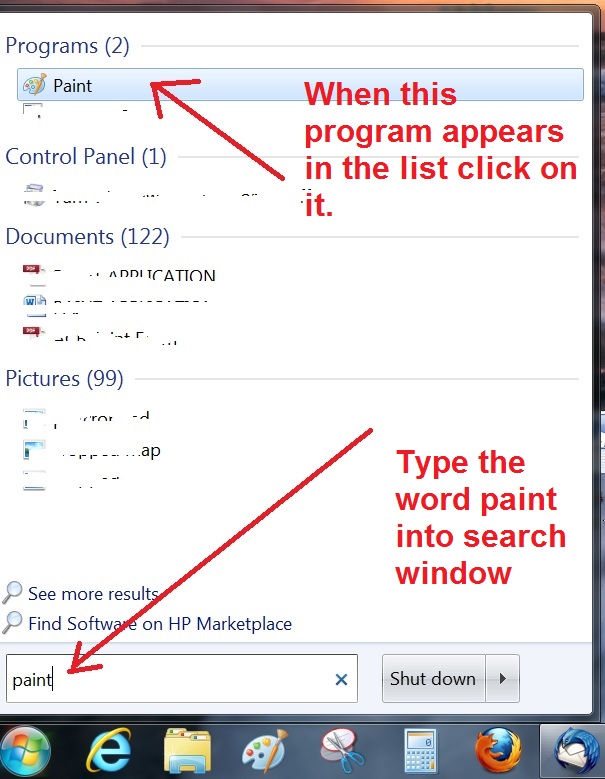
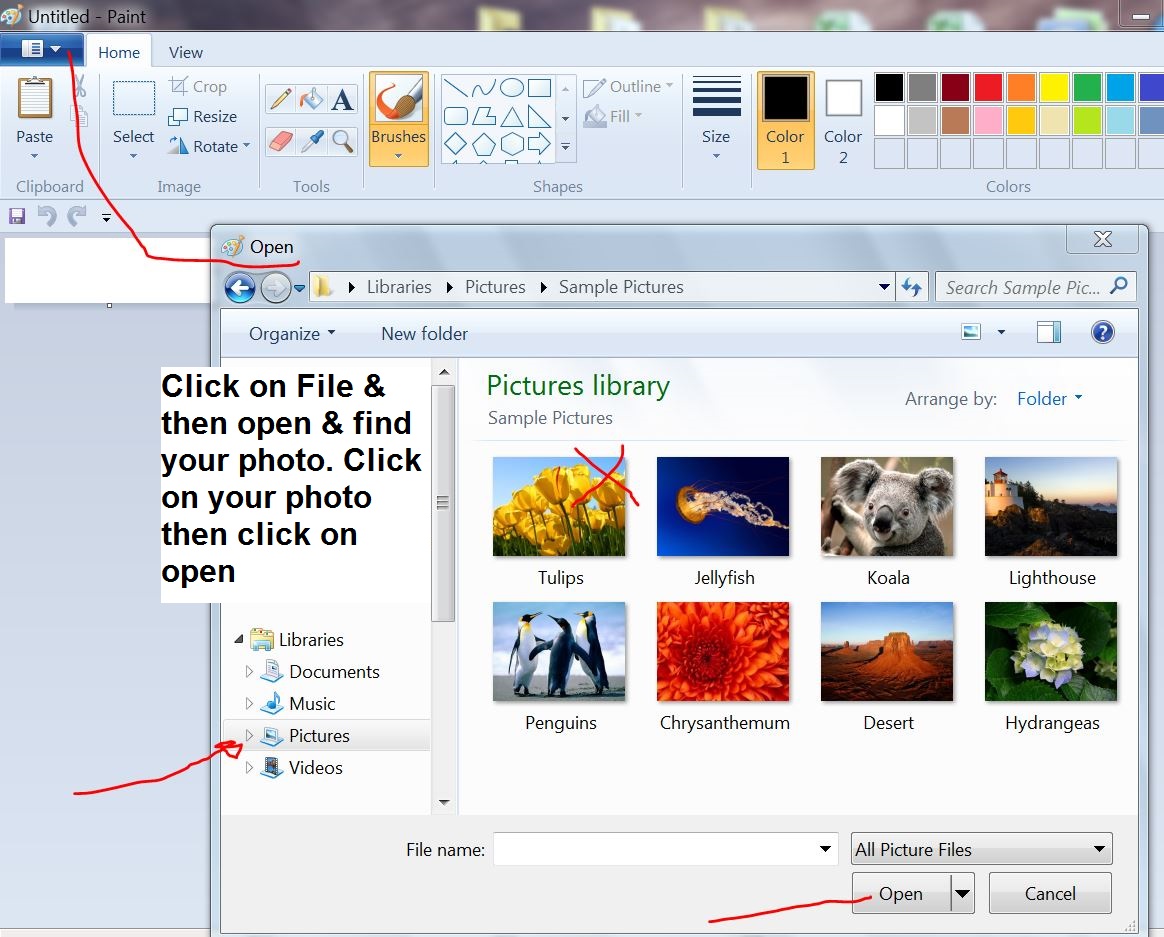
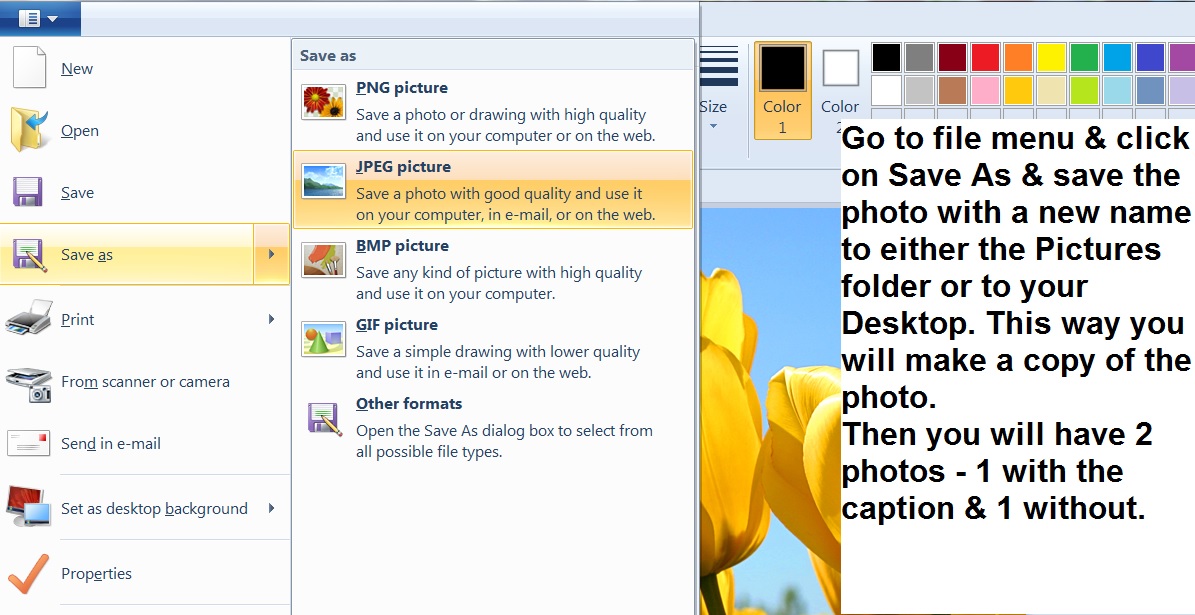
How to add text to photos using Microsoft Paint:

![]()


Click here to return to top.
Free Word: I found this new option to paying for Office on your new computer. Click on the link below to check it out. This is a free version of Word. The only catch is the program does not install on your computer. It runs in your Microsoft Account on the Microsoft server. This is also a great option if you want to learn how to use the newest version of Word, without paying for it. They also offer Excel & PowerPoint.
When the webpage loads you are given the option to log in with your current Microsoft Account. If you have Windows 8 on your computer then chances are you already have a Microsoft Account. Just sign in with your email address & Microsoft Acct password.
If you do not have a Microsoft Account then you will need to create one.
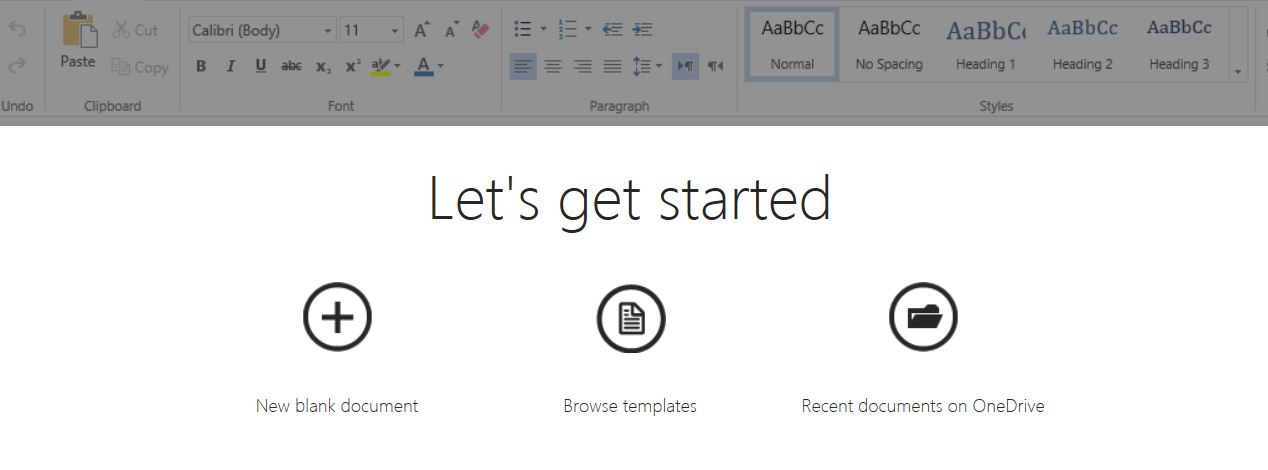
When you log in the window above gives you 3 options. To try out the program, click on Blank Document option.

The program gives you the basic features. The paid version has all the bells & whistles, but most users never use half of these features.
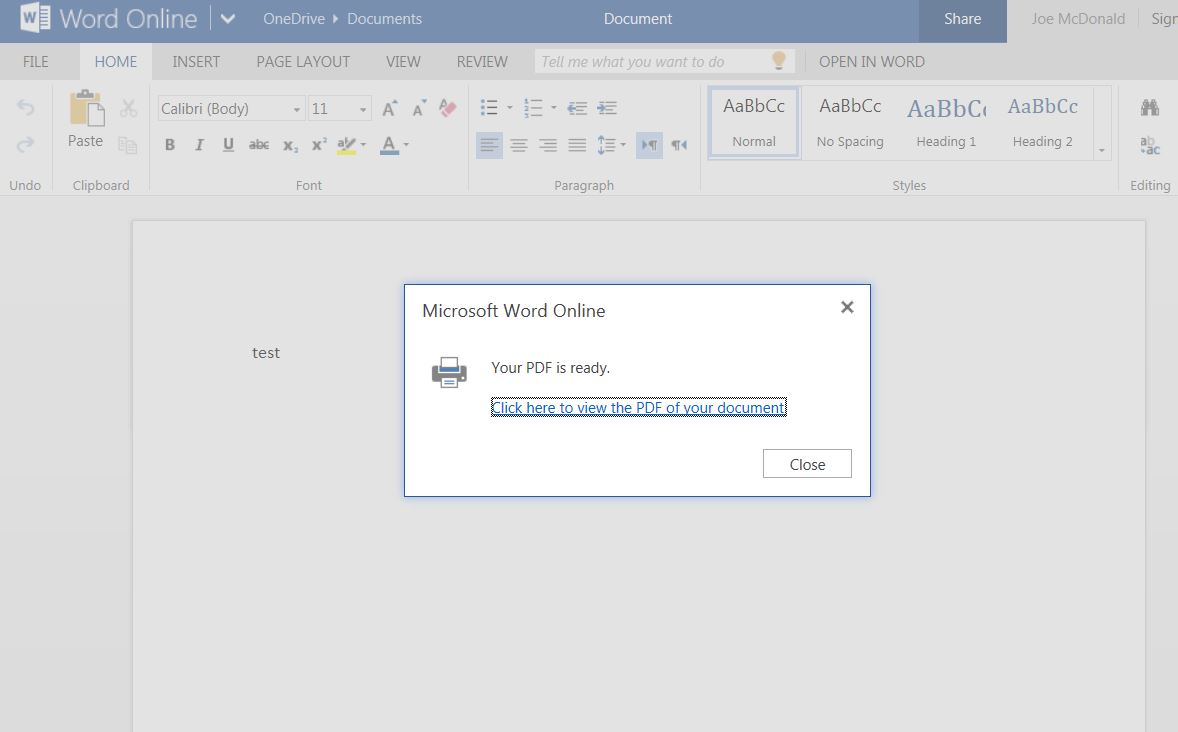
If you want to print, click on the File menu & then click on Print. This creates a temporary PDF file. Click on the Click here text & then your printer properties window opens with the option to print the document. Then close the window & go back to main document.
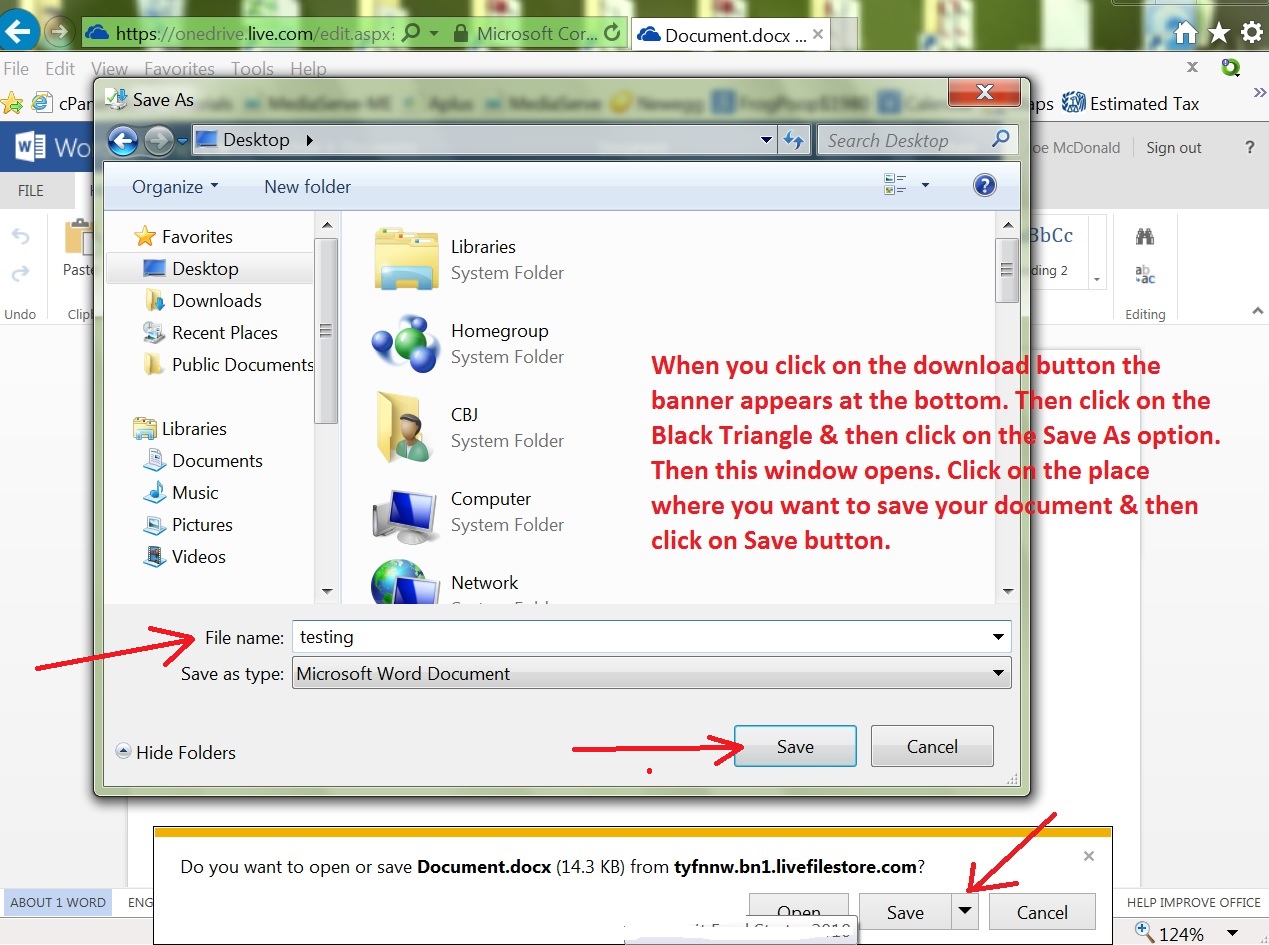
When you are done with your document you can save a copy to your computer. Click on the File Menu. Then click on Save As & then click on the Download option.

See directions below to save the document to your computer. When you are done, log off & close the Internet Browser. To make it easier to return, add word to your Favorites menu.
Click here, then create a Microsoft Account, verify your email address & then log in & start using your new program.
Click here to return to top.
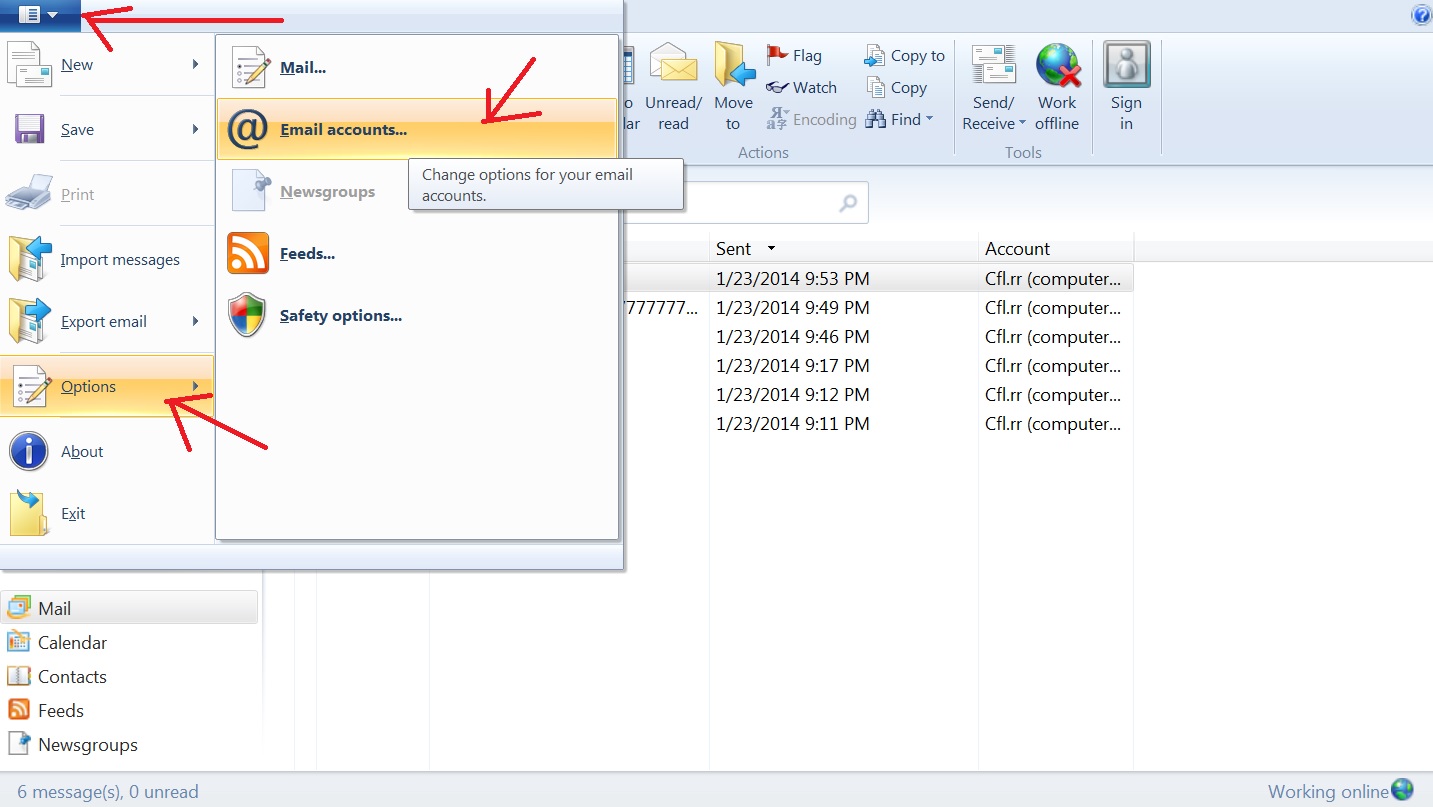
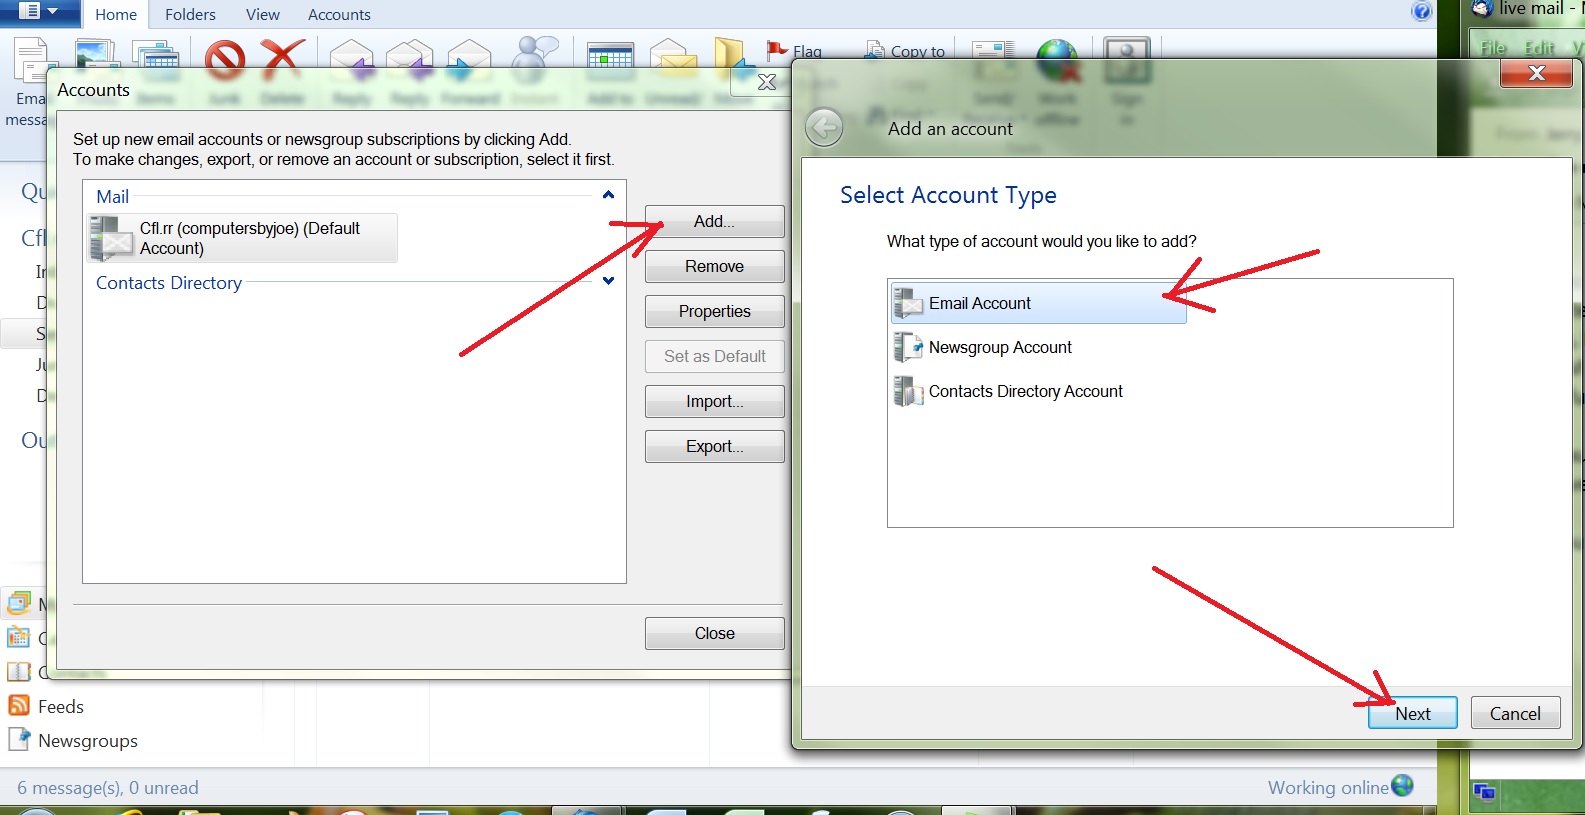
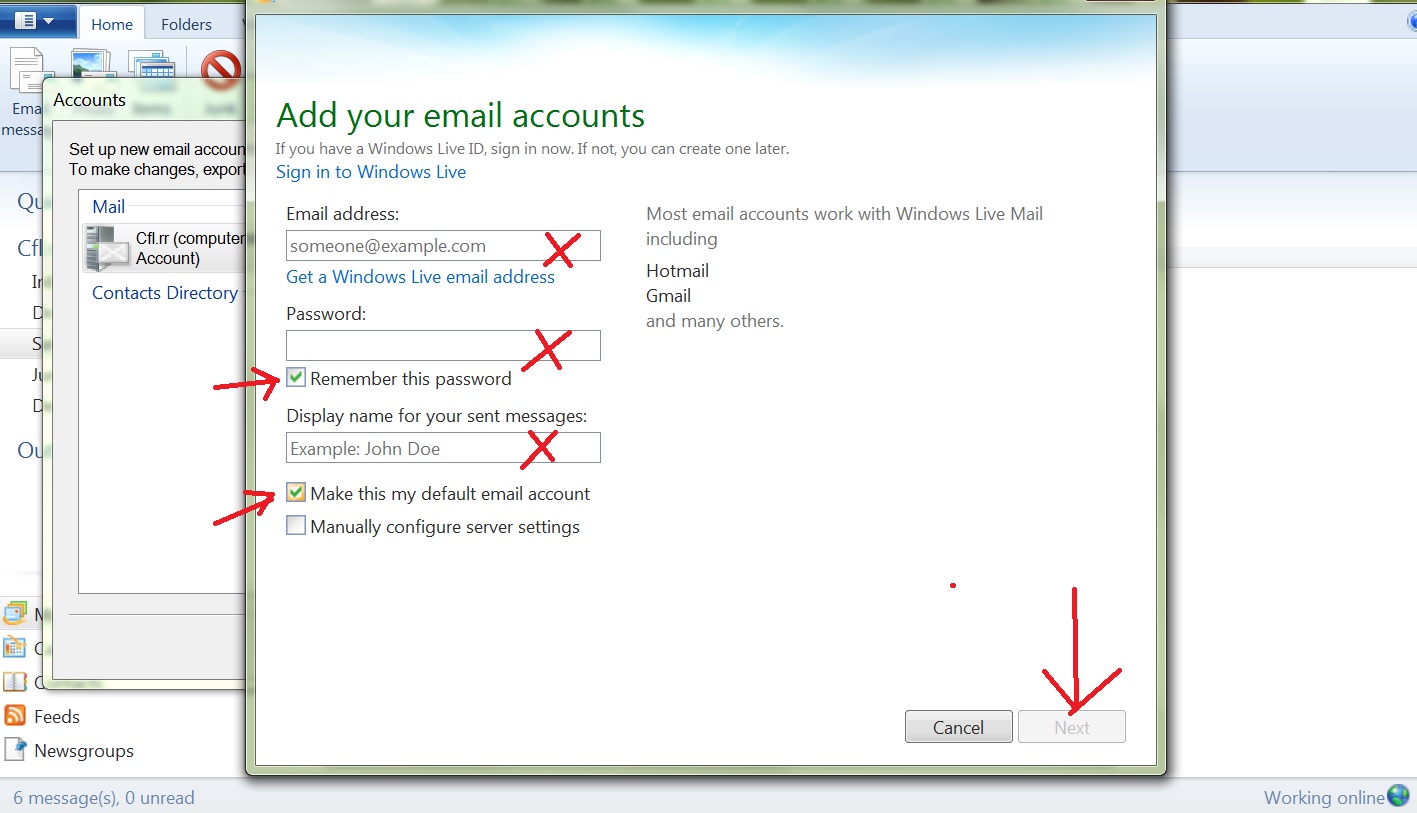
How to get webmail on your computer using Windows Live Mail email program - If you are using email from the popular email providers (gmail, comcast, road runner, AOL, MSN, etc) you need to open an Internet browser to get your email. From time to time they change the look of the email, forcing you to re-learn how to use it. The companies change the webmail programs so that their ads are more visible, the ads pay for the email & we get it for free. Using a email program like Windows Live Mail, you get the free email without the ads & you decide what the program looks like on your computer. Below are the steps to setup Windows Live Mail, you will need to know your email address & password.
Note: Yahoo Mail charges you monthly if you want to use an email program to access your email.
Click here to return to top.
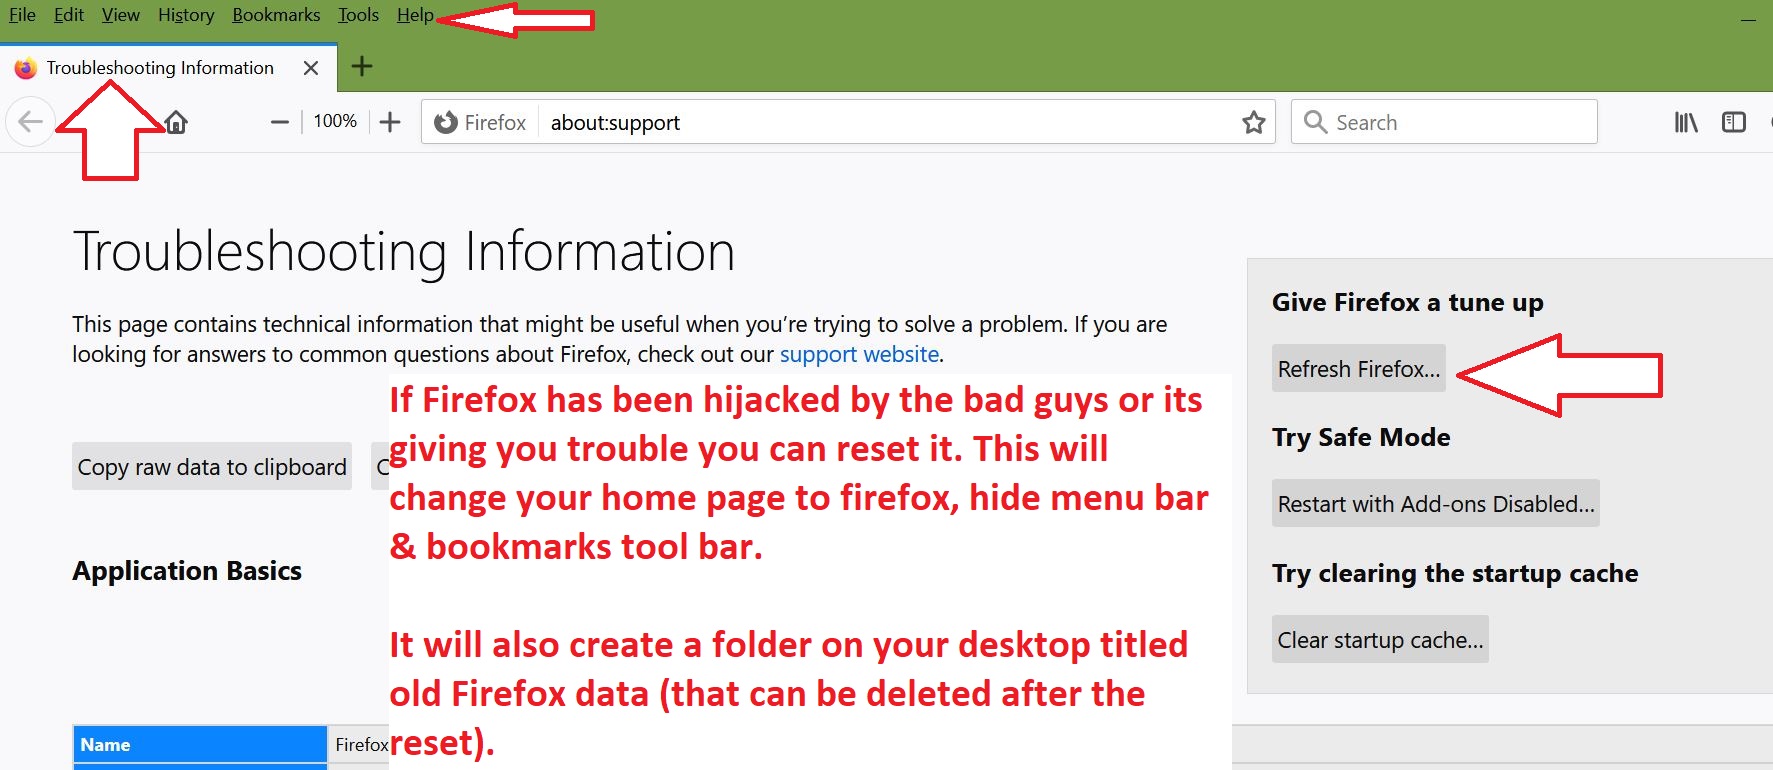
How to change your Home Page in the Firefox Internet browser:
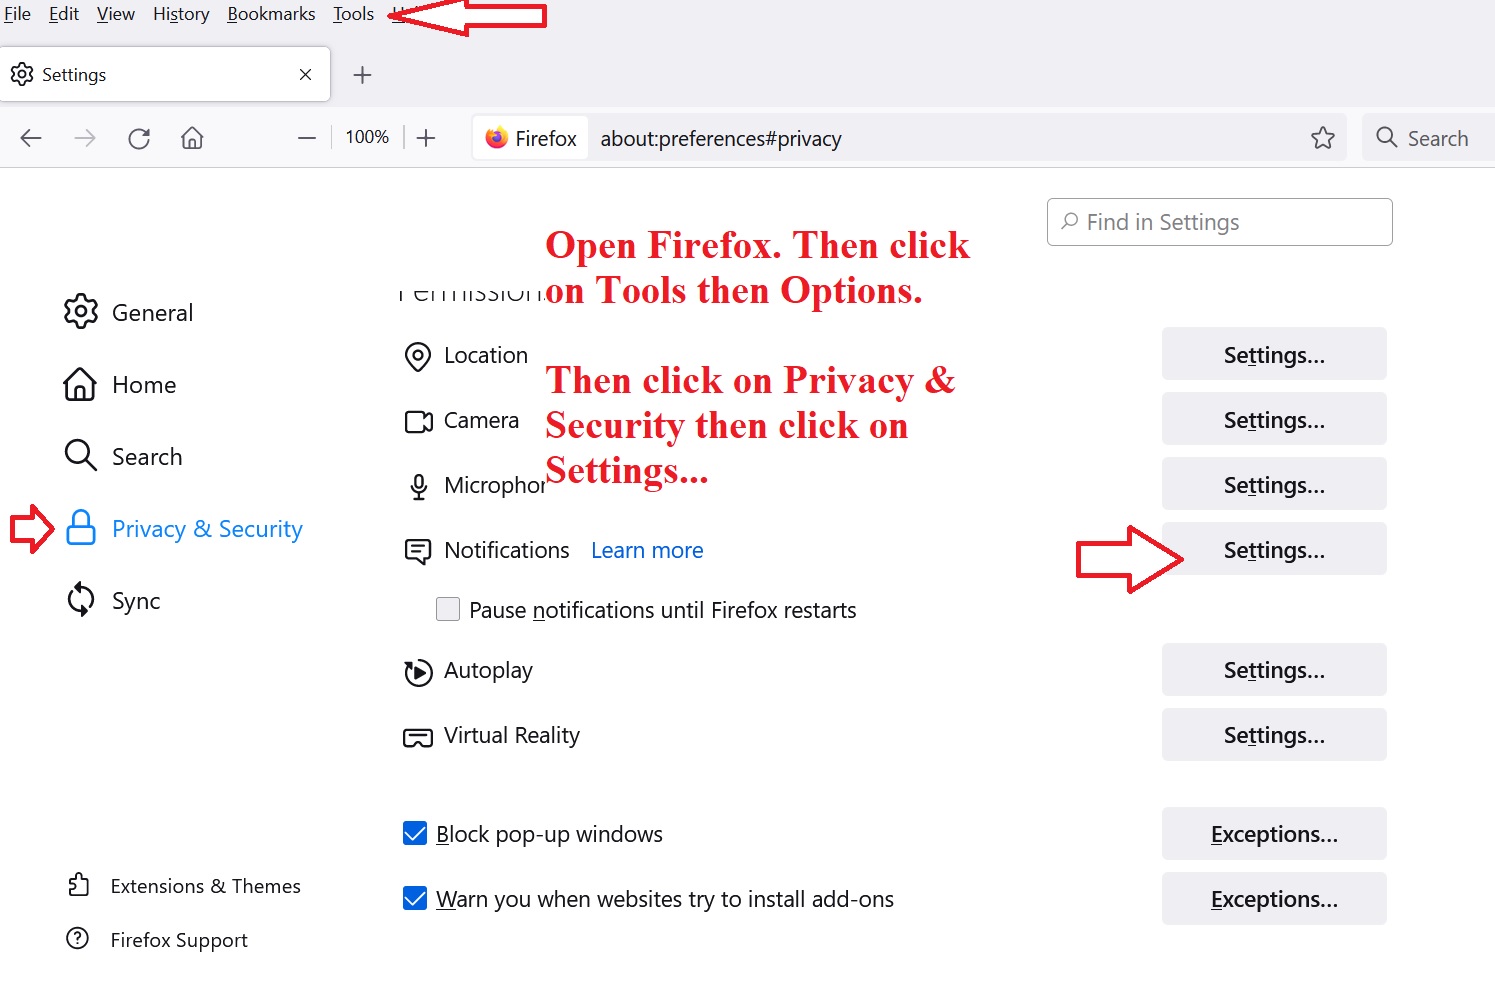
If you are using the Firefox Internet browser & would like to change your home page see the instructions below:
Click on the Tools menu then click on Options. Then click on Home. Check to Custom URL then type in the home page that you want to use.
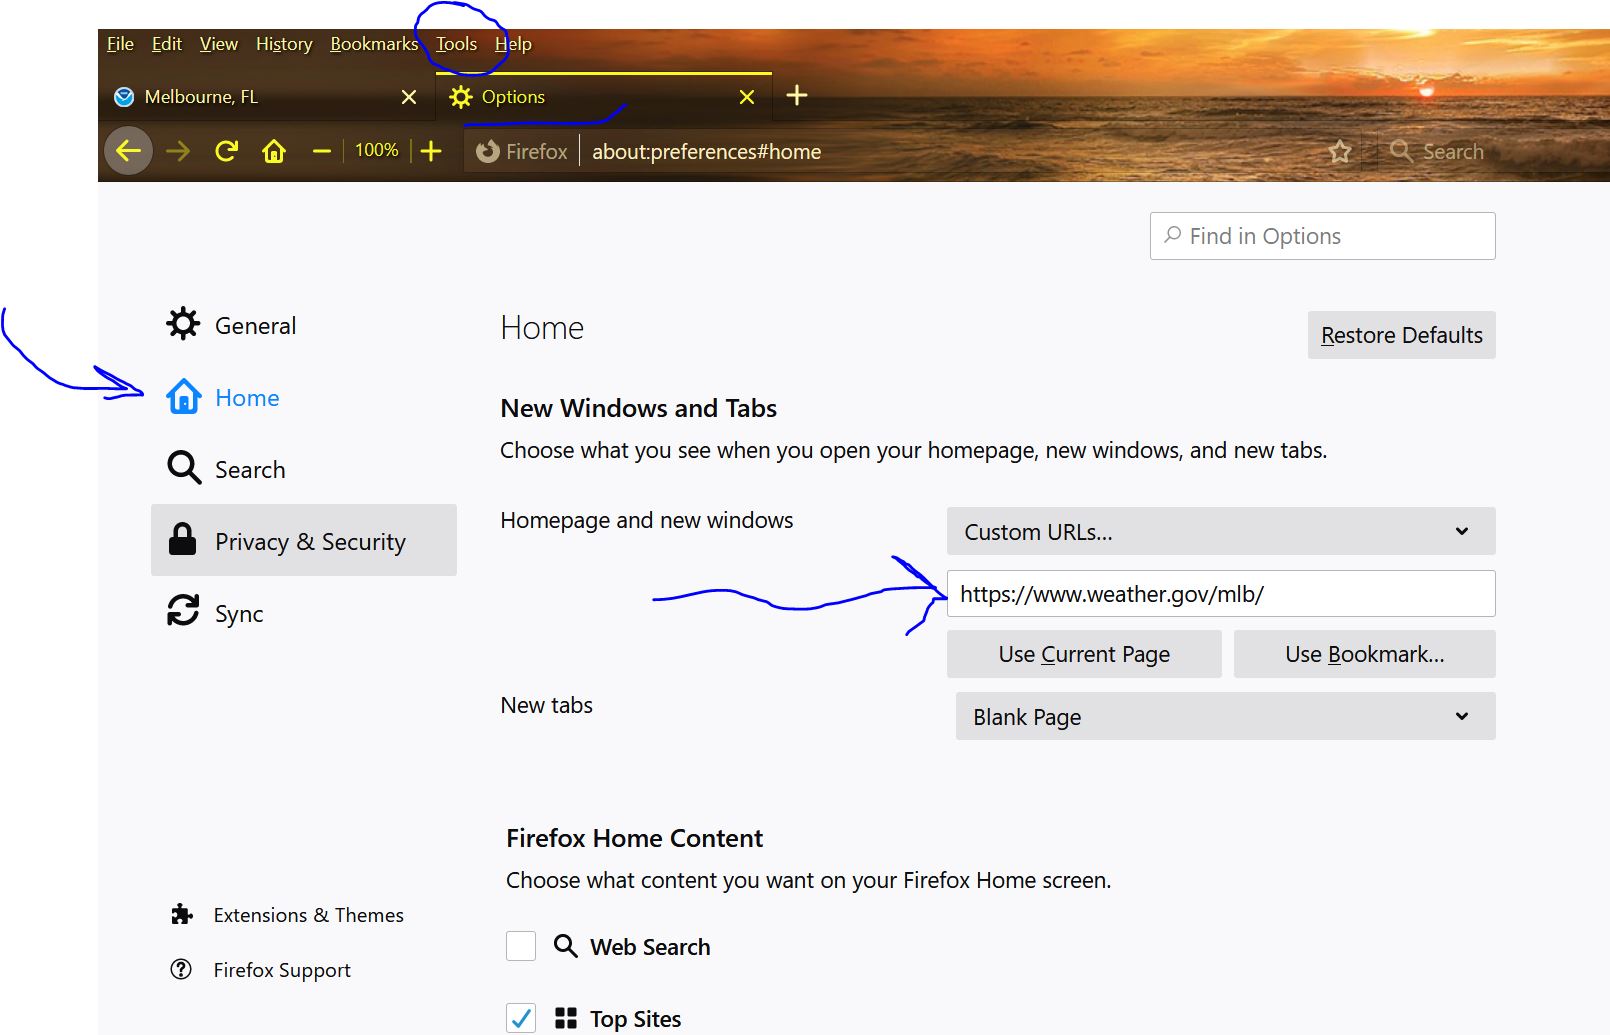
Another option is to go to the website you want to use then click on Tools then Options & then press the Use Current Page button & the website will automatically fill the window. If the page is in your Bookmarks (Favorites) list, then click on the Bookmarks button & then click on the website you would like to use.
When you click on the OK button your change will be saved. Then close the Firefox browser & then open it again to show your home page.
Click here to return to top.
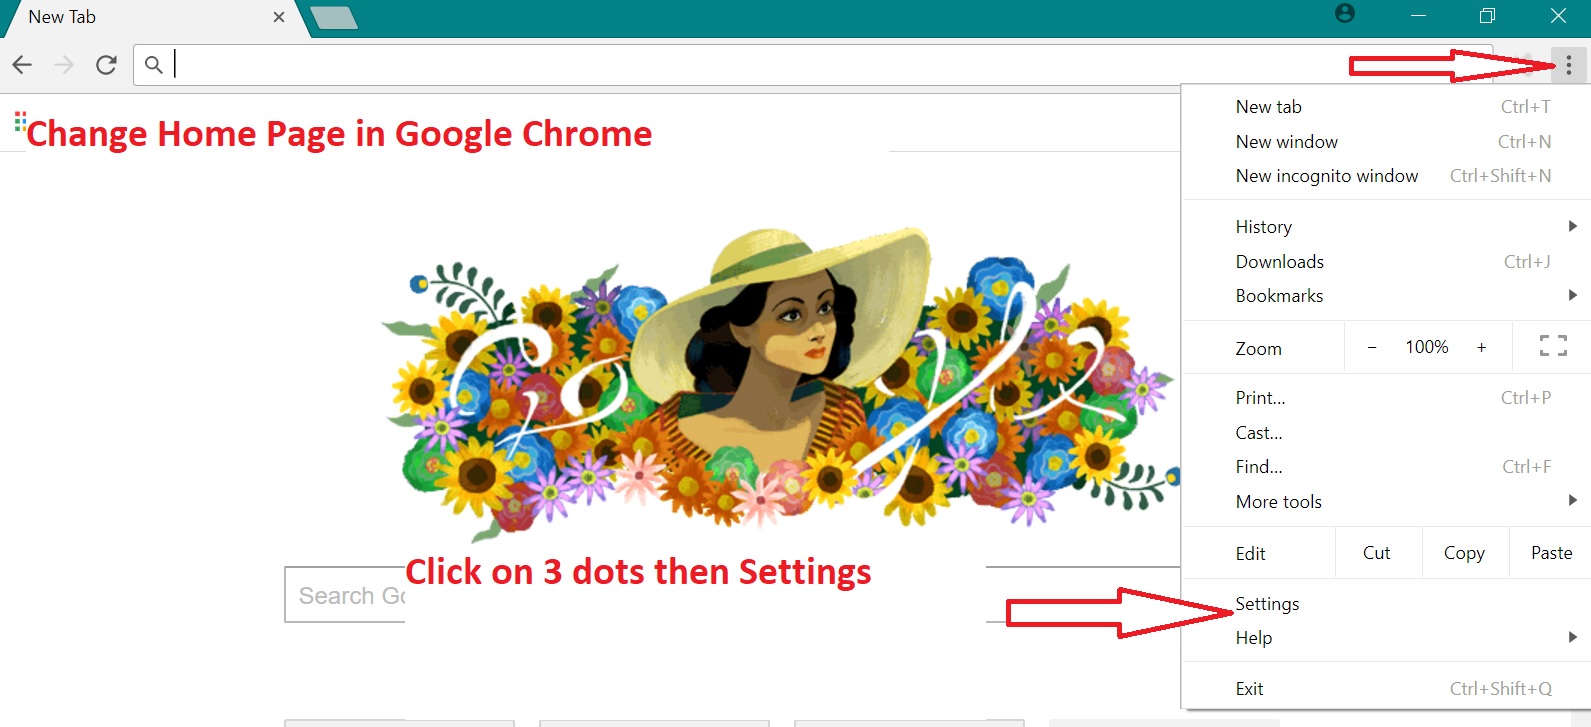
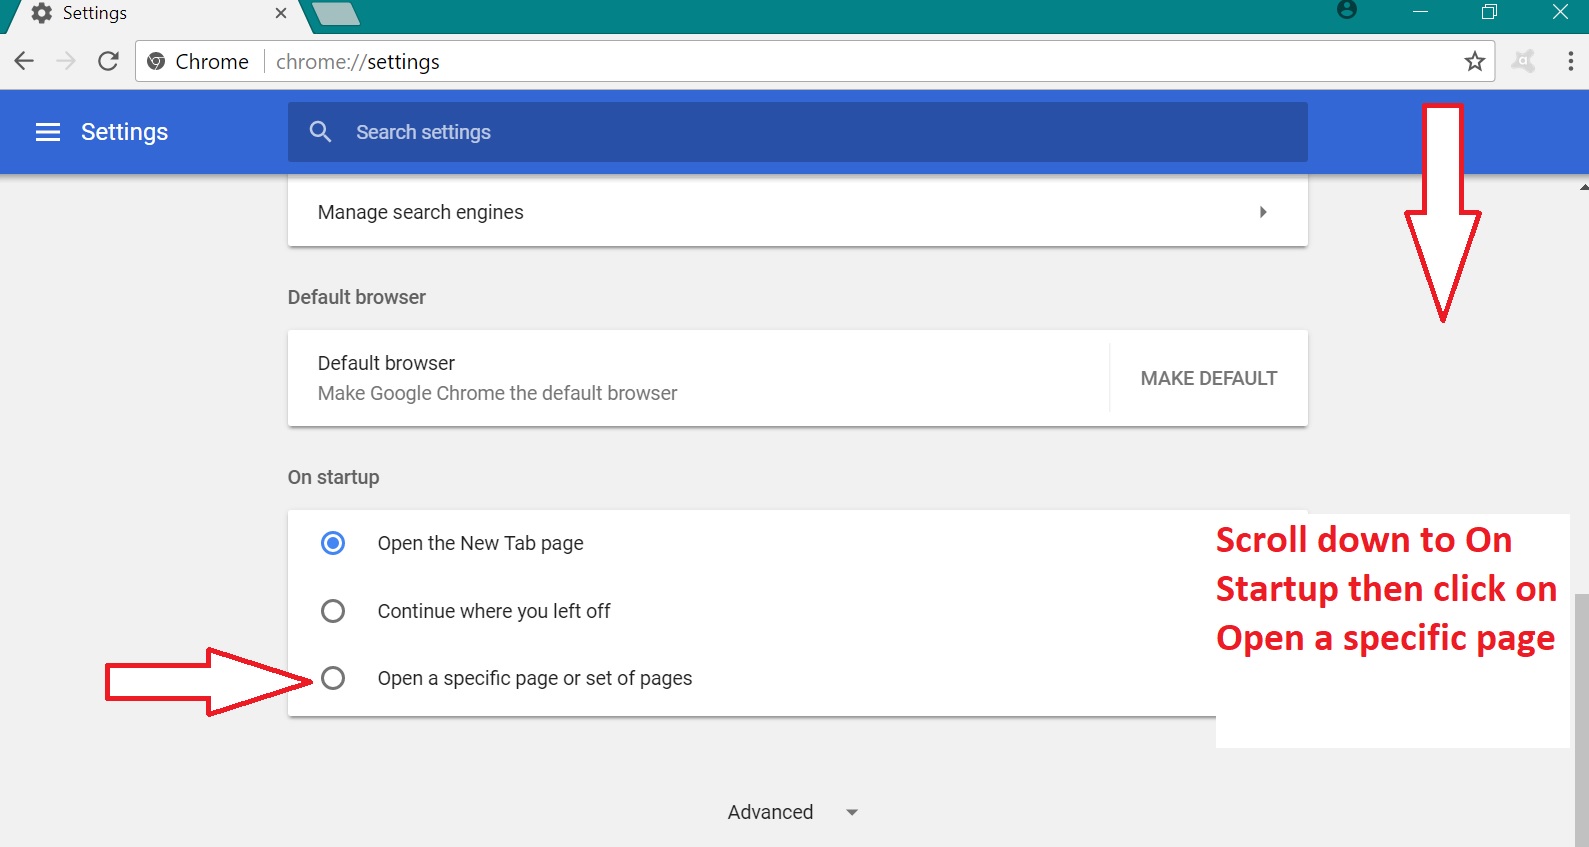
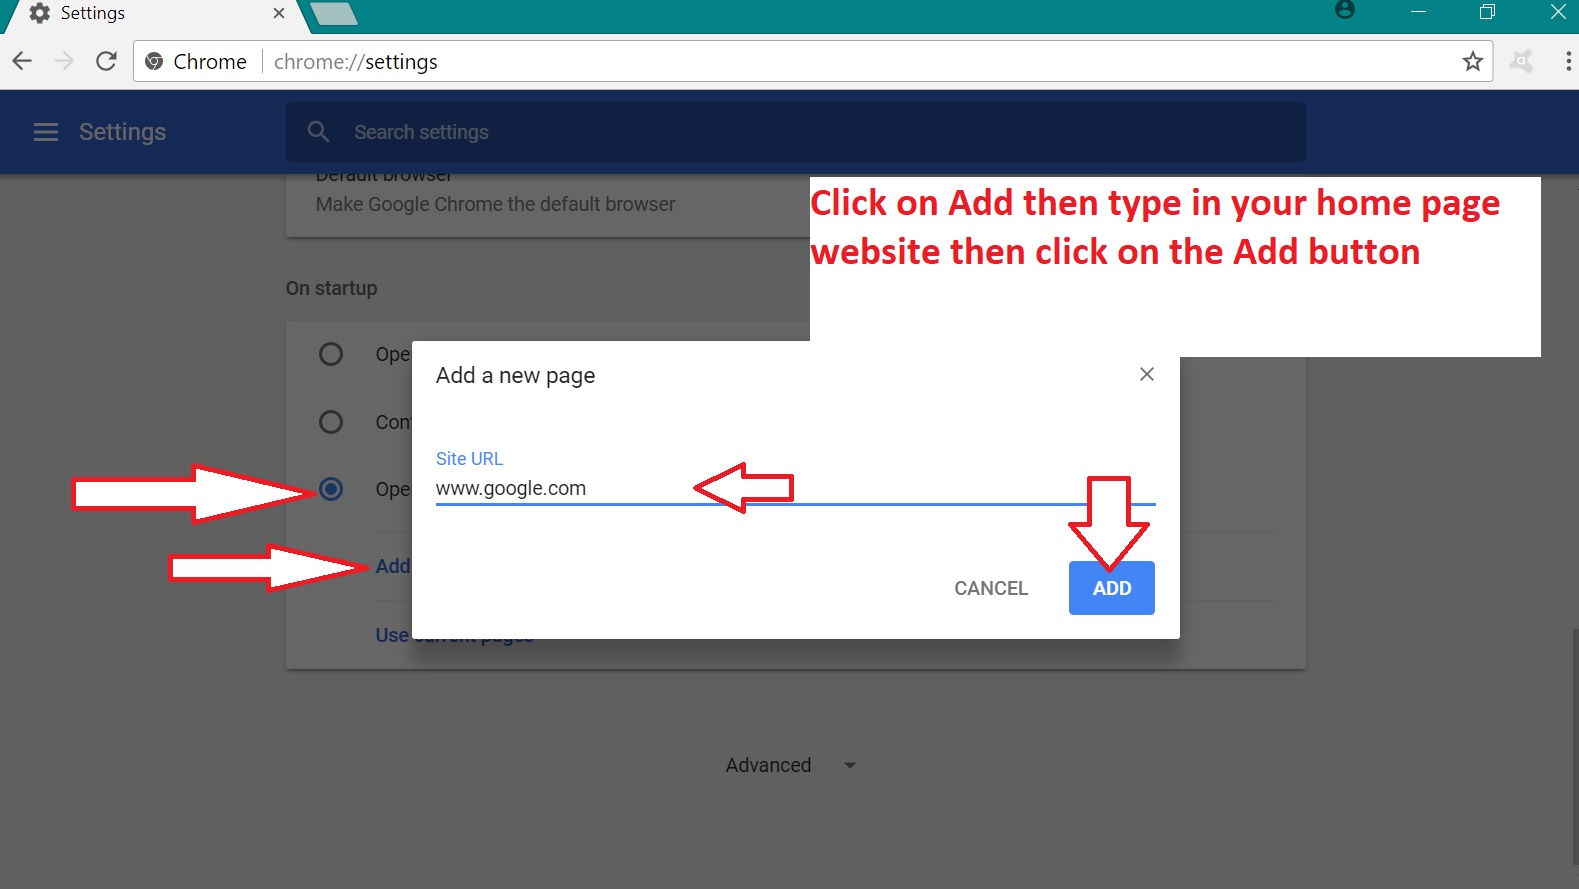
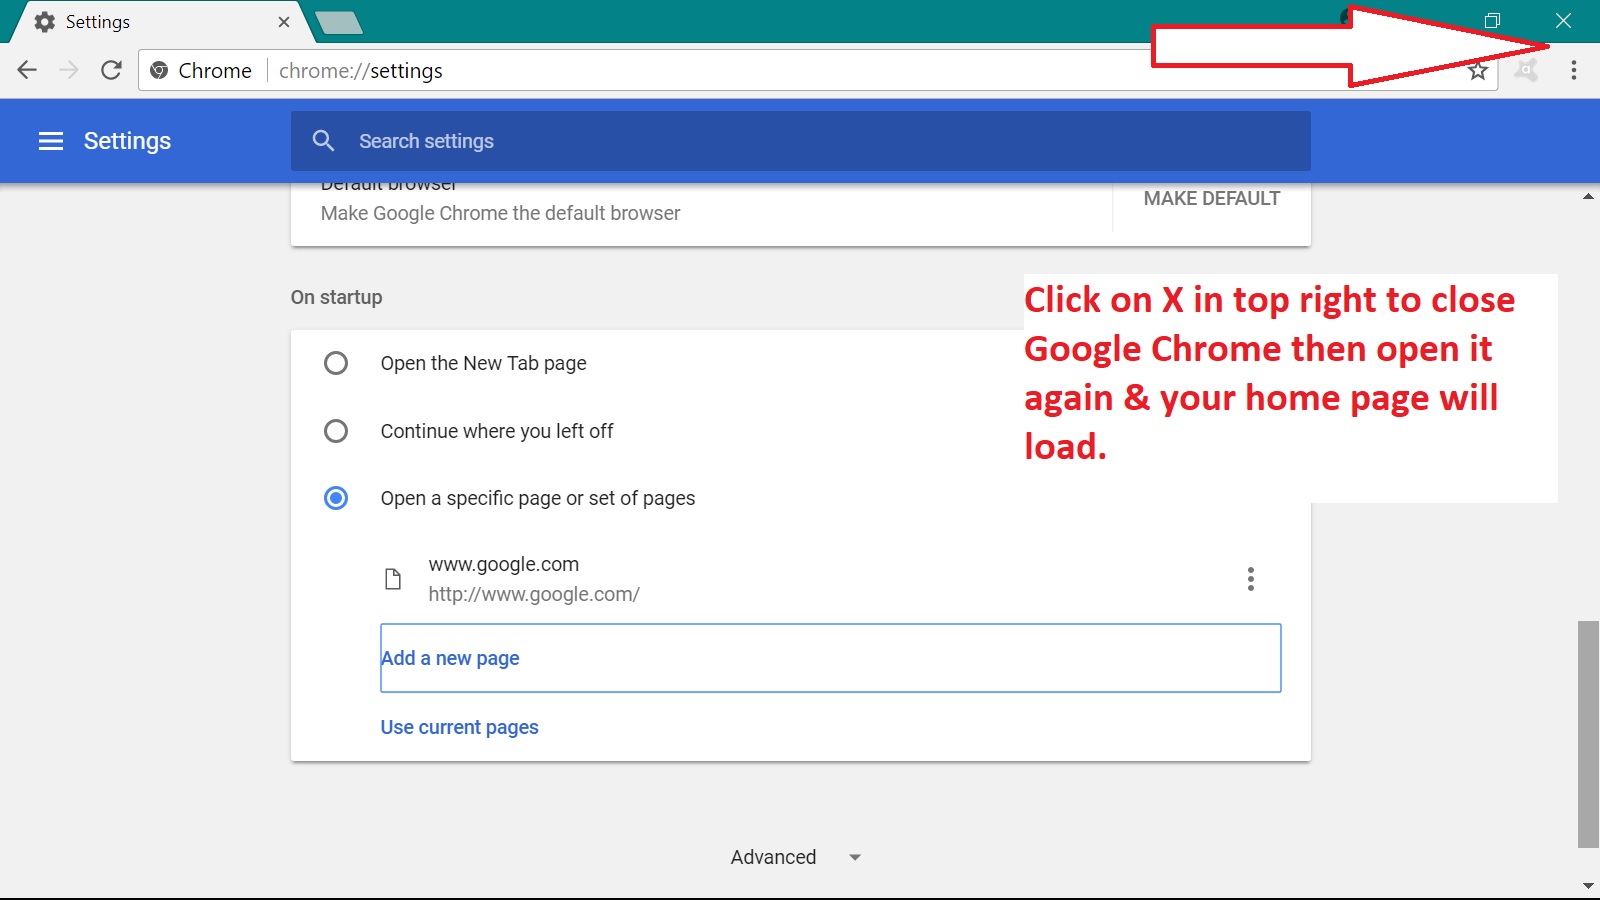
How to change your Home Page in the Google Chrome browser:
Click here to return to top.
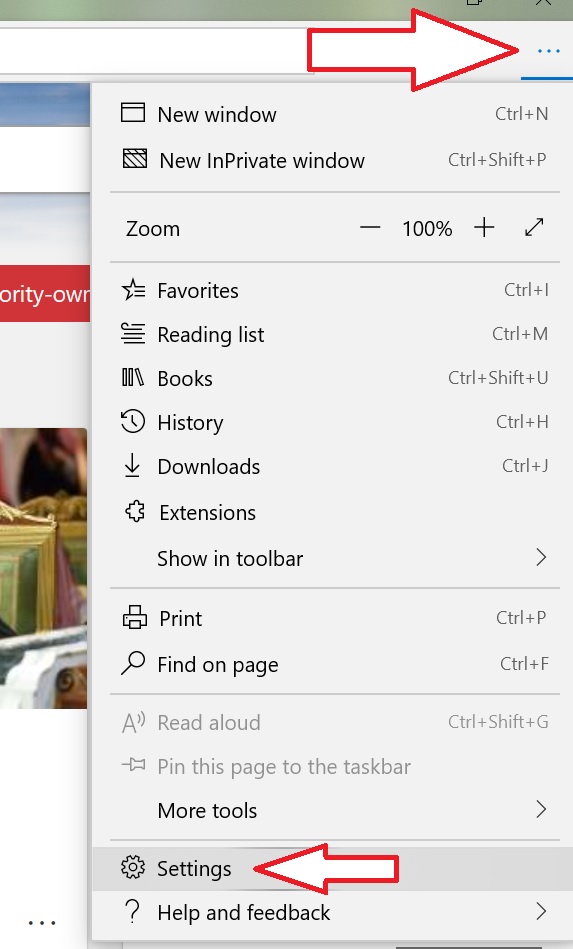
Change The Edge Home Page
1 - Open Edge then click on 3 dots in top right corner then click on Settings
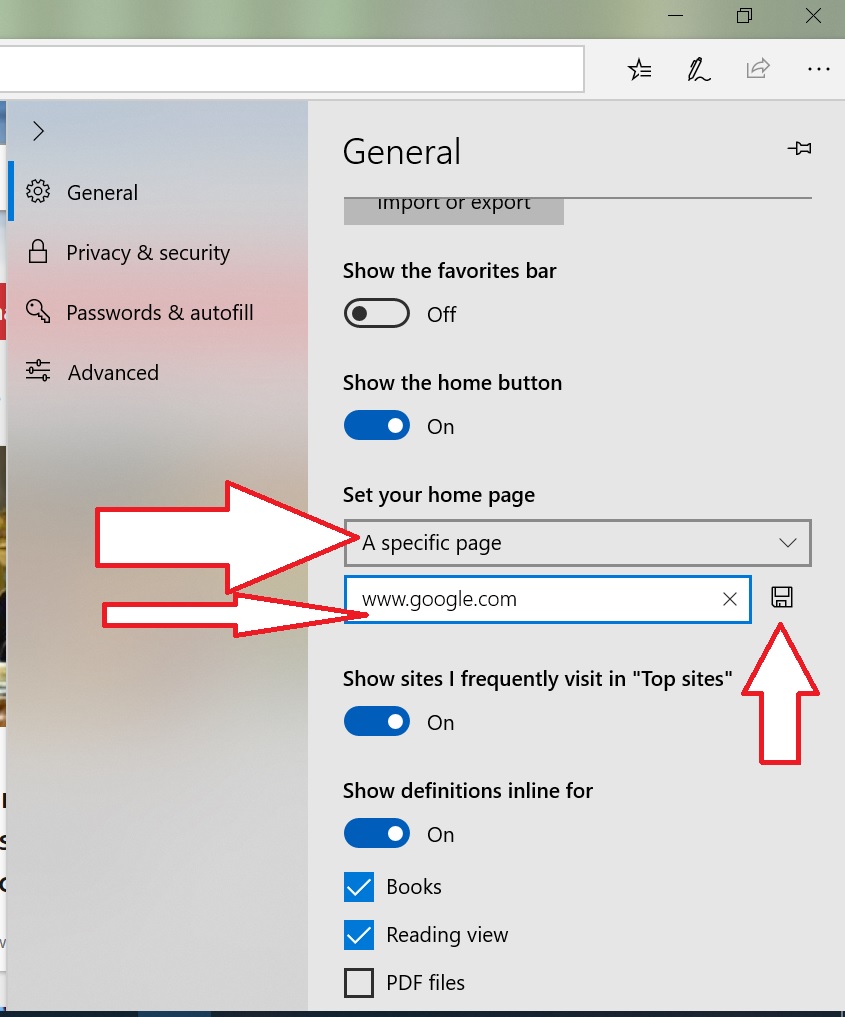
2 - Scroll down to Home page & then click on A Specific Page. Type in your home page then click on the Save icon. Close the browser then reopen it & you will be all set. If you are using the New version of the Edge (to be released in the Spring 2020) then follow the Google Chrome Change Home page link (the new Edge is using the same Settings widows as Google Chrome is).
Click here to return to top.
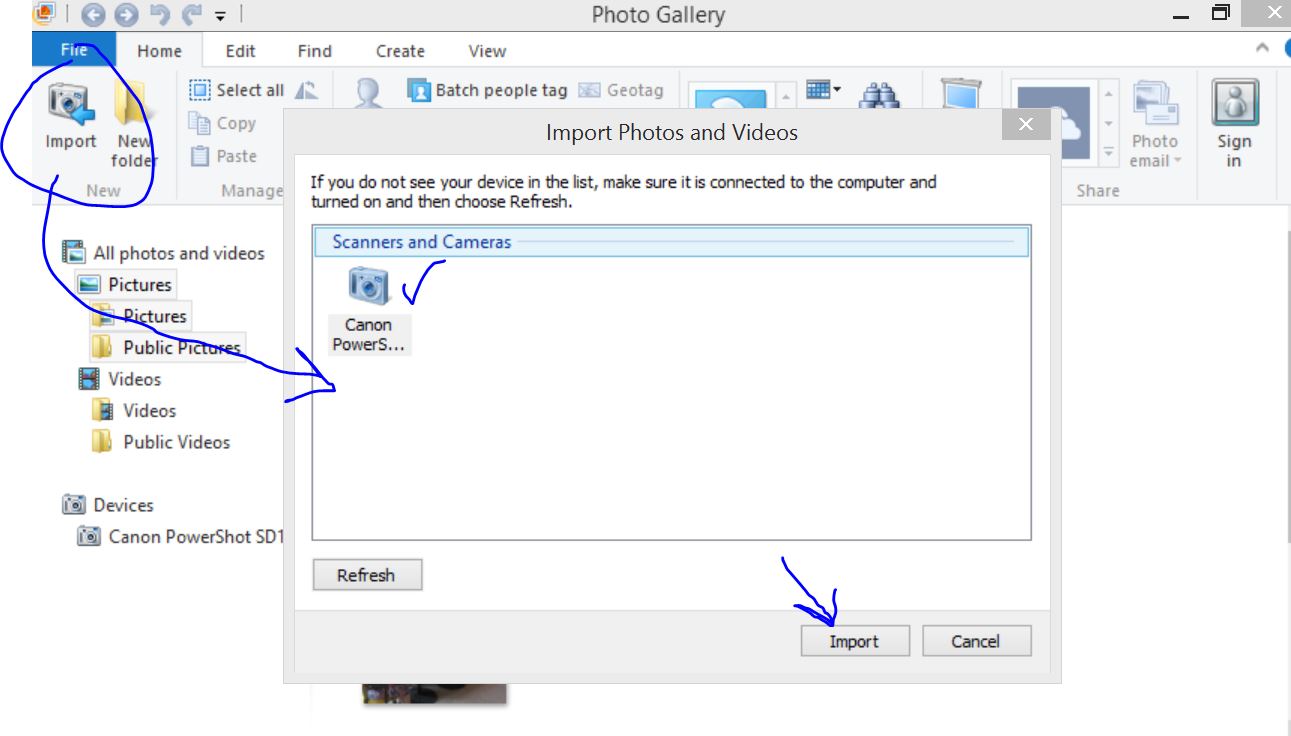
How to Import Photos to Computer (applies to Digital Camera, Smart Phone & Tablet)
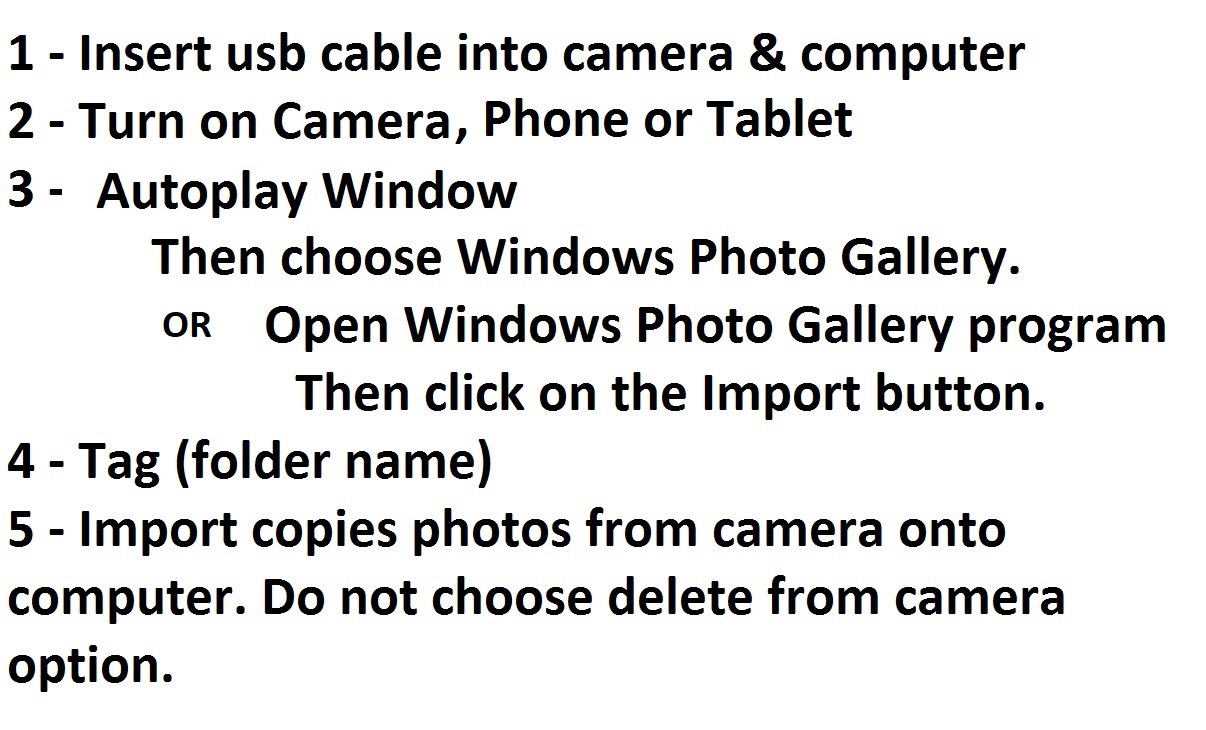
Windows 8 users, Open Windows Photo Gallery first then click on the Import button.
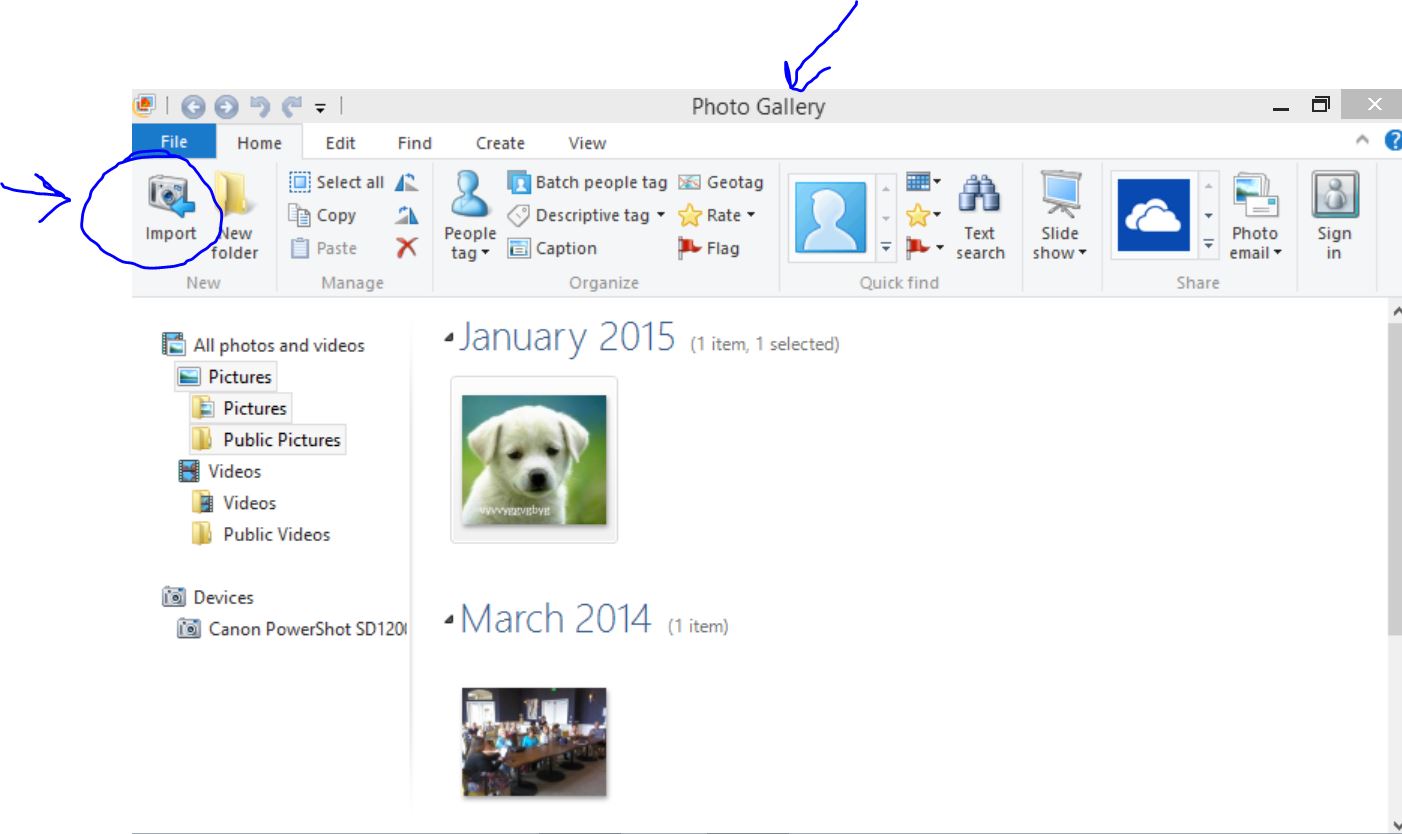
Click on your Camera, smart phone or tablet icon then click on the Import button
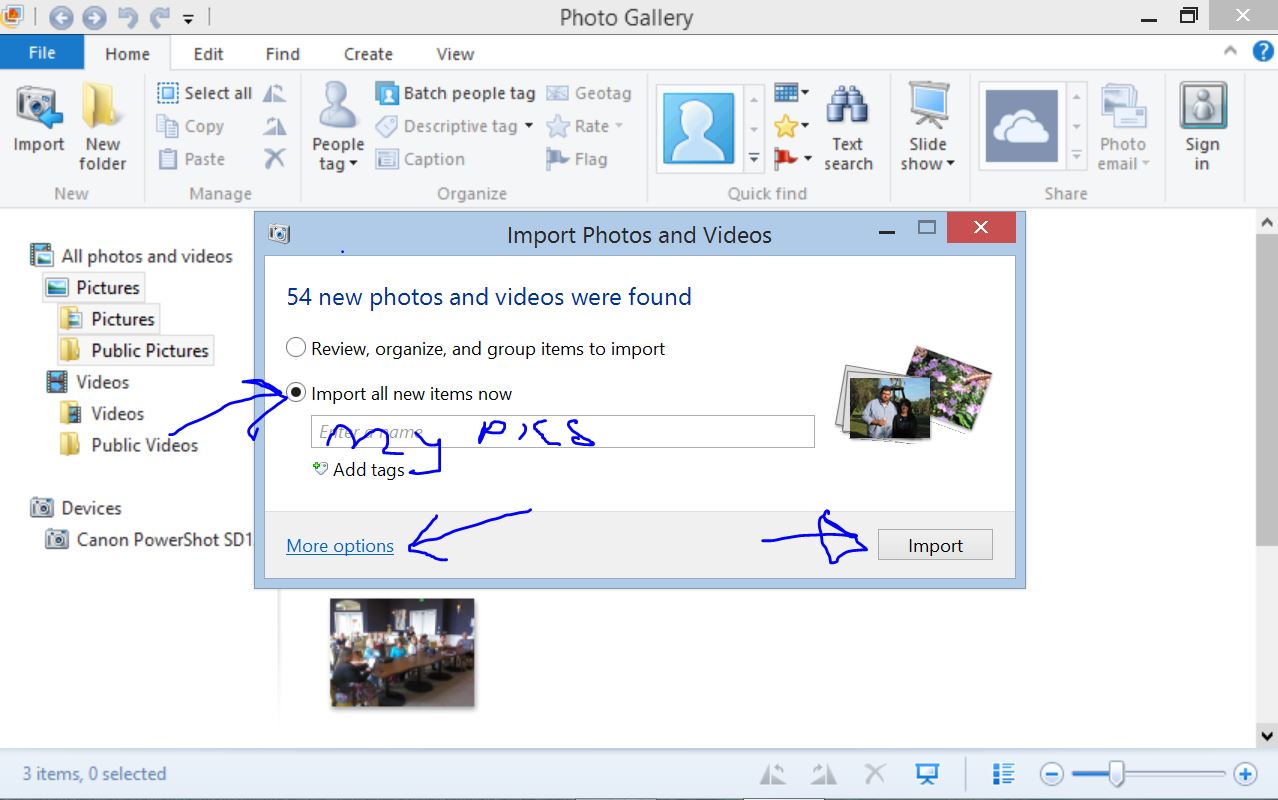
Option 1 - Pick which photos you want to import
Option 2 - Import all new items (all new photos on device)
You can create a new folder (called Tags) by typing in a name in the window
Very important - do NOT choose the 'erase after importing' option. A glitch may delete the photos in both locations. Always leave this option off. You can manually delete the photos later on from your device after the images have been safely imported into your computer.
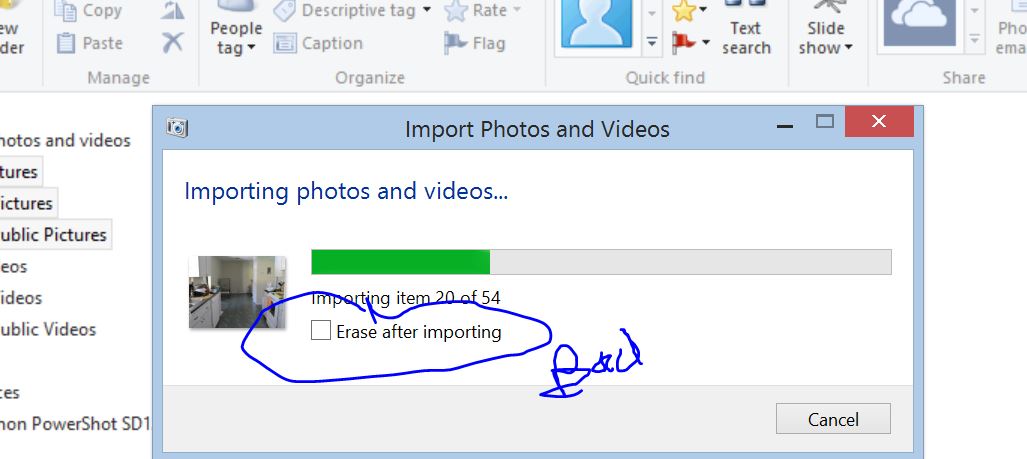
Photos are then Imported & displayed in the Photo Gallery. If you are done, turn off your camera then pull out the cables & store them safely away for the next time.
Click here to return to top.
PC & Mac - Gmail Less Secure Apps - turned off - Must turn back on!

If you use Microsoft Outlook, Mozilla Thunderbird, Windows Live Mail, Mac Mail or any email program on your tablet or smart phone, you may have received a strange message during the past few days saying "the server has rejected access" to your email. Google has created a setting that blocks access by any non-google email programs. The only way to get the email back on your device is to turn on the less secure access option. Log into your gmail webmail account then click here to turn Less Secure Apps back on. Scroll down on Account Security page to Less secure app access then click on grey dot to turn on, should match picture above. Note that google will send you an email telling you that this option has been turned on & they recommend that you turn it back off & use only google products to access your email. You must ignore Google's advice if you want to read email on smart phones, tablets or desktop based email programs.
Close all the open windows, and try to get email again on your device, this should work. Note, you only need to make this change if your email program has stopped working. If you have not had any issues, do not make the above change.
Click here for more information.
Click here to return to top.
How to install Google Chrome Internet browser the safe way
1 - In your administrator account open Internet Explorer
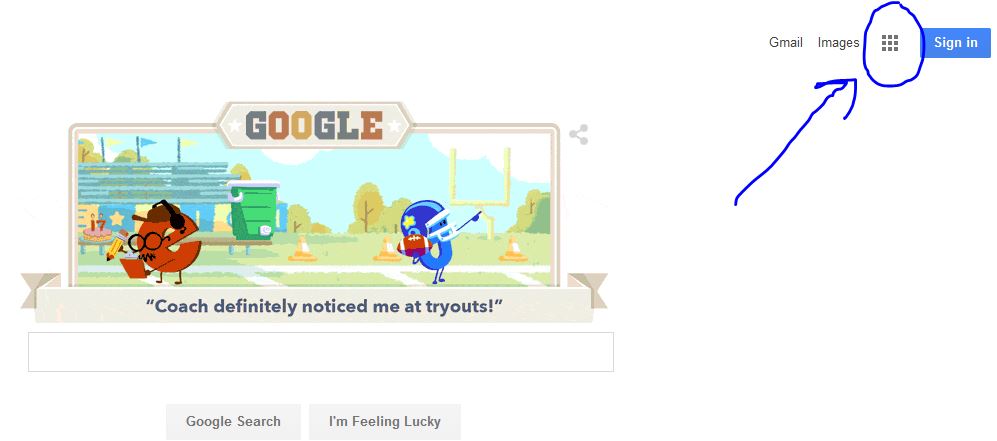
2 - Go to Google.com (type this address into the top window, press enter)
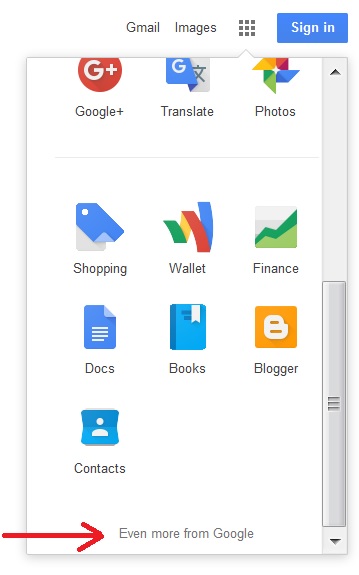
3 - In top right of page click on 9 black boxes to open the menu
4 - Then Click on the word "More" at the bottom of the menu

5 - Click on the words "Even more from Google" at the bottom of the menu
6 - Click on Google Chrome link on the next page
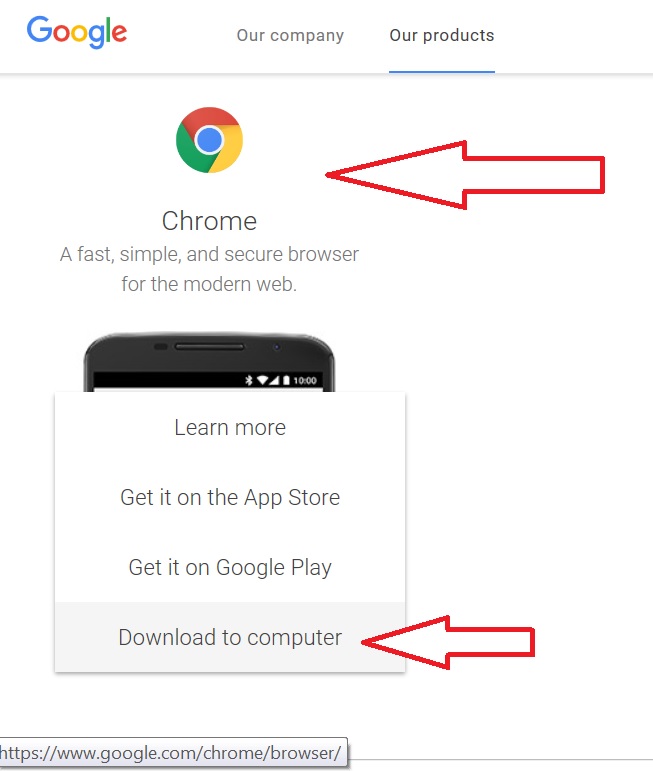
7 - Click on the blue "Download Chrome" button

The program will then download & install (Click on Yes when the User Account Control window appears).
Click here to return to top.
If your computer screen suddenly appears sideways or upside down then you may have accidentally changed the orientation by pressing the Ctrl + ALT+ & Arrow keys.
To fix you can try to press the CRTL key & ALT key on your keyboard & then tap the down arrow key. If the view changes back to the normal landscape you are all set. Keep tapping the arrow key until the screen is correct. The other method is to right click on the Desktop then left click on Screen Resolution. Then click on the Screen Orientation menu & choose Landscape. Then click on Apply to save your selection. You should be all set.

Click here to return to top.
Click here to return to top.
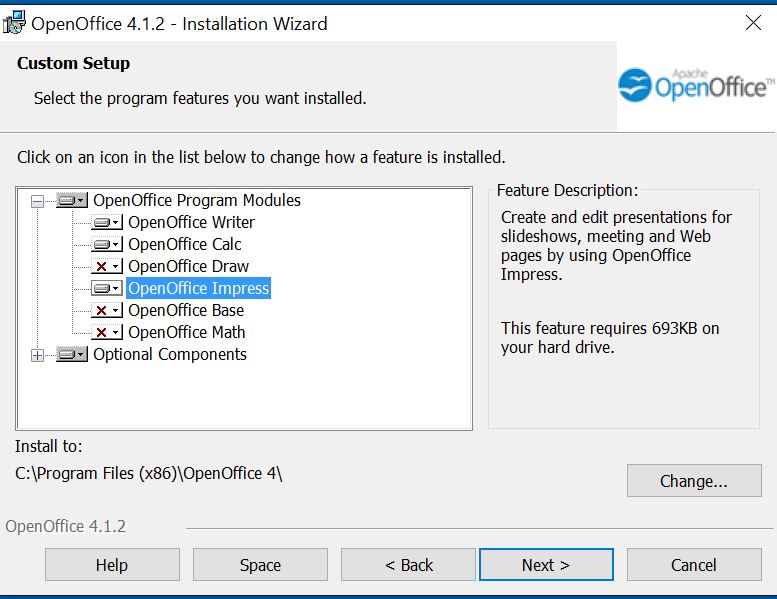
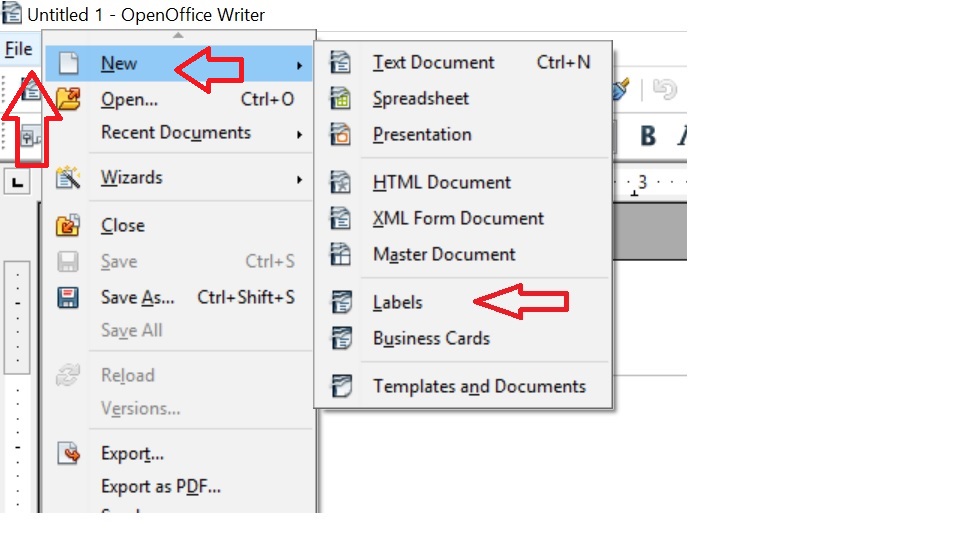
Free Office Programs - Below are the three most common programs. If you do some basic tasks such as writing letters, printing labels and envelopes these programs may be what you have been looking for. If you purchase Microsoft office it may cost you big bucks depending on the version you purchase. Below are screen shots of how to do some basic tasks with these programs, which may help you decide on which one to choose. I have been installing the Open Office for years but I have just installed the Libre office program on my computer & I prefer the look of the icons on this program over Open Office. Please contact me if you have any questions about these programs.
When installing the program you can either install everything or you can pick what to install. I usually only install the Word, Excel & Power Point programs.
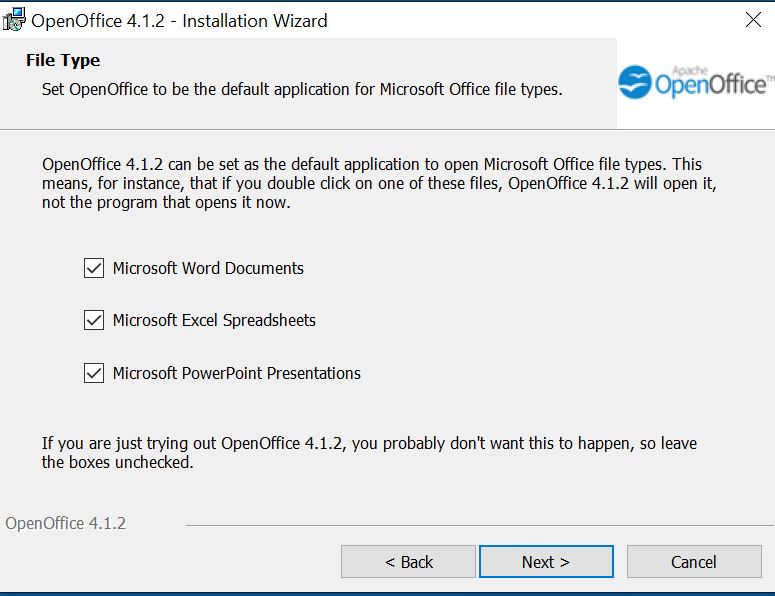
Then next screen you can set these programs to be default. If you are emailed a document then Open Office will then open that document automatically.
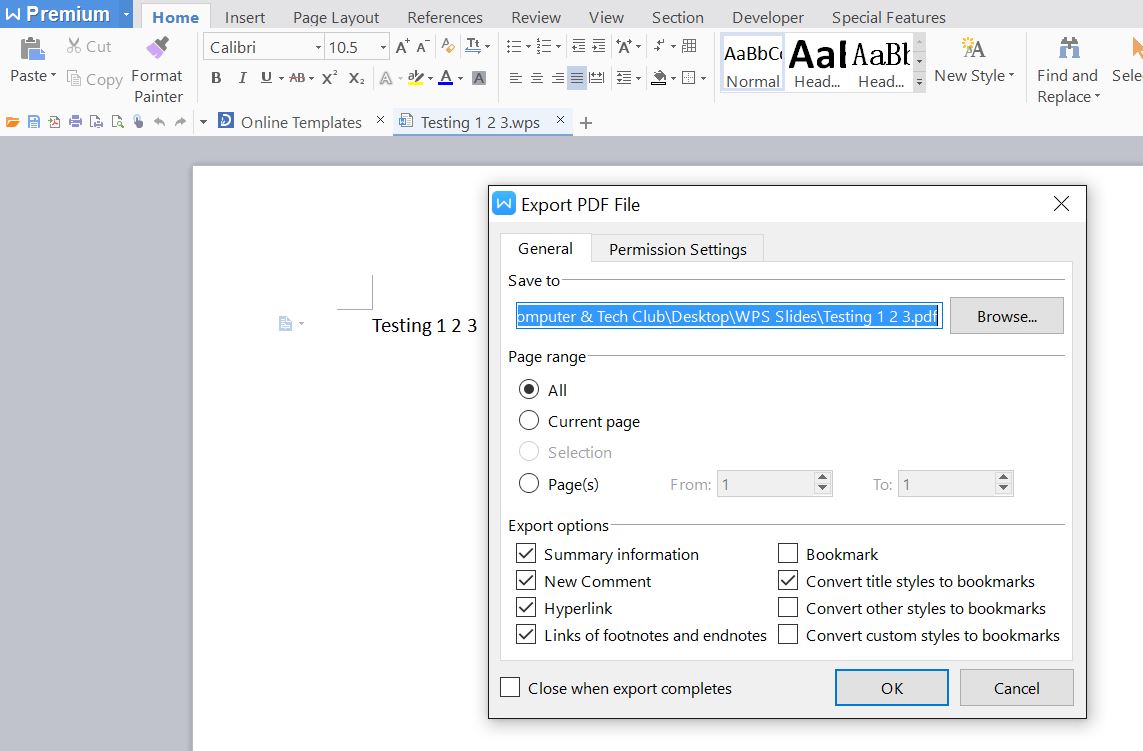
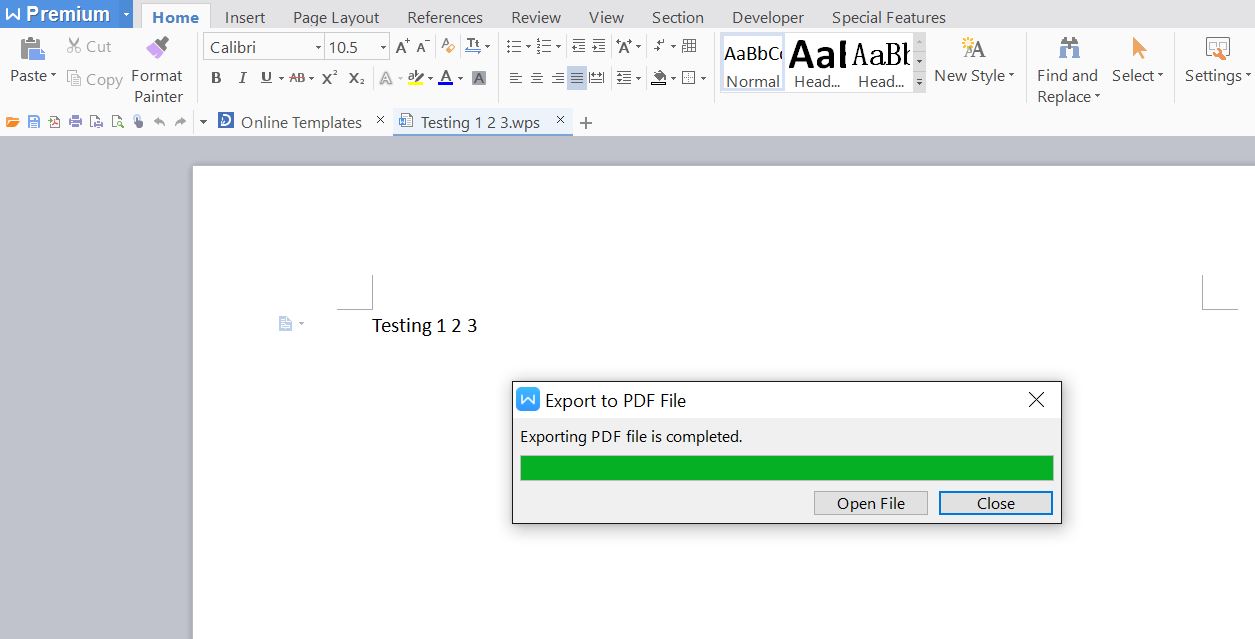
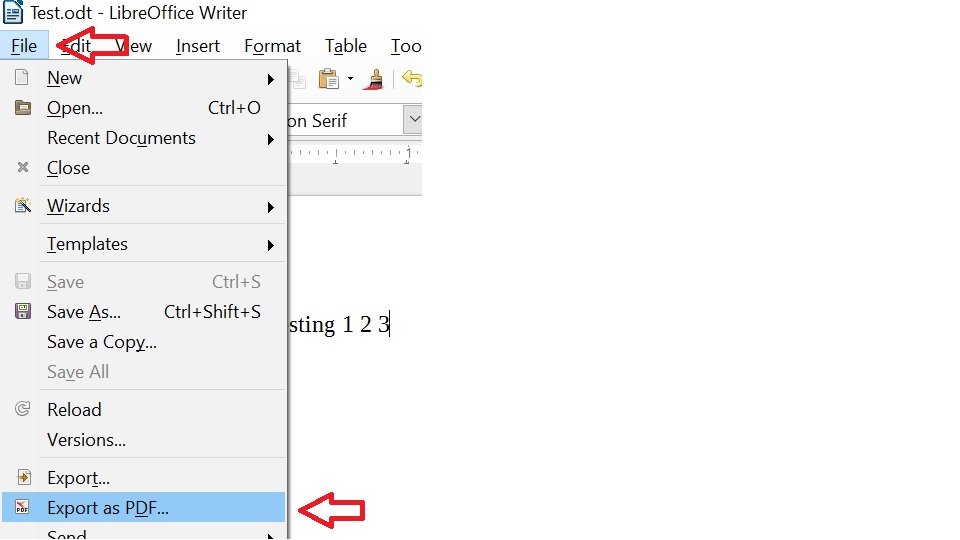
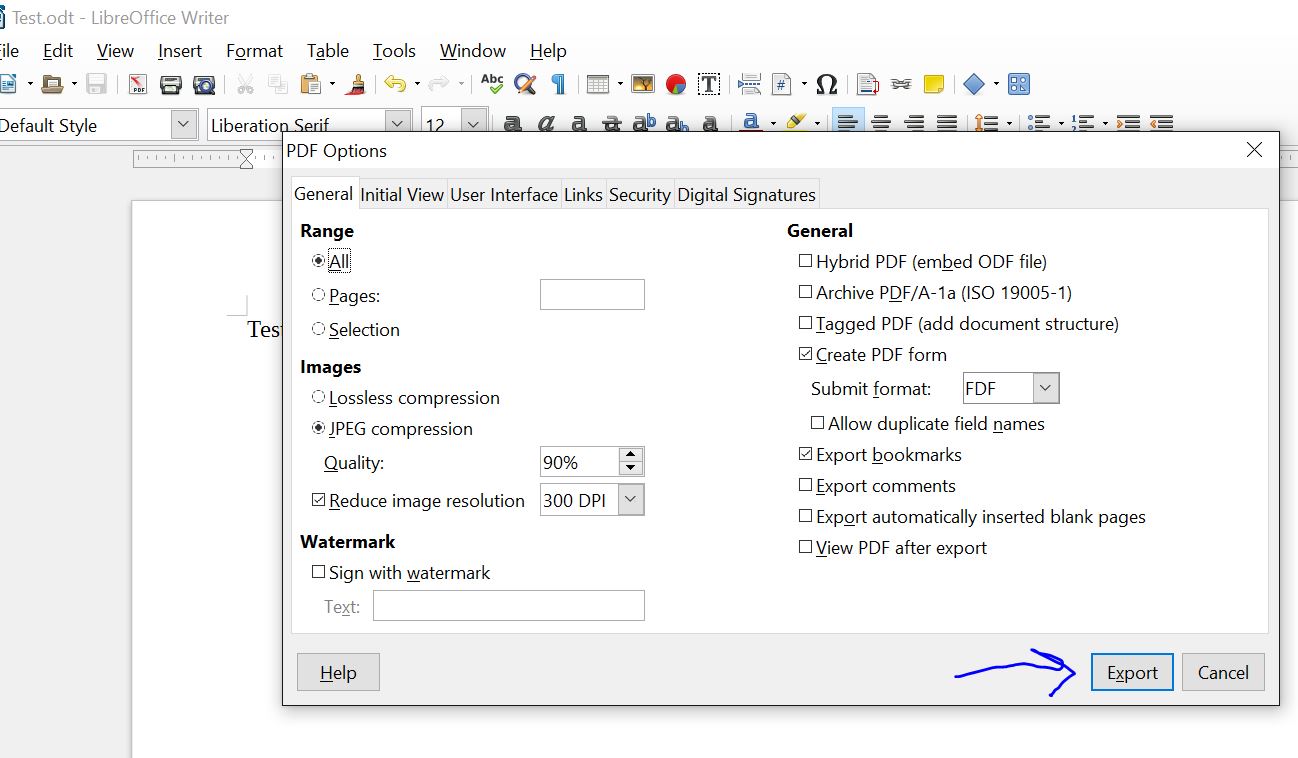
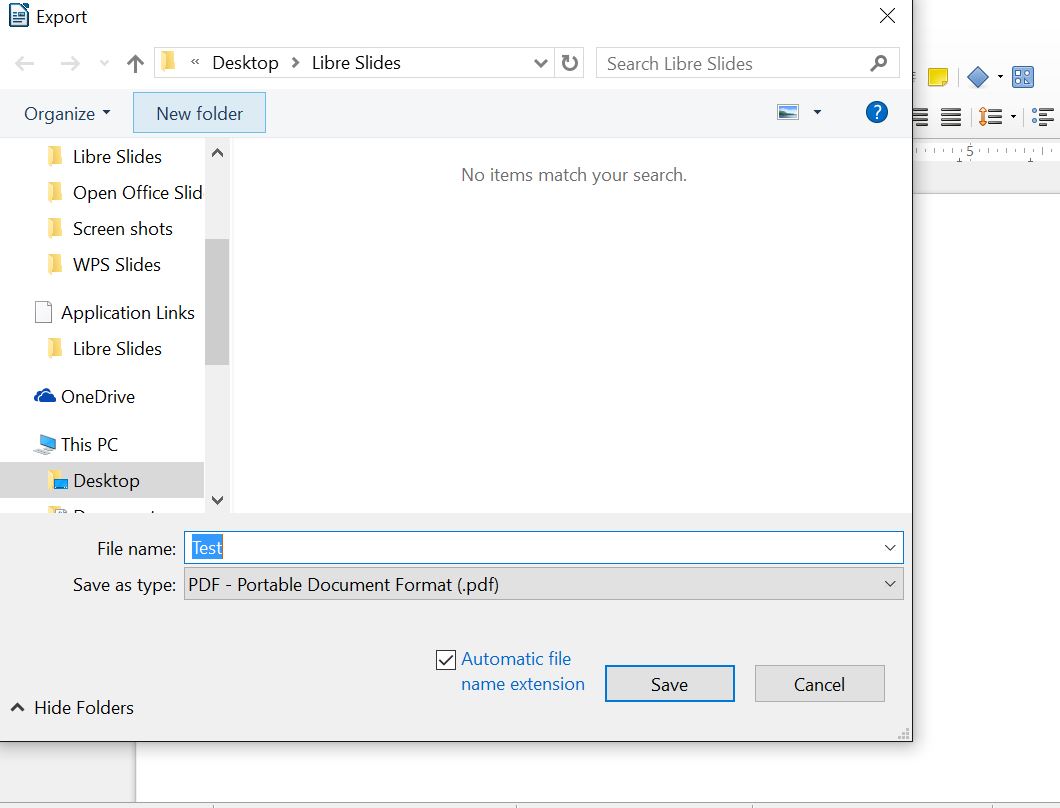
How to Export a file as a PDF:
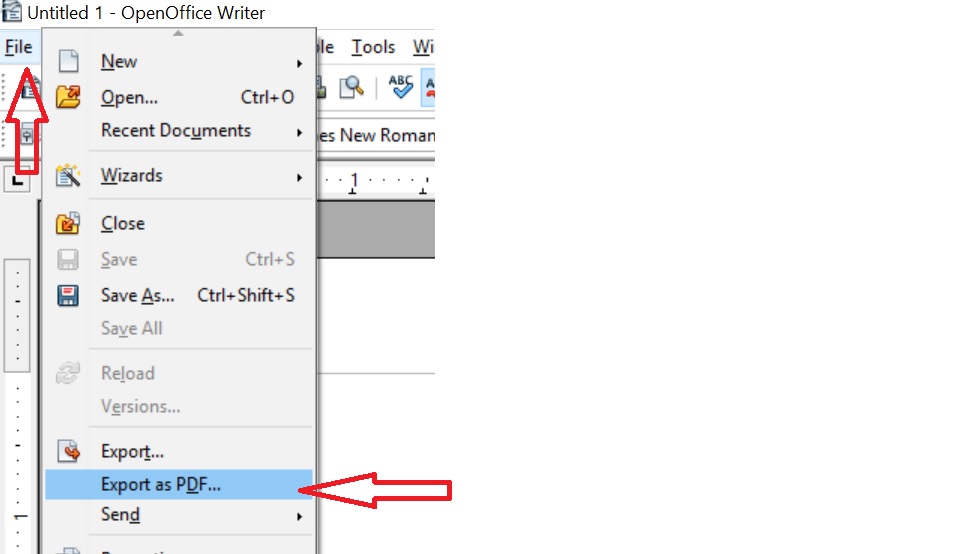
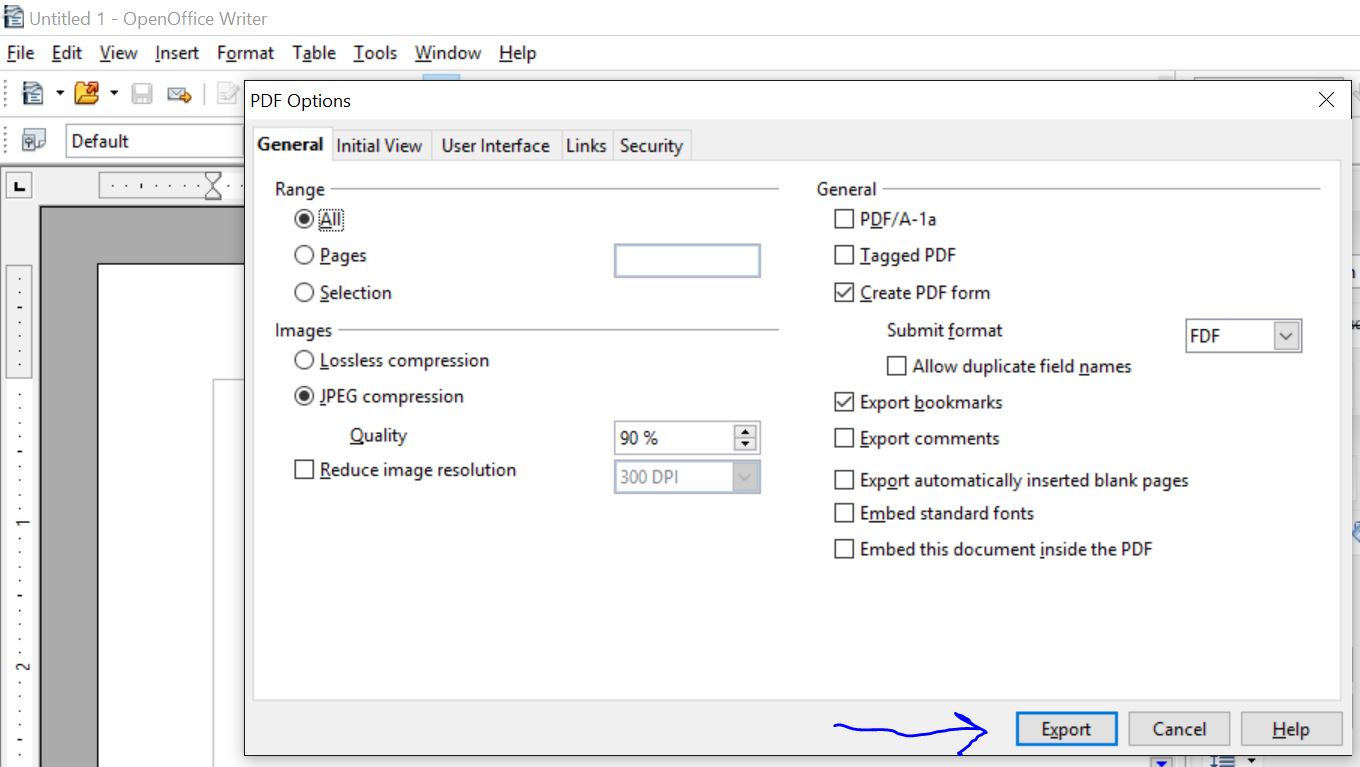
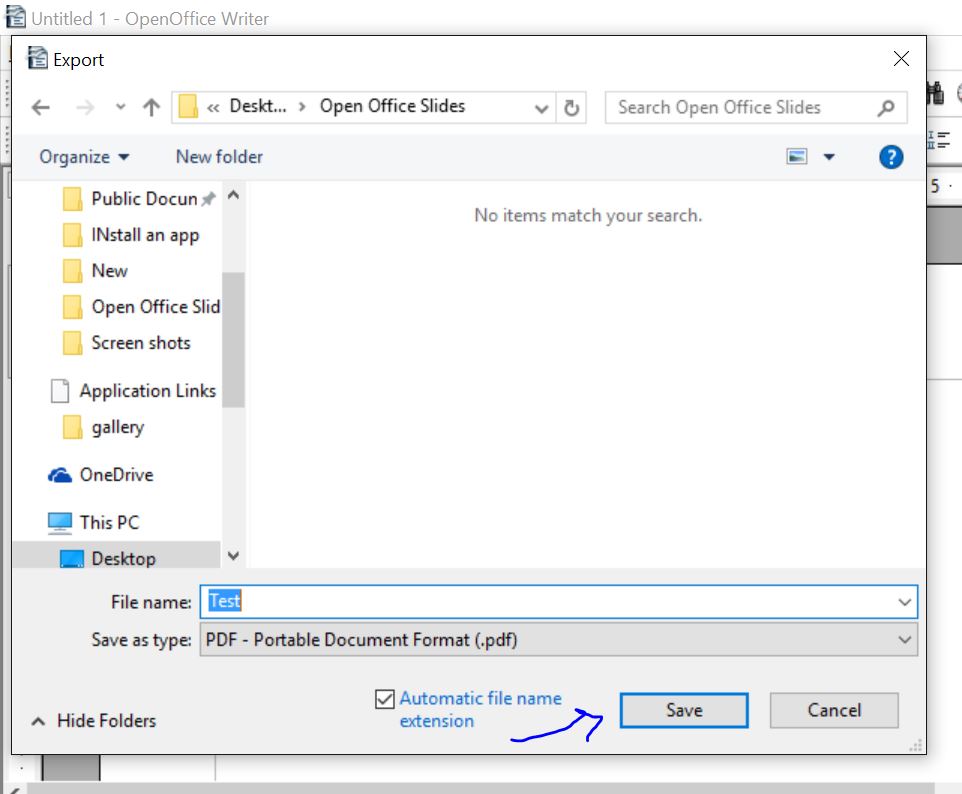
PDF files are opened with Adobe Reader which is on most computers, tablets & smart phones.
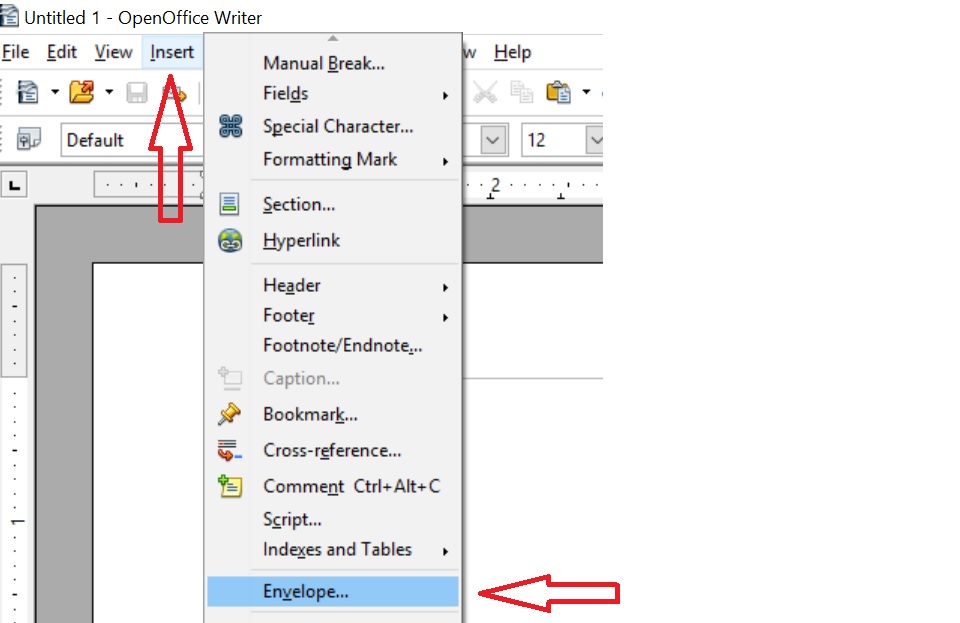
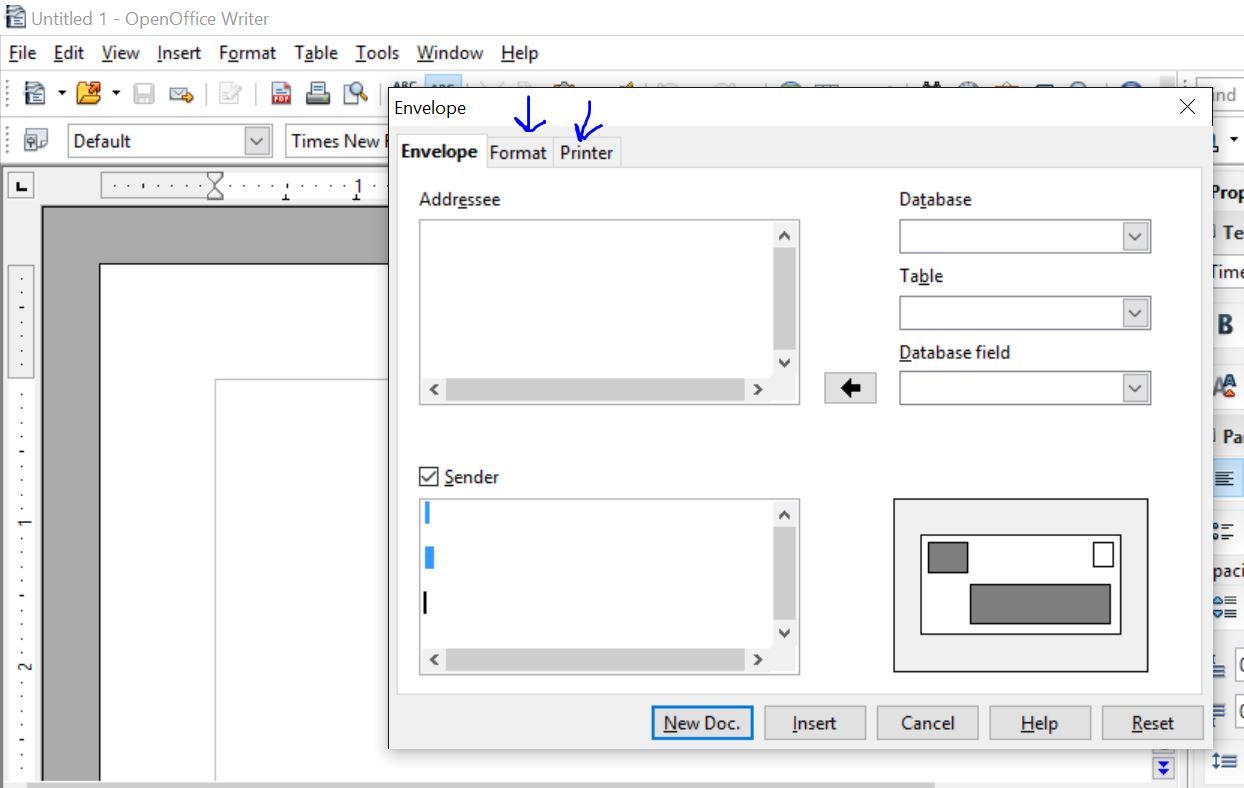
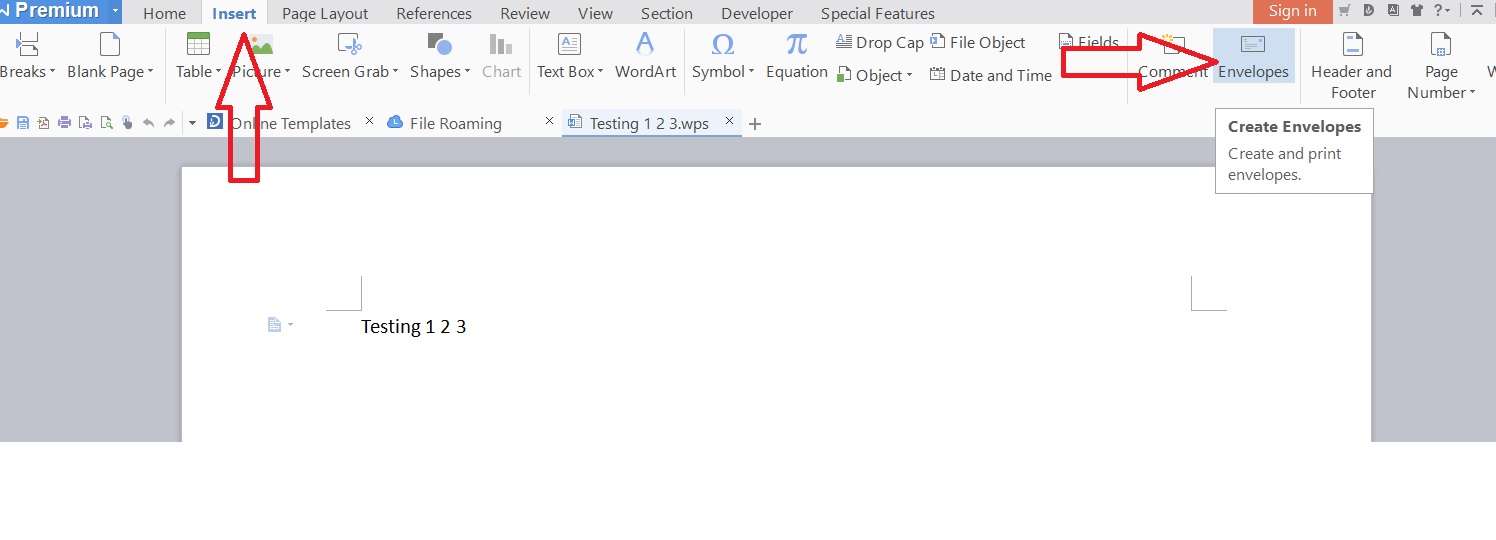
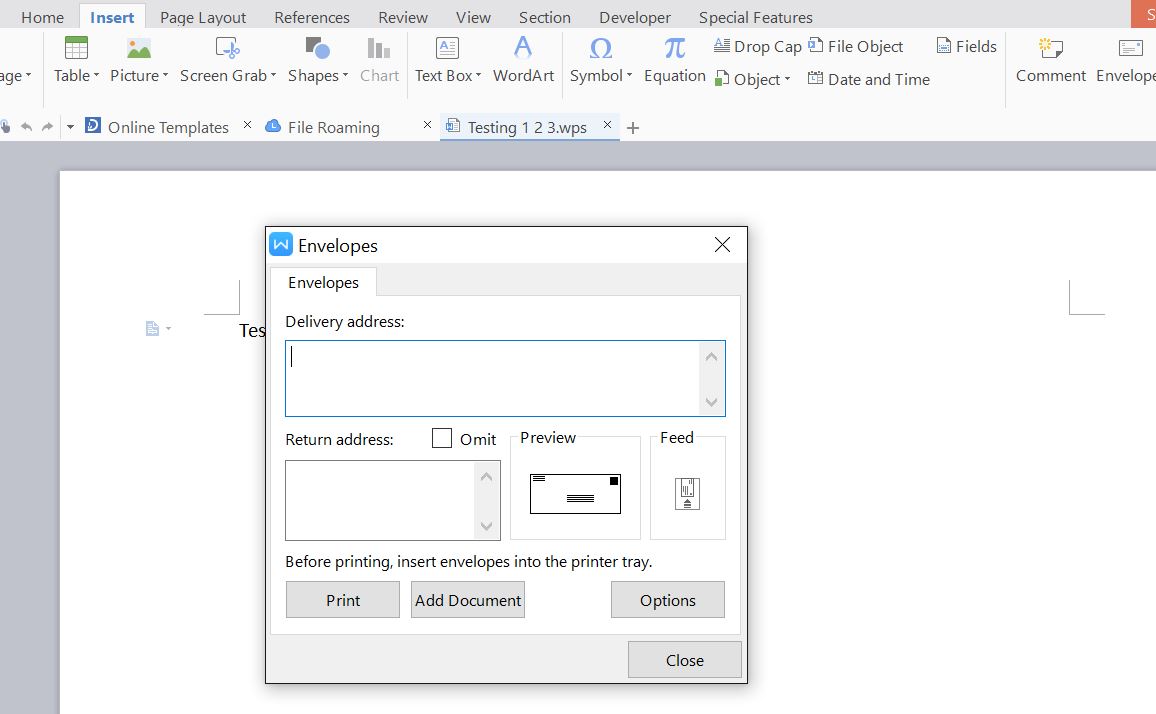
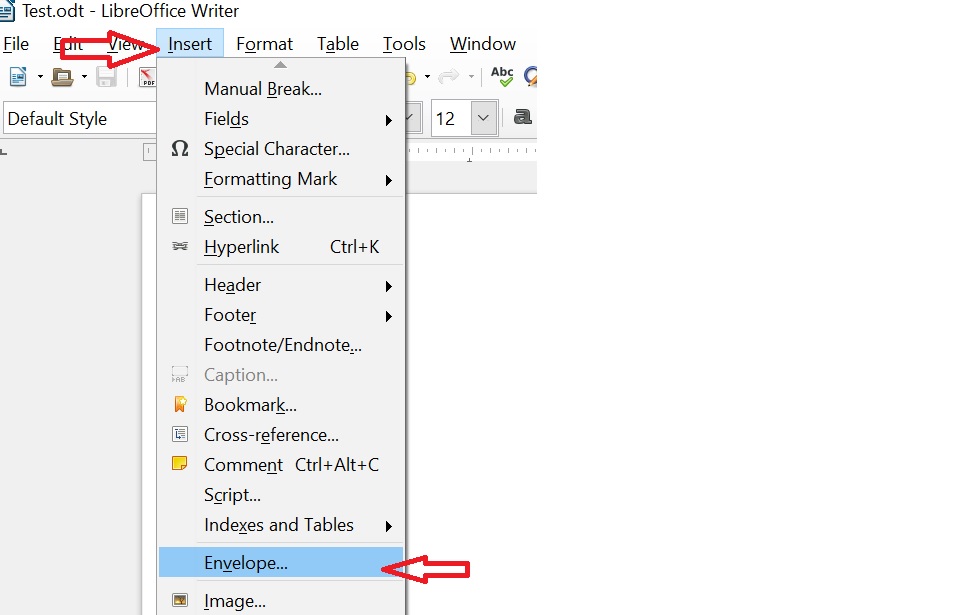
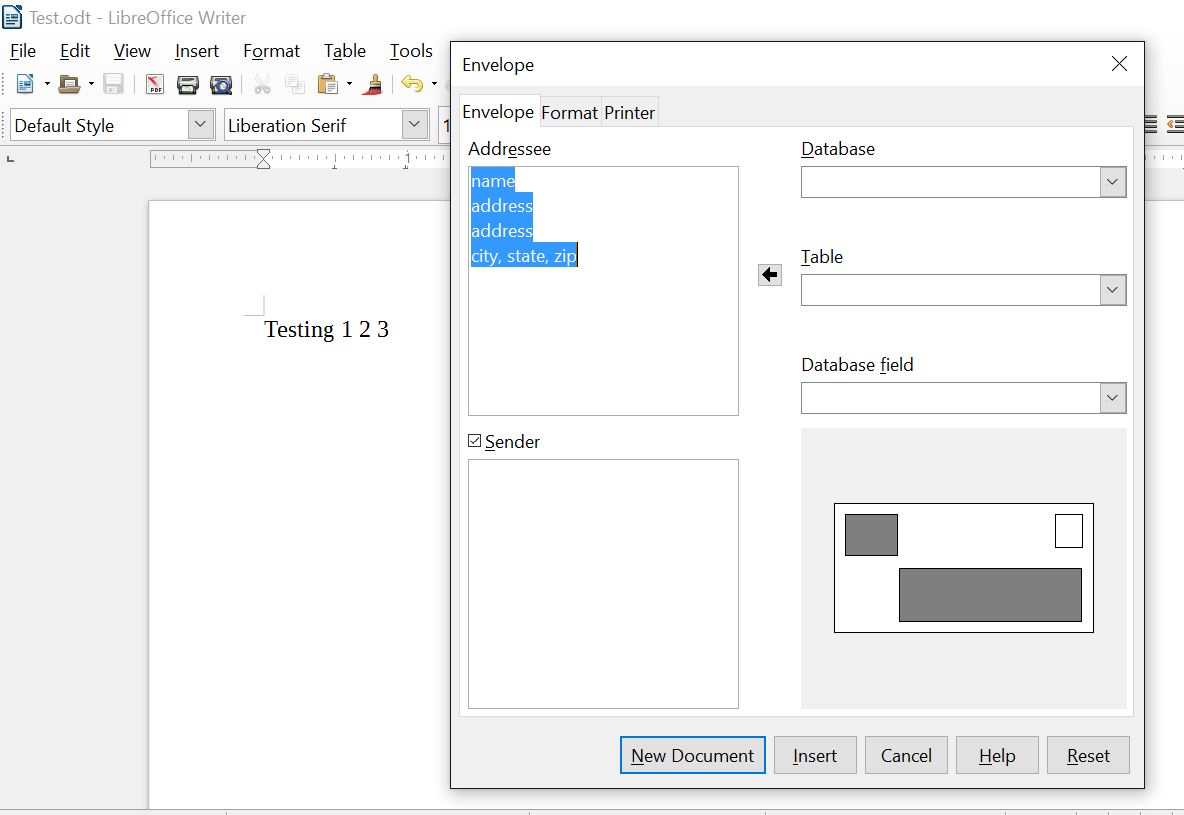
How to print an Envelope:
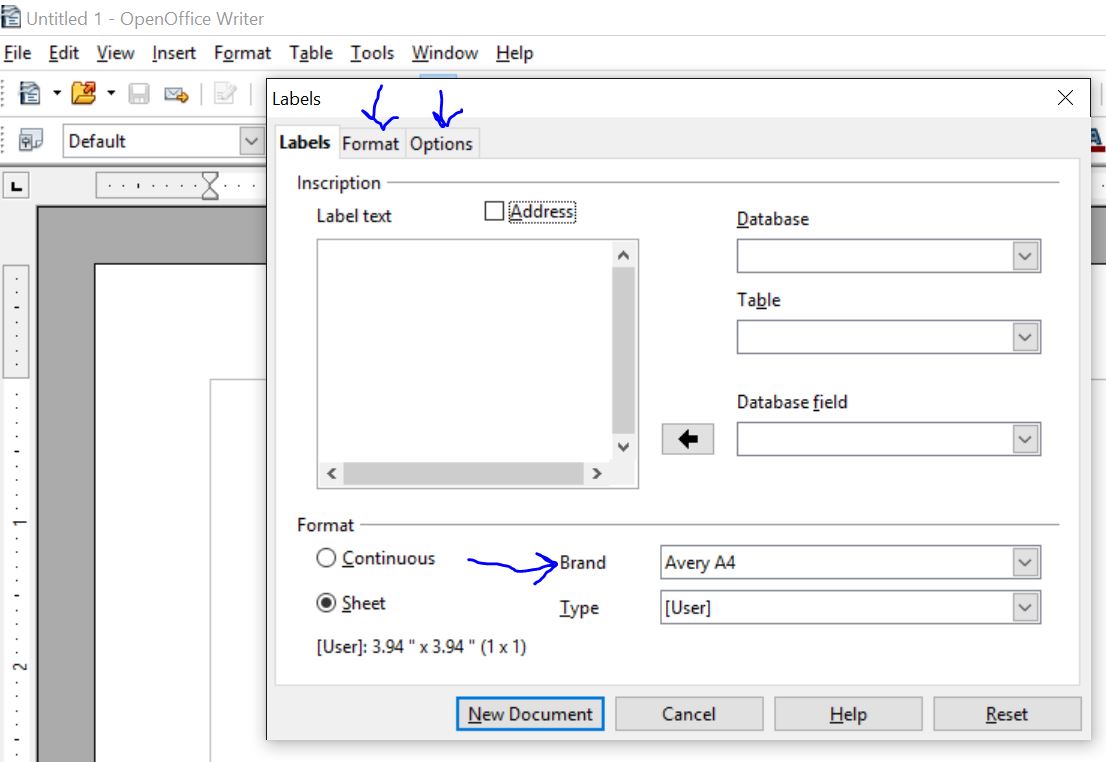
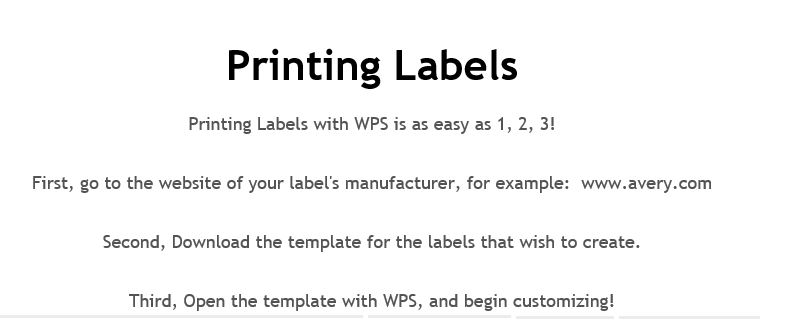
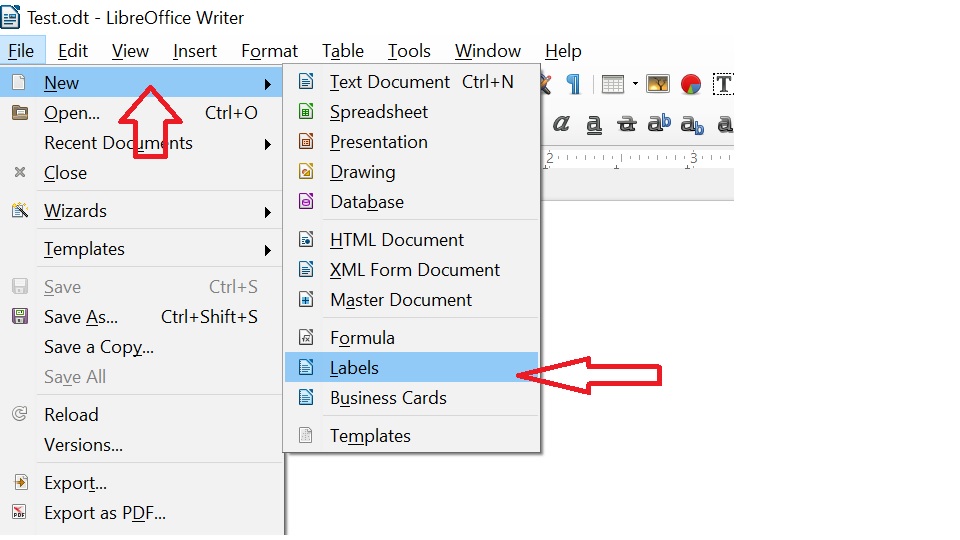
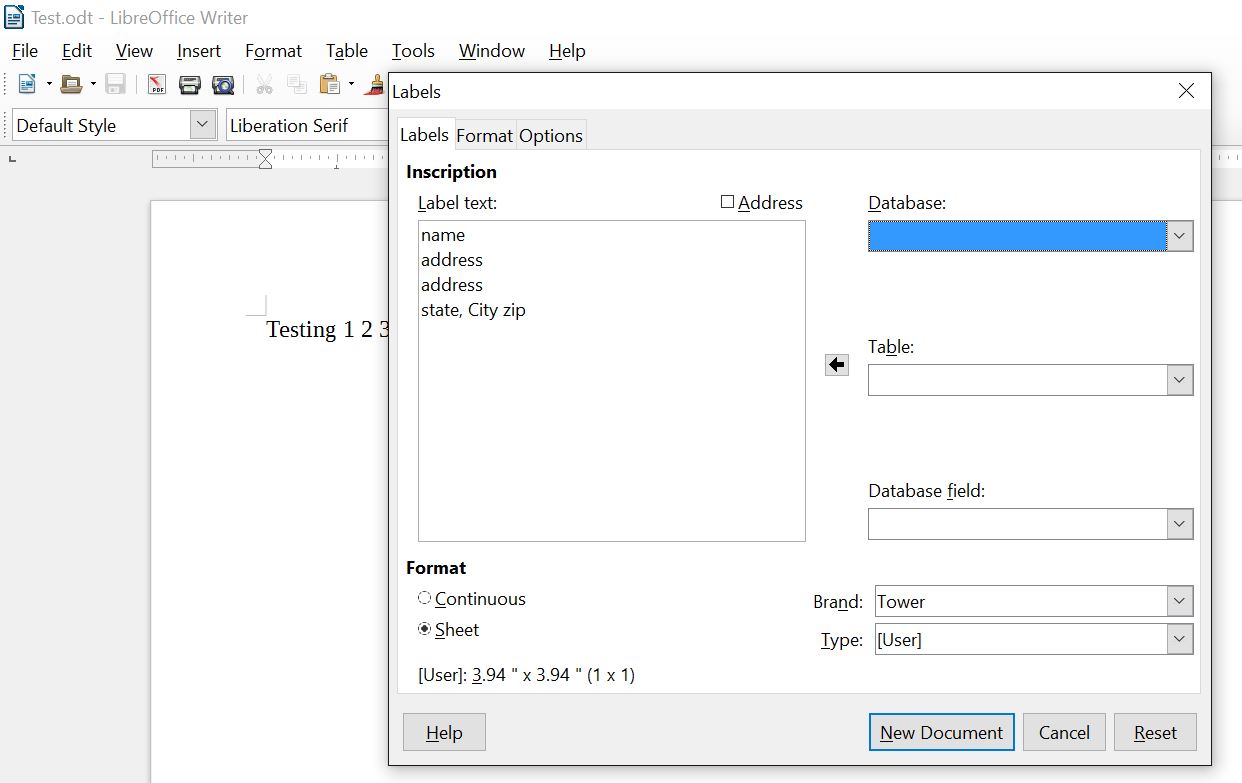
How to print labels:
Free Office Programs - WPS Office
Export PDF:

Print Envelopes:
How to print labels:
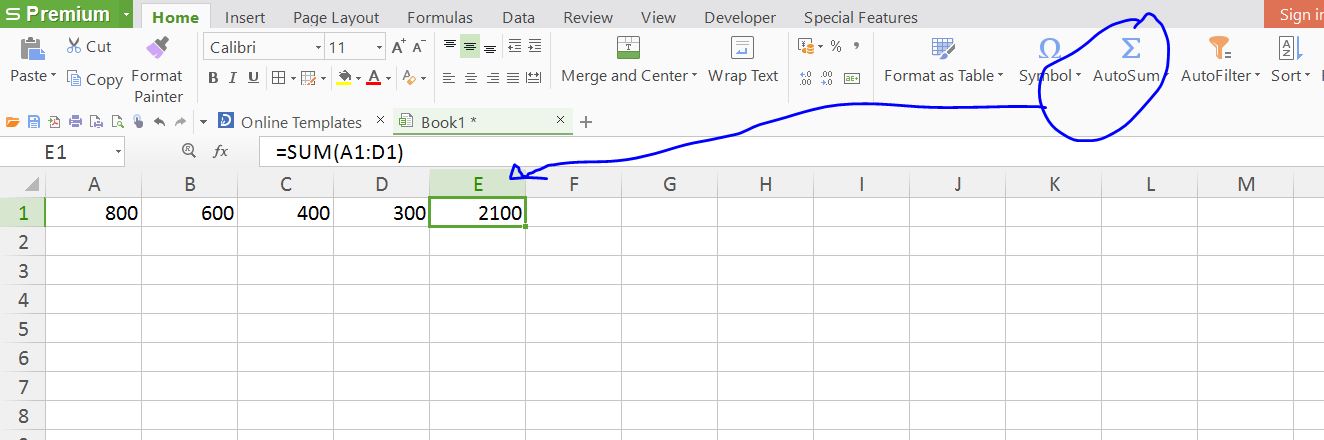
Free Office Programs - Libre office
Export PDF:
Print Envelopes:
Print Labels:

How to print from Yahoo email
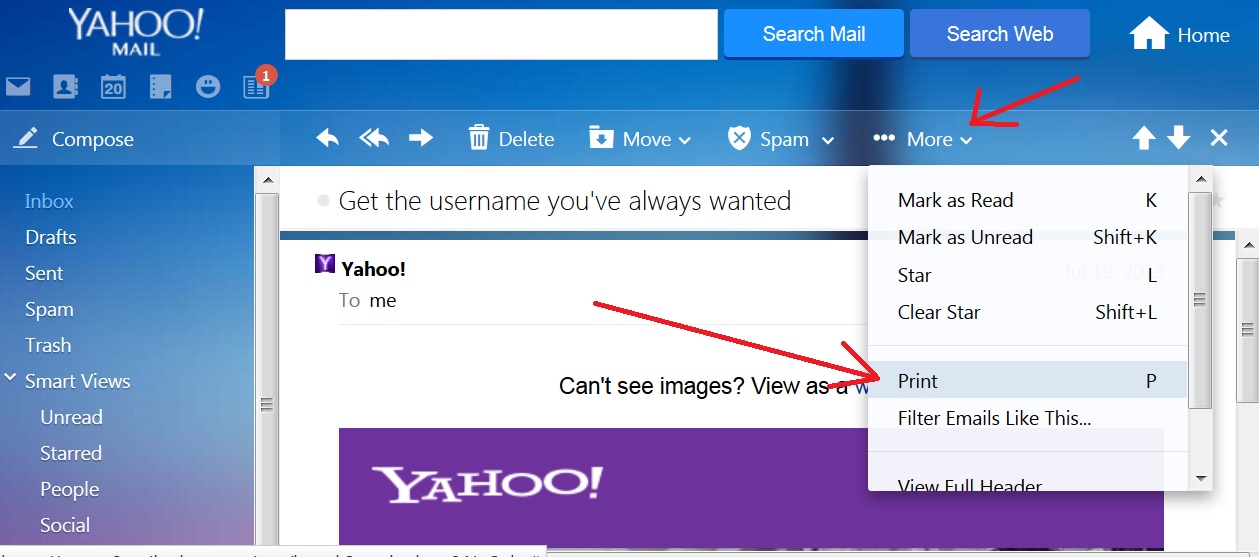
Do not use File then Print, this will chop your email in half. Yahoo has a Table of Contents (Inbox and other folders) on the left side of the page which pushes your email to the right. When you click on More then click on Print the email opens in a new window without the table of content and the ads. This method will save you ink usage and print your email at 100%.
Click here to return to top.
Change Mouse Pointer to black
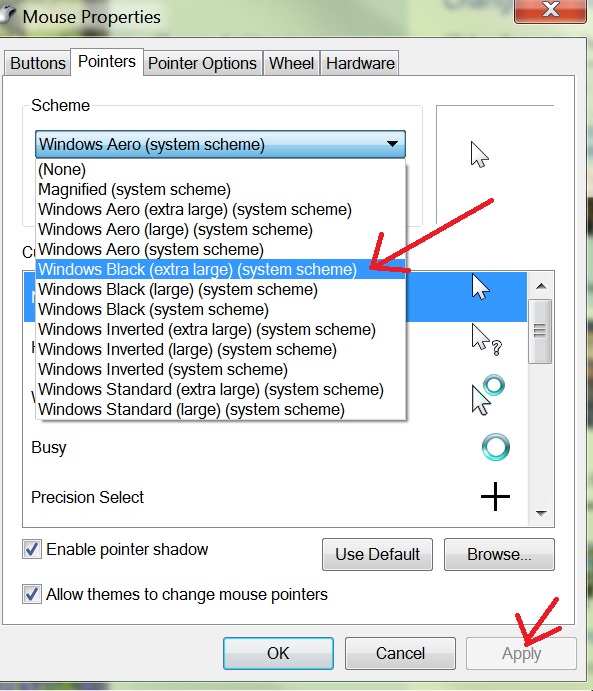
By default the mouse pointer is small and white, which makes it difficult to find since most windows backgrounds are white. I recommend "Windows Black Large". Go to the Control Panel then scroll down and open "Mouse". Then click on "Pointers" then click on the menu and chose a different color and size. Make sure to click on the Apply button to save your change then click on OK. The mouse turns to your selection as soon as you click on the Apply button. Then close the Control Panel.
Click here to return to top.
Gmail - Create Mailing Lists (Groups)
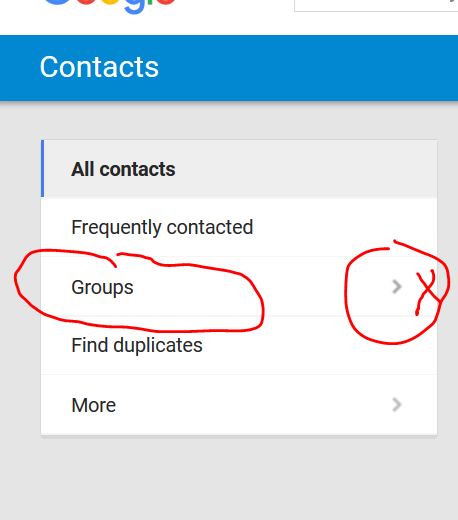
Click on the word Gmail (red type) in top left corner of your webmail gmail account then click on Contacts what it appears from the menu. Your contact list will then appear.
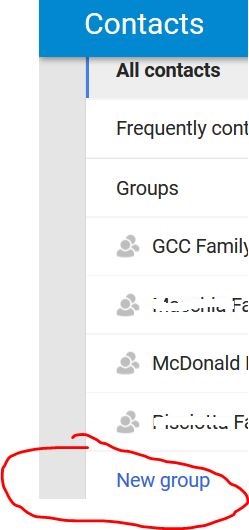
Scroll down & click on New Group
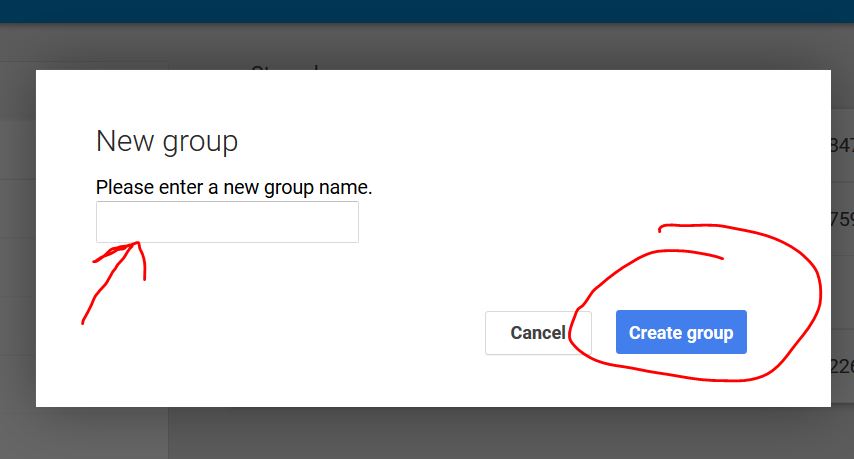
Give your Group/List a Name (ie Poker, Golf, ect.) then click on Create Group button.
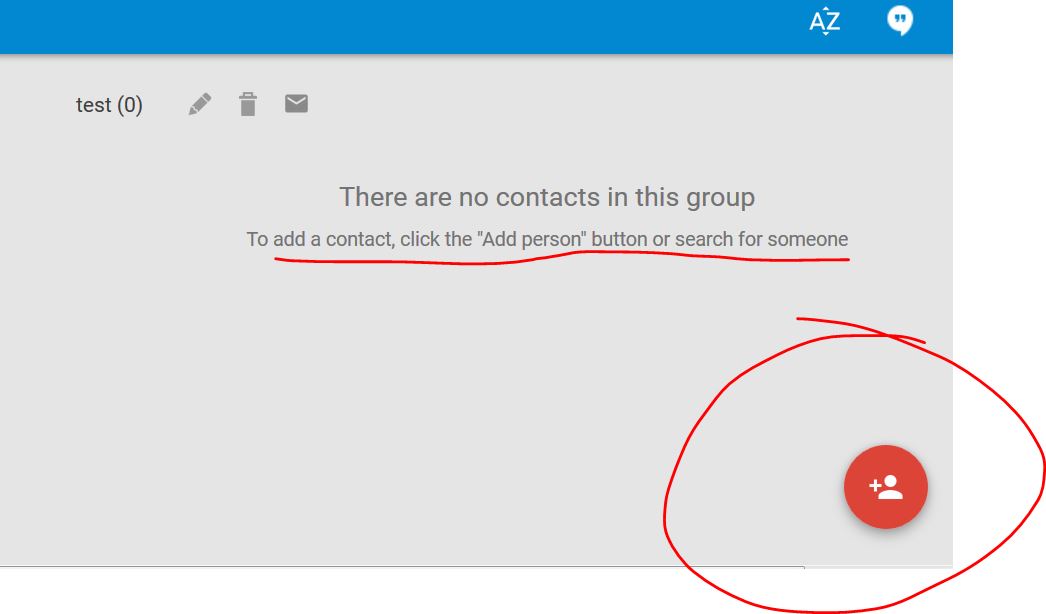
Now click on the red button to add people to your new group. Email addresses that are already in your Master list will appear when you start typing. Fill in the Name & email addresses.
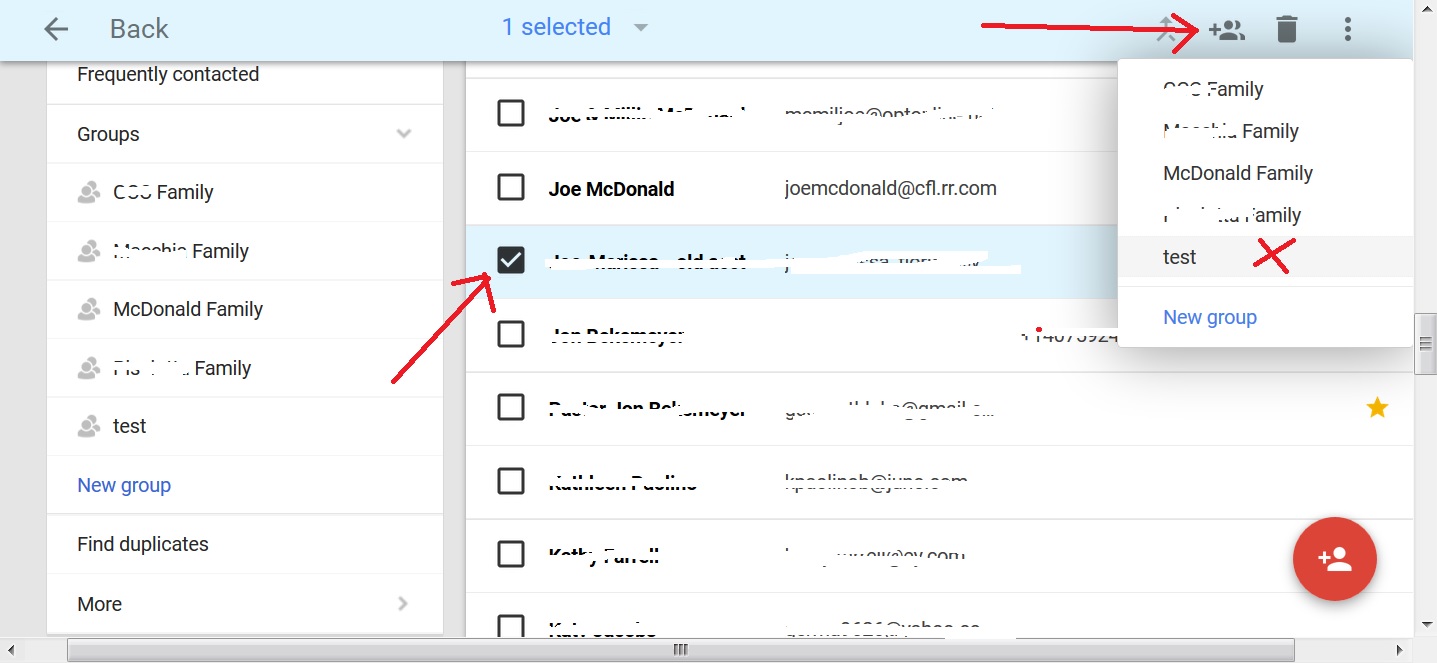
Your new group will appear in your list. When you write a new email click in the BCC window then type the name of you group and everyone in that group will get a copy of this email when you click on the Send button. When sending group emails please remember to blind carbon copy the people in your group, this protects everyone's email addresses (hides them).
Click here to return to top.
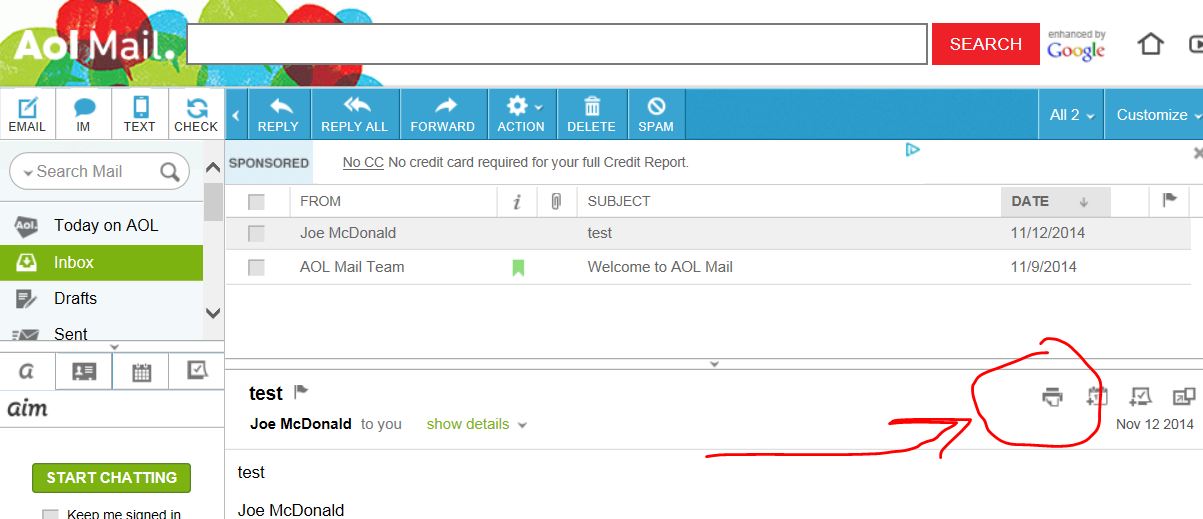
When using AOL webmail email do not use the File/Print method. If you do your email will get chopped off. AOl webmail email has a Table of Contents (Inbox and other folders) on the left side of the page which pushes your email to the right. When you click on More then click on Print the email opens in a new window without the table of content and the ads. This method will save you ink usage and print your email at 100%.
Click here to return to top.
Microsoft Office Word Basic Tasks Websites
Word 2010 - click here
Word 2013 - click here
Word Newer Versions - click here
Microsoft Office Excel Basic Tasks Websites
Excel All Versions - click here
Click here to return to top.
Click here to return to top.
Click here to return to top.
Kings Ridge Community new Internet Provider is using iPhotonix modems. Click here for the manual on how to change the settings. You must be skilled to make any of these changes, the interface is not easy. The Default IP is https://192.168.1.1
If this IP does not work then run cmd as admin then type in ipconfig & press enter.
Default Gateway is the IP number to enter into the browser window.
Login ID - admin
Password - (serial number of bottom of modem, starts with IPHOxxxxxxxx)
To change your Wireless Network Name & Password click on Wifi at top of window.
Be careful of making changes.
Click here to return to top.
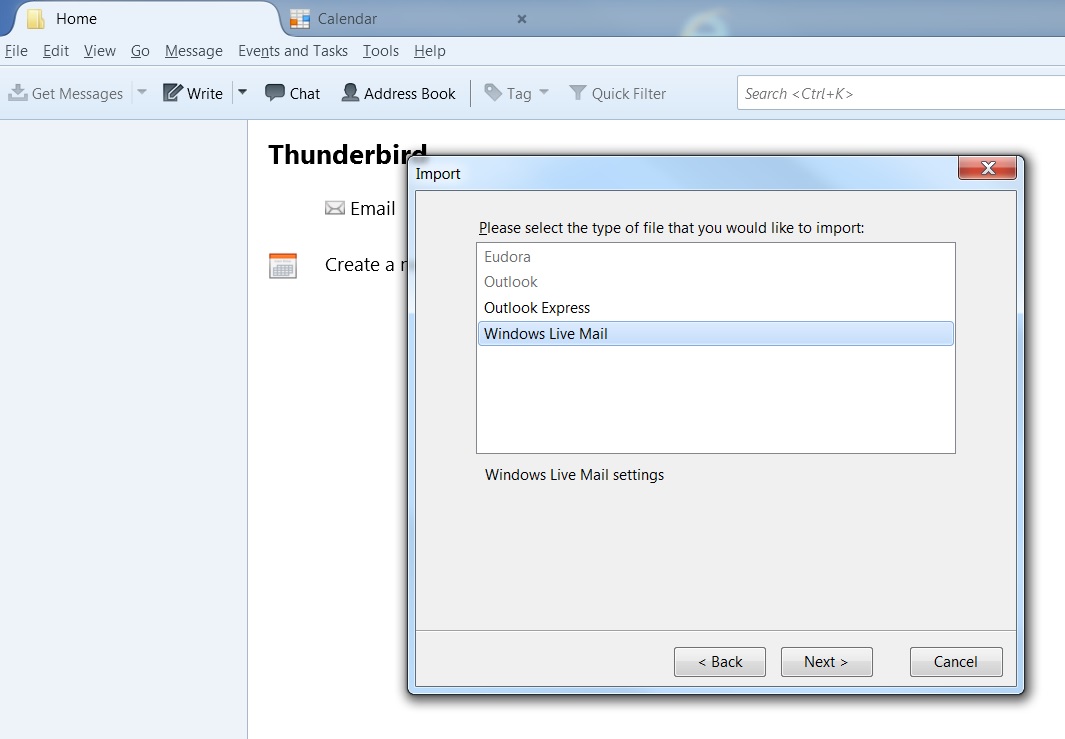
Import Settings into Thunderbird: If you are changing from Windows Live Mail to Thunderbird below are the steps you can do to move your imap & smtp settings which will save you from having to look up these settings from a website. You need to install Thunderbird on your computer prior to following the steps below.
Click on Next then you are all set.
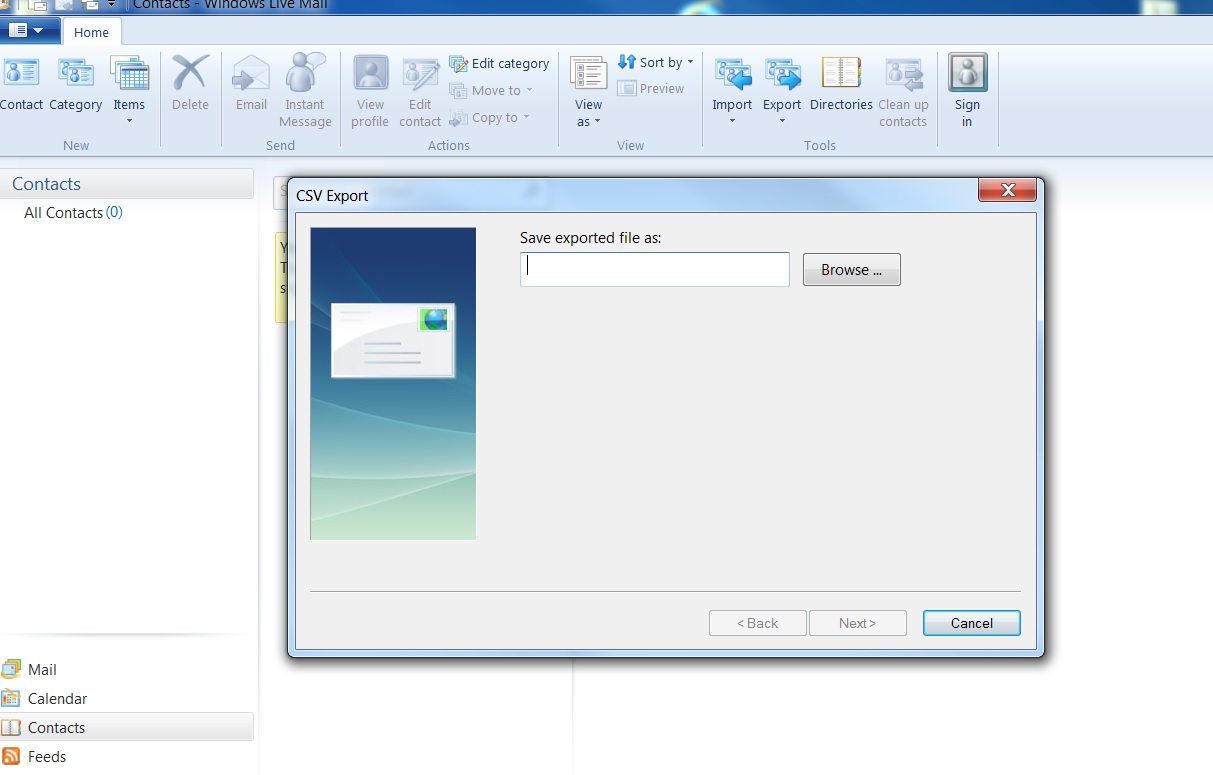
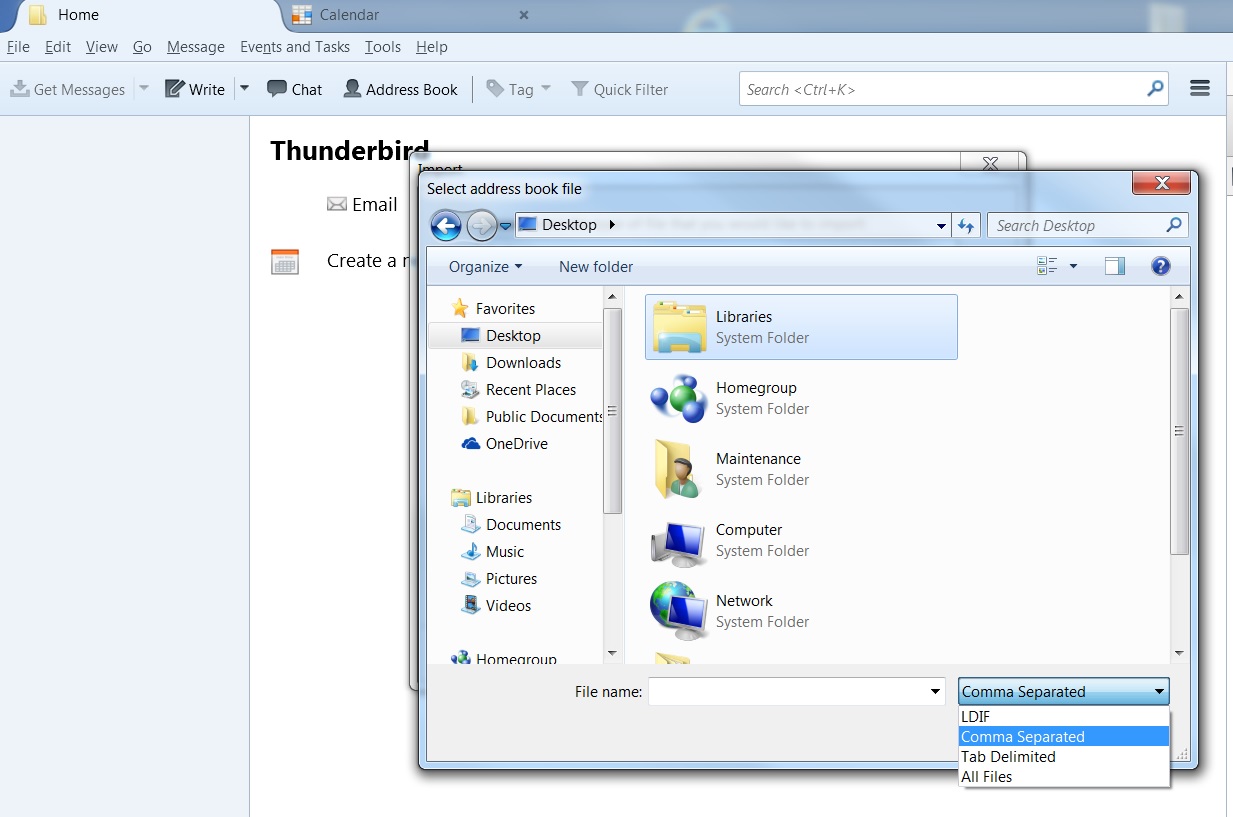
Import Address book from Live Mail
Open Live Mail then click on Contacts then click on Export from the toolbar then click on the first option Comma Separated (csv)

Type the word Contacts in the window then click on Browse button & save the address book to your Desktop.
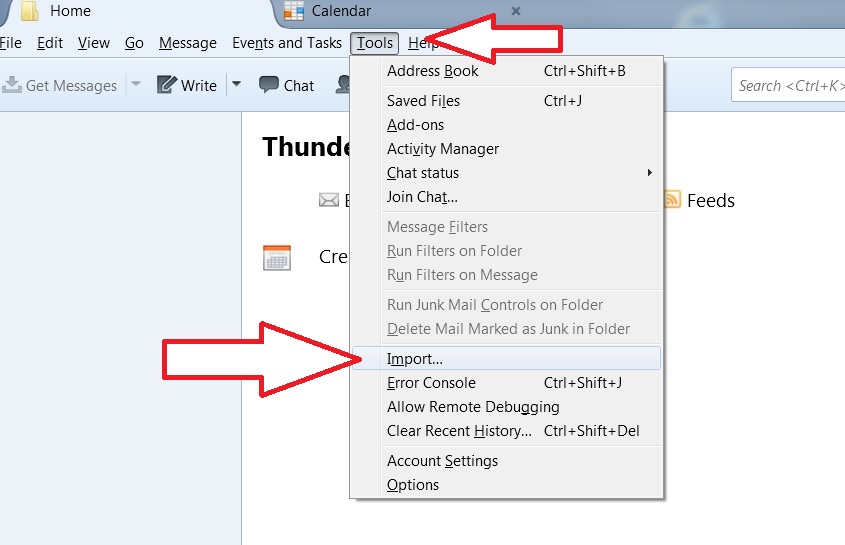
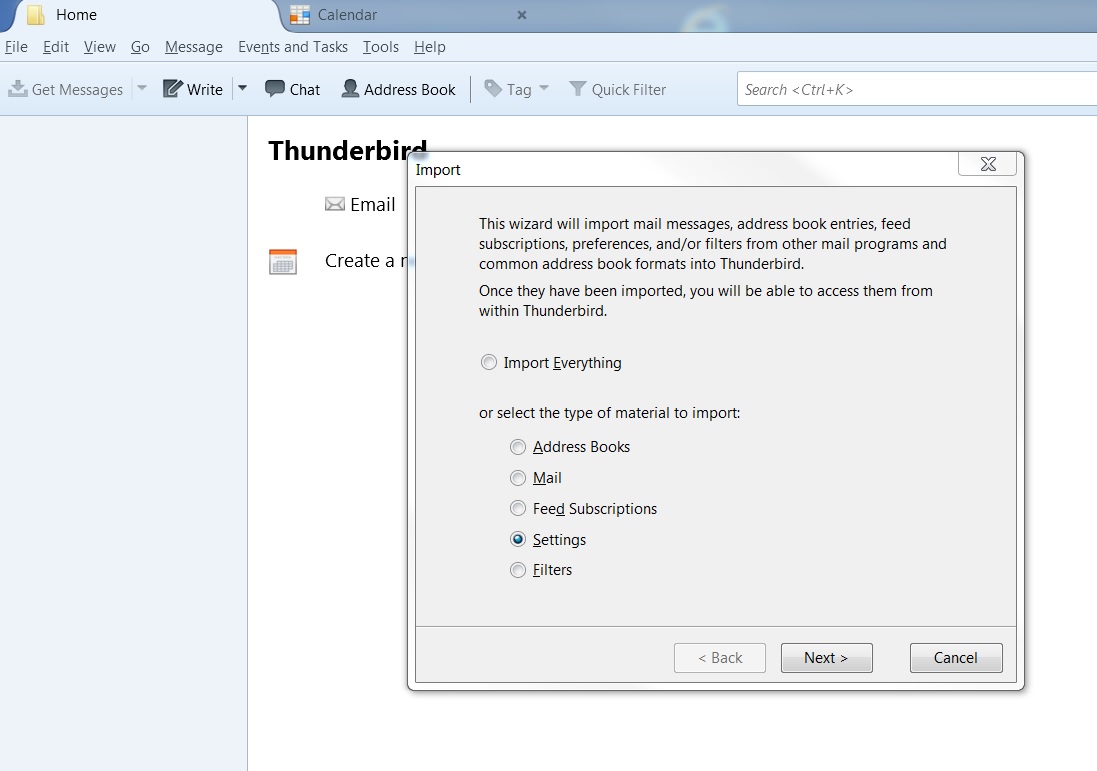
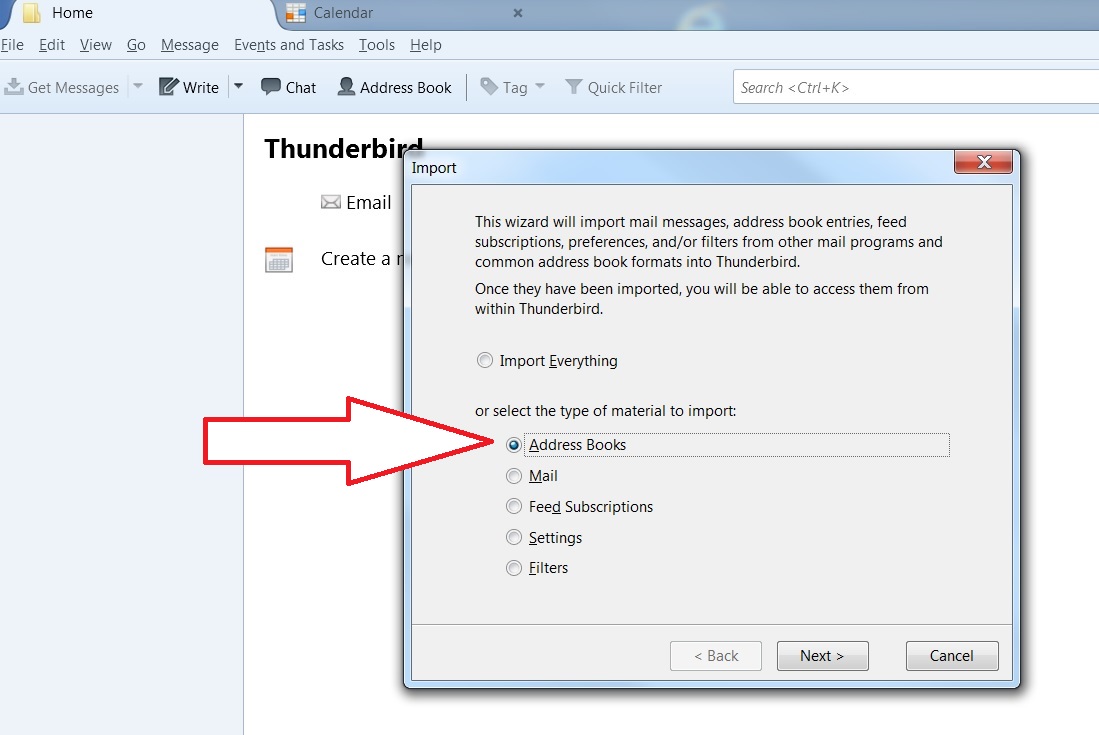
Open Thunderbird & click on Tools then Import then in the next window click on Address Books then click on Next button
Then choose the Text file as the type to import. Then click on the Next button.
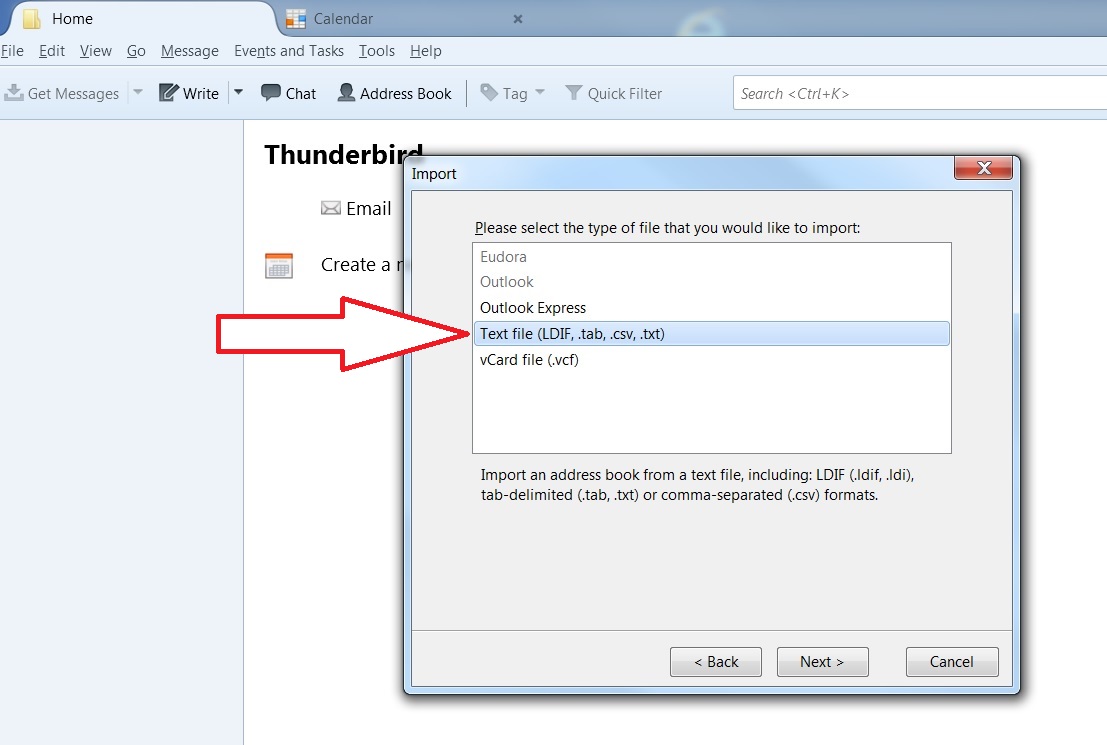
Then find the csv contacts file you saved on your desktop. You will need to change the file type to Comma Separated in order to see your file. Click on the file in the window then click on the OK button & your Address book will be imported into Thunderbird.
Click here to return to top.
Put a website on your Desktop
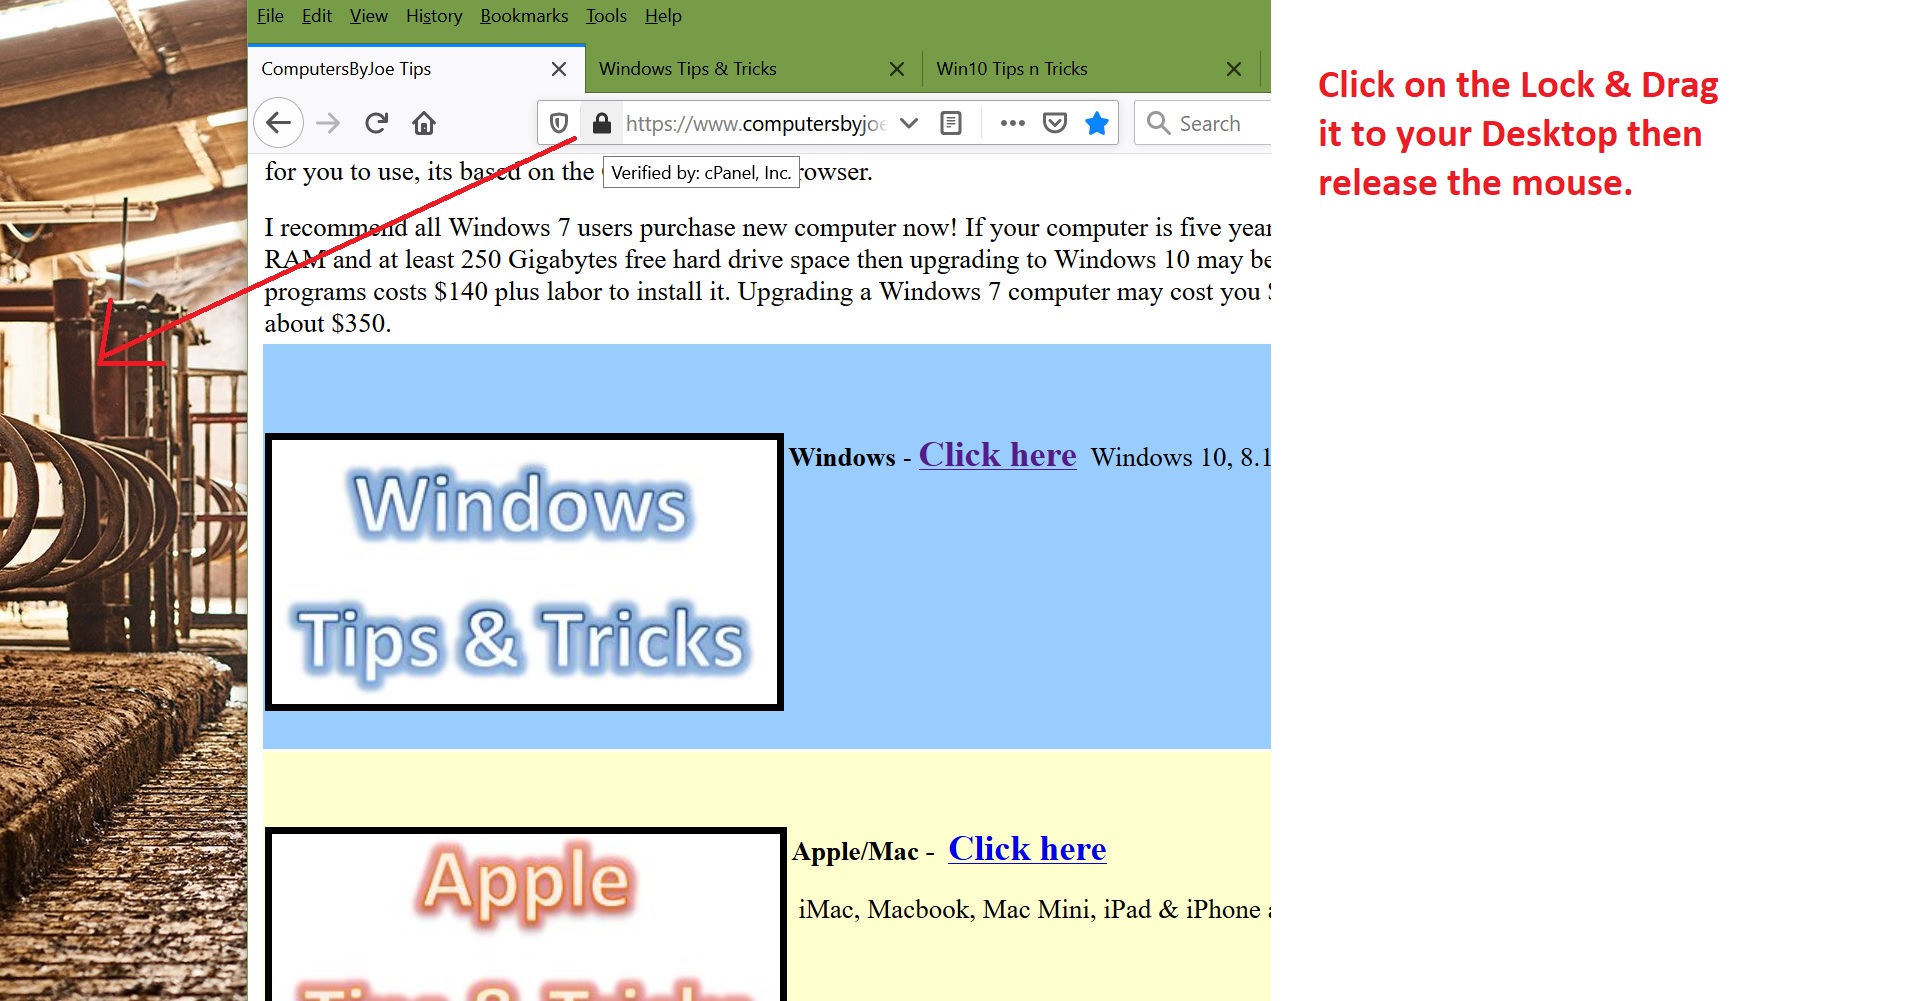
This comes in handy for gmail or aol email. Once the shortcut is on your desktop then you just double click on it to go directly to that website. I recommend not to put more then 5 websites on your desktop.
Click here to return to top.
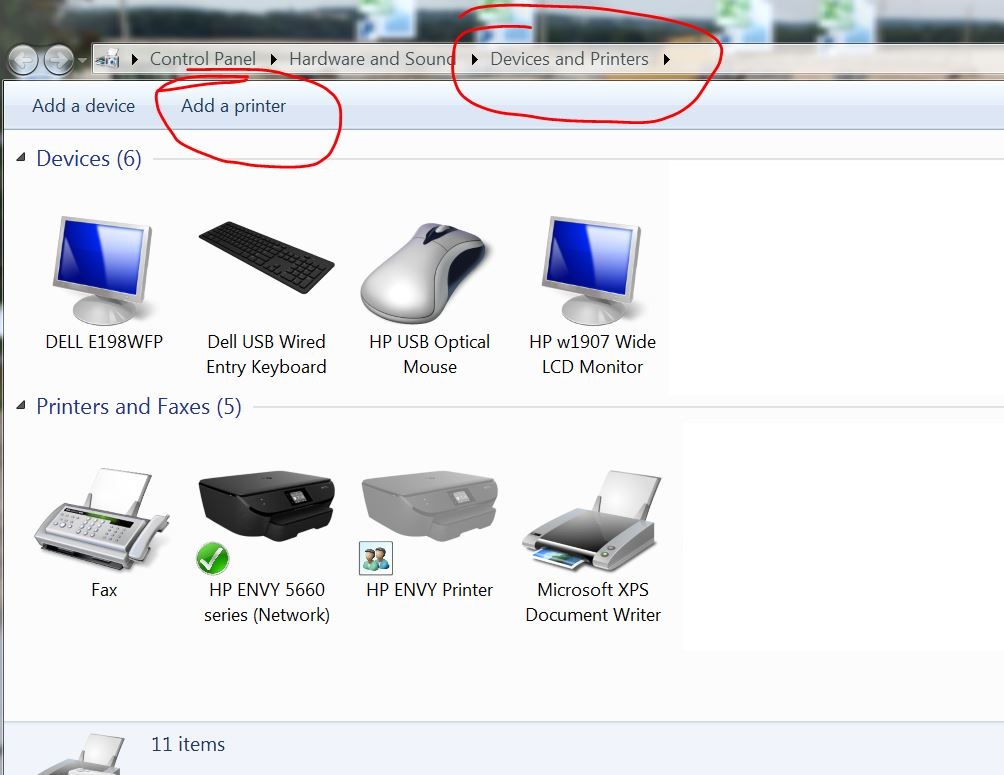
Fix the dreaded Printer is Offline Error
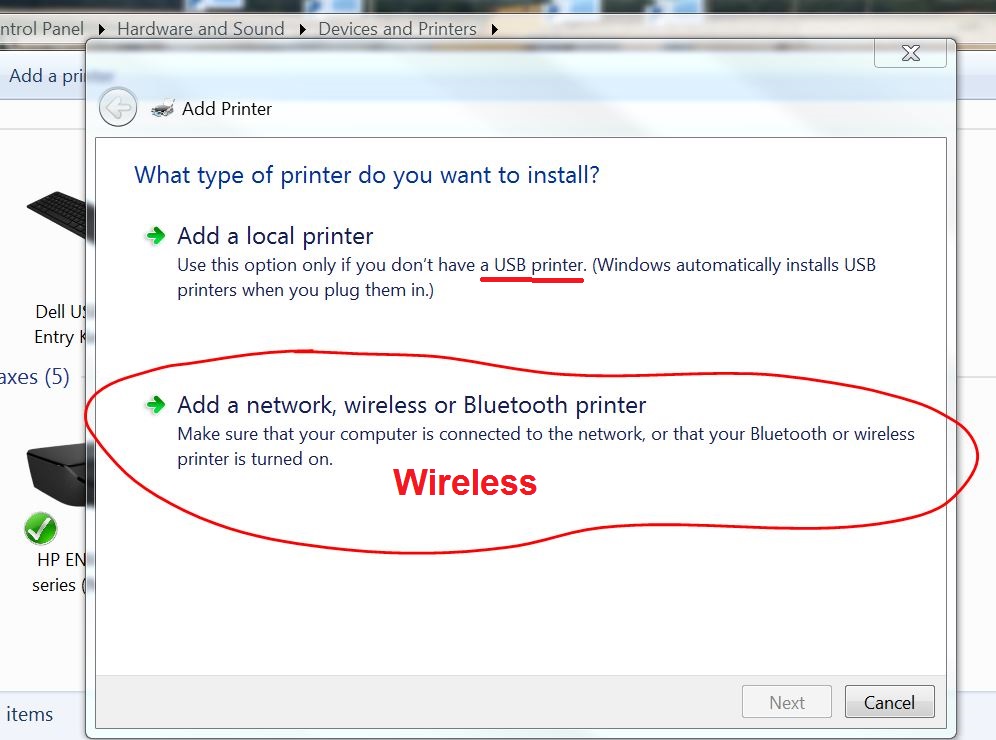
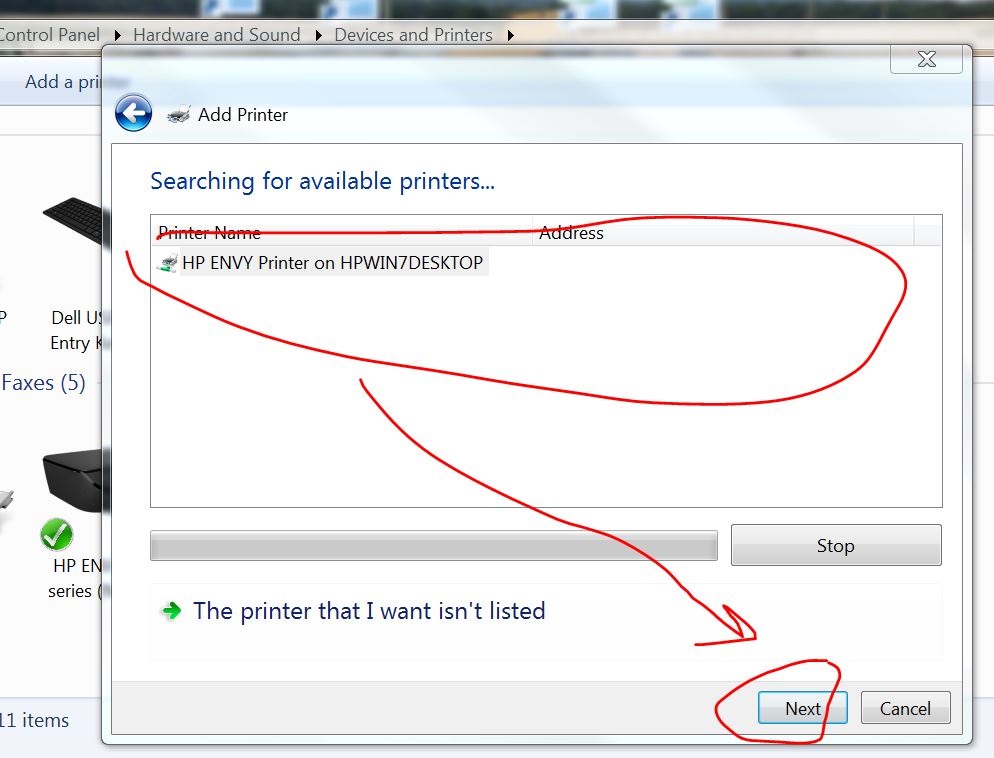
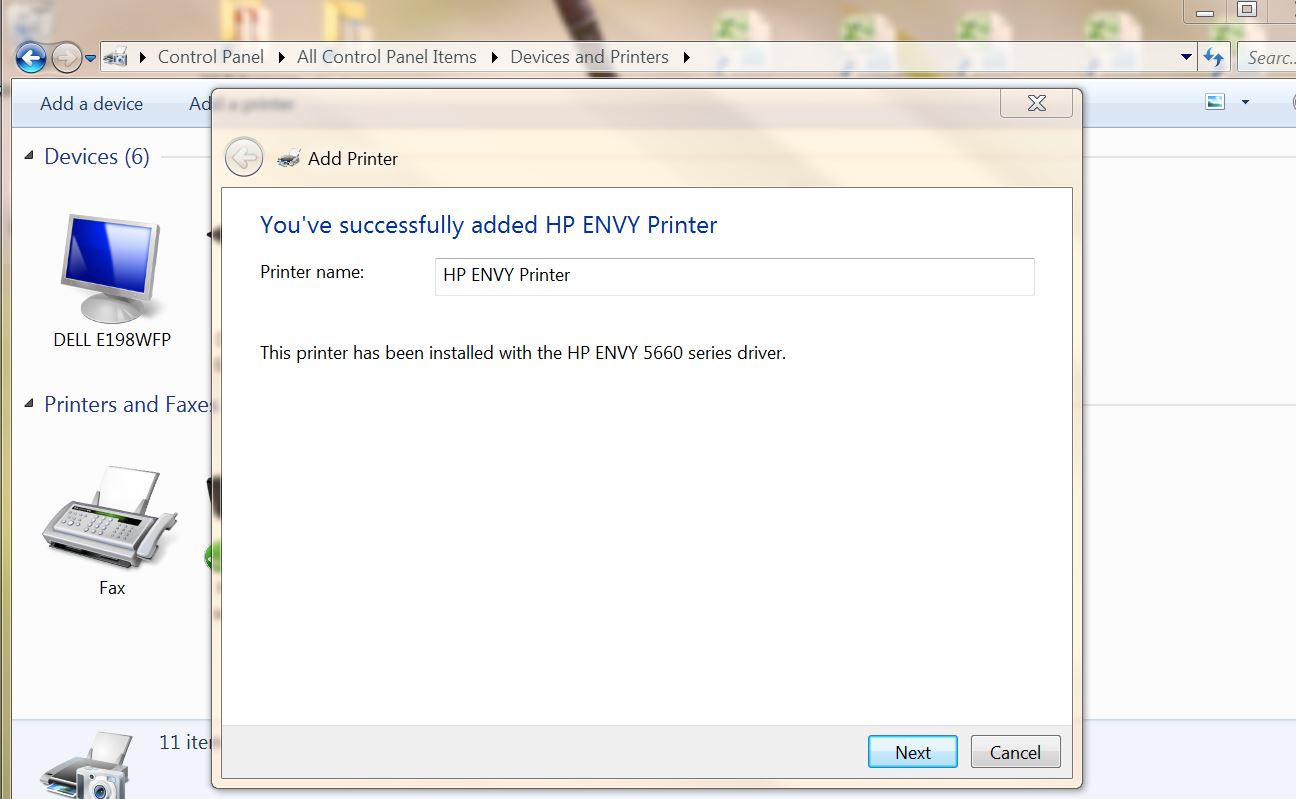
If you are given the option to Keep the driver already installed or Install a new Driver, pick the top (Recommended) option.
Click here to return to top.
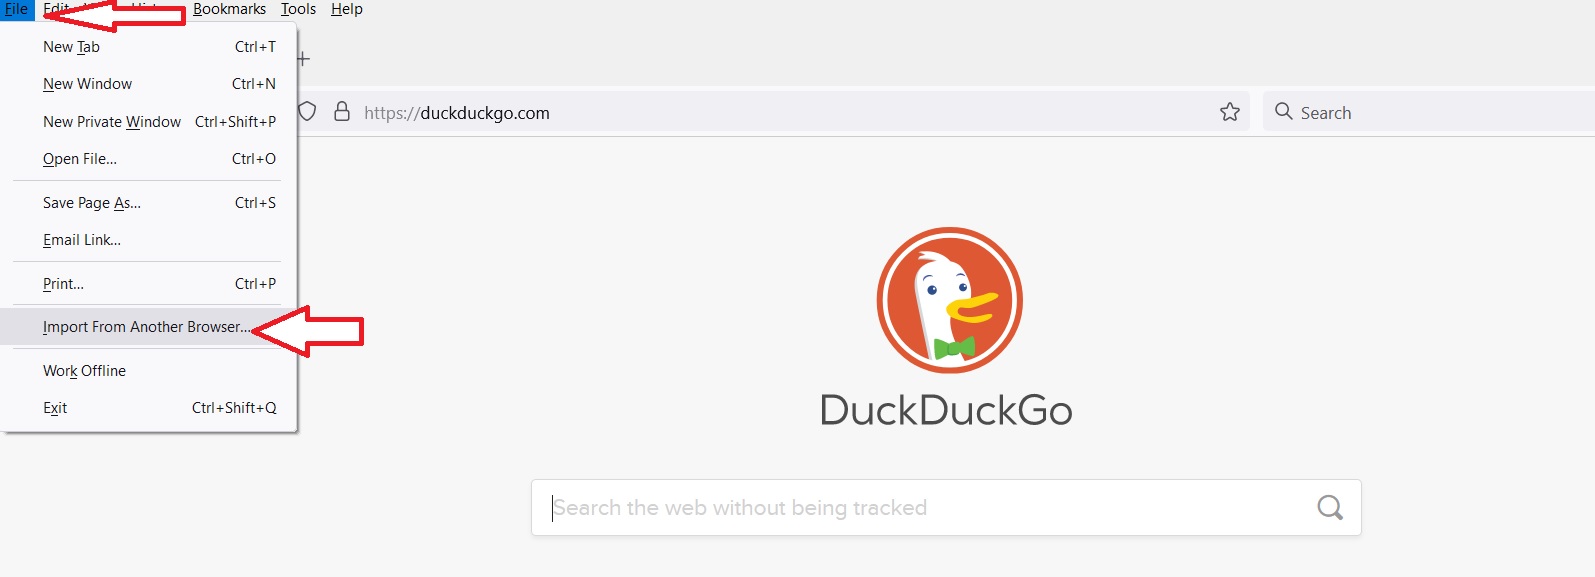
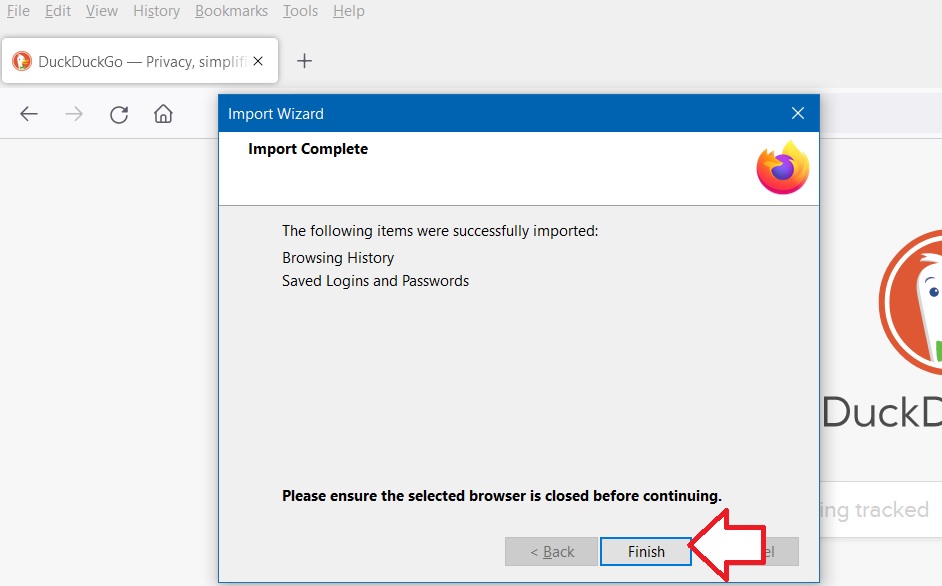
How to Import Favorites from another Internet browser into Firefox browser
1 - Open Firefox browser then click on "File" then click on "Import from another browser..."
2 - Click on the name of the browser you are importing from then click on "Next" button

3 - keep check marks in both boxes then click on "Next" button
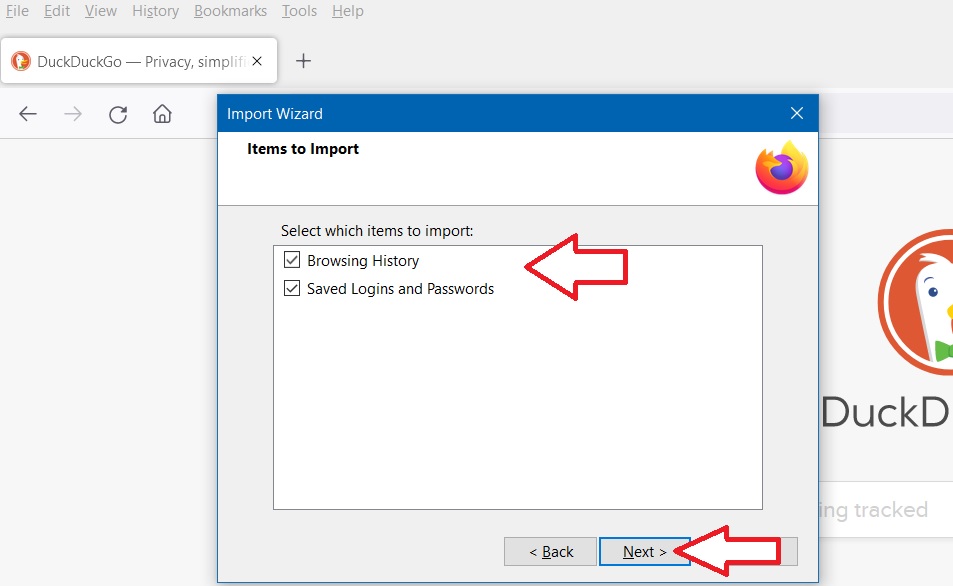
4 - click on "Finish" button
Click here to return to top.
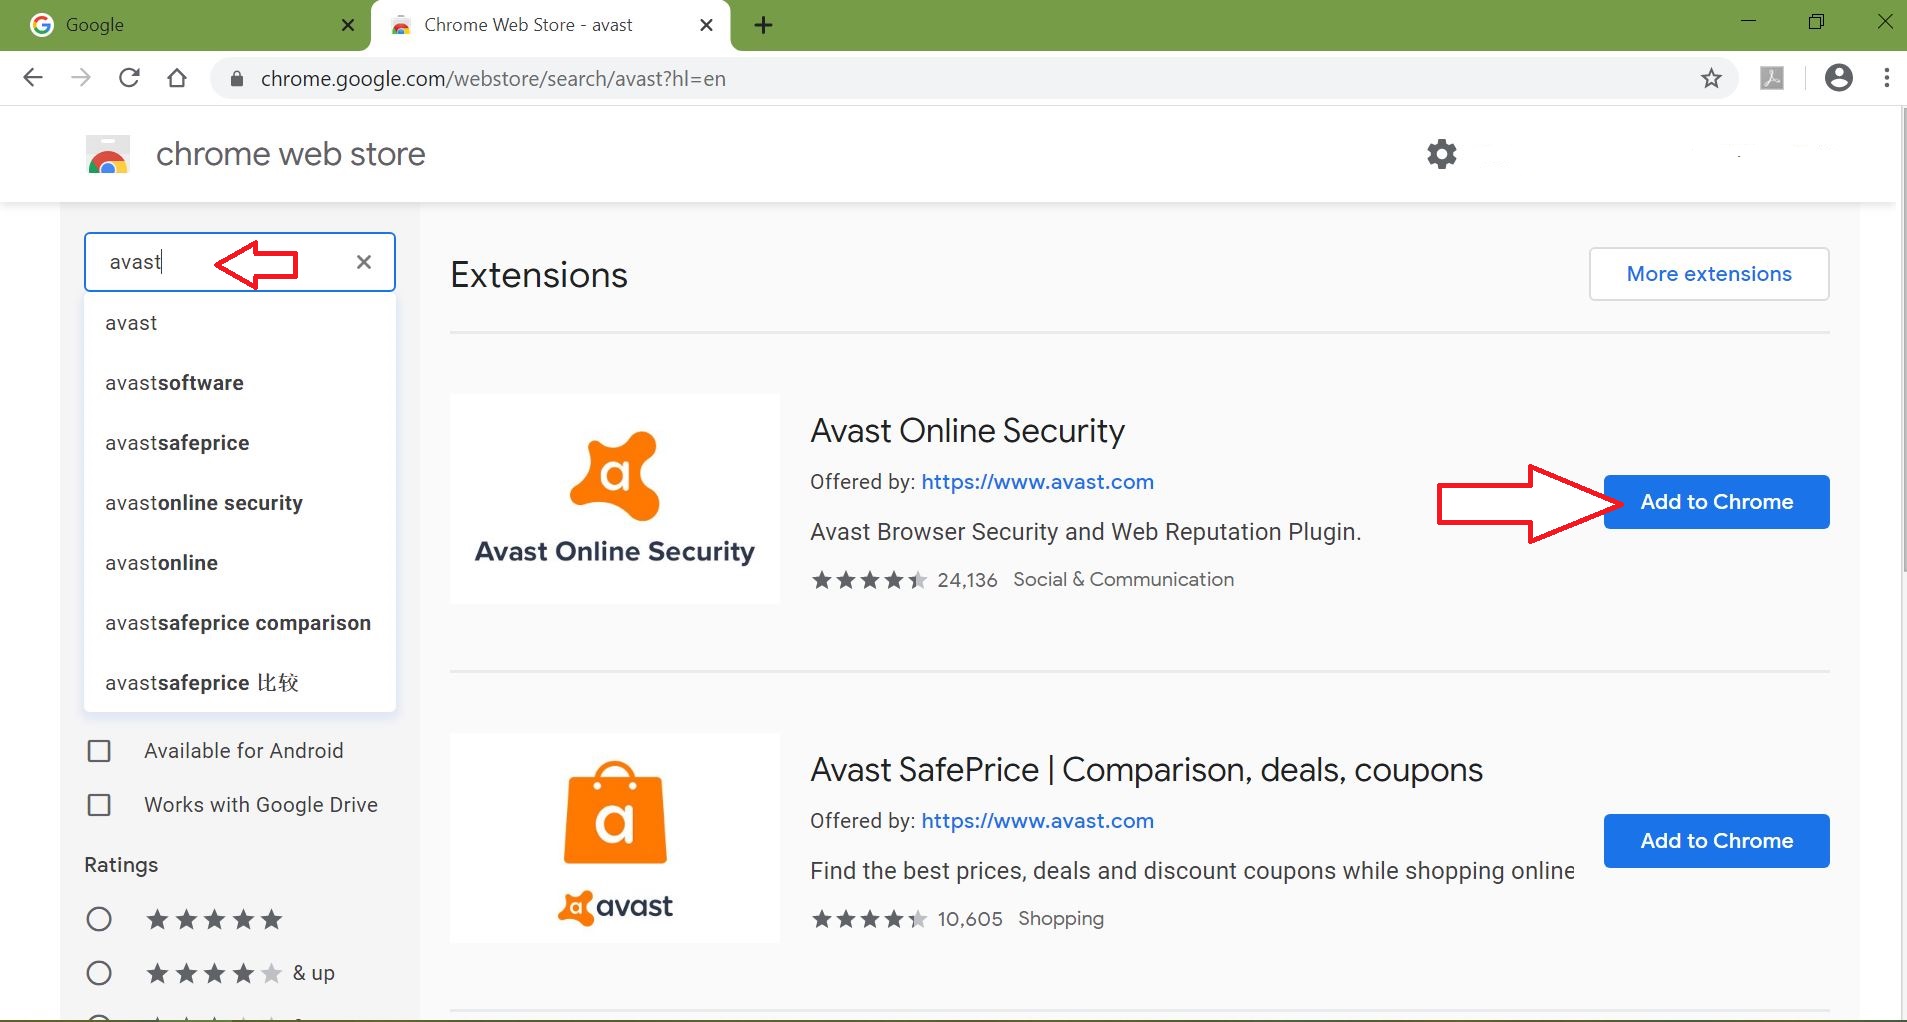
Add Avast Online Security to Google Chrome Browser
This is a free tool that helps you stay safe on the Internet. One of the best features is the green check marks next to websites that are safe to visit see below). Dangerous websites will have an orange dot warning you not to visit.
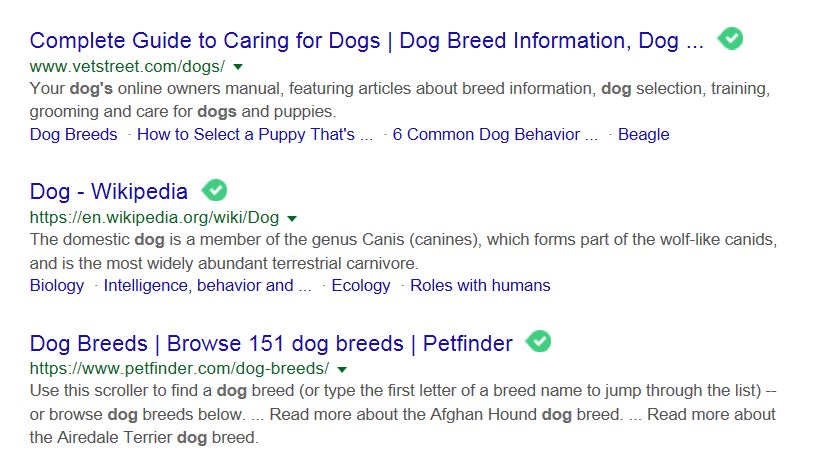
This tool also prevents fake websites from loading (phishing scams), Blocks ads from loading on some websites (you will just get a white window), Site Correct - if you have a typo in your search it will redirect you to the correct website.
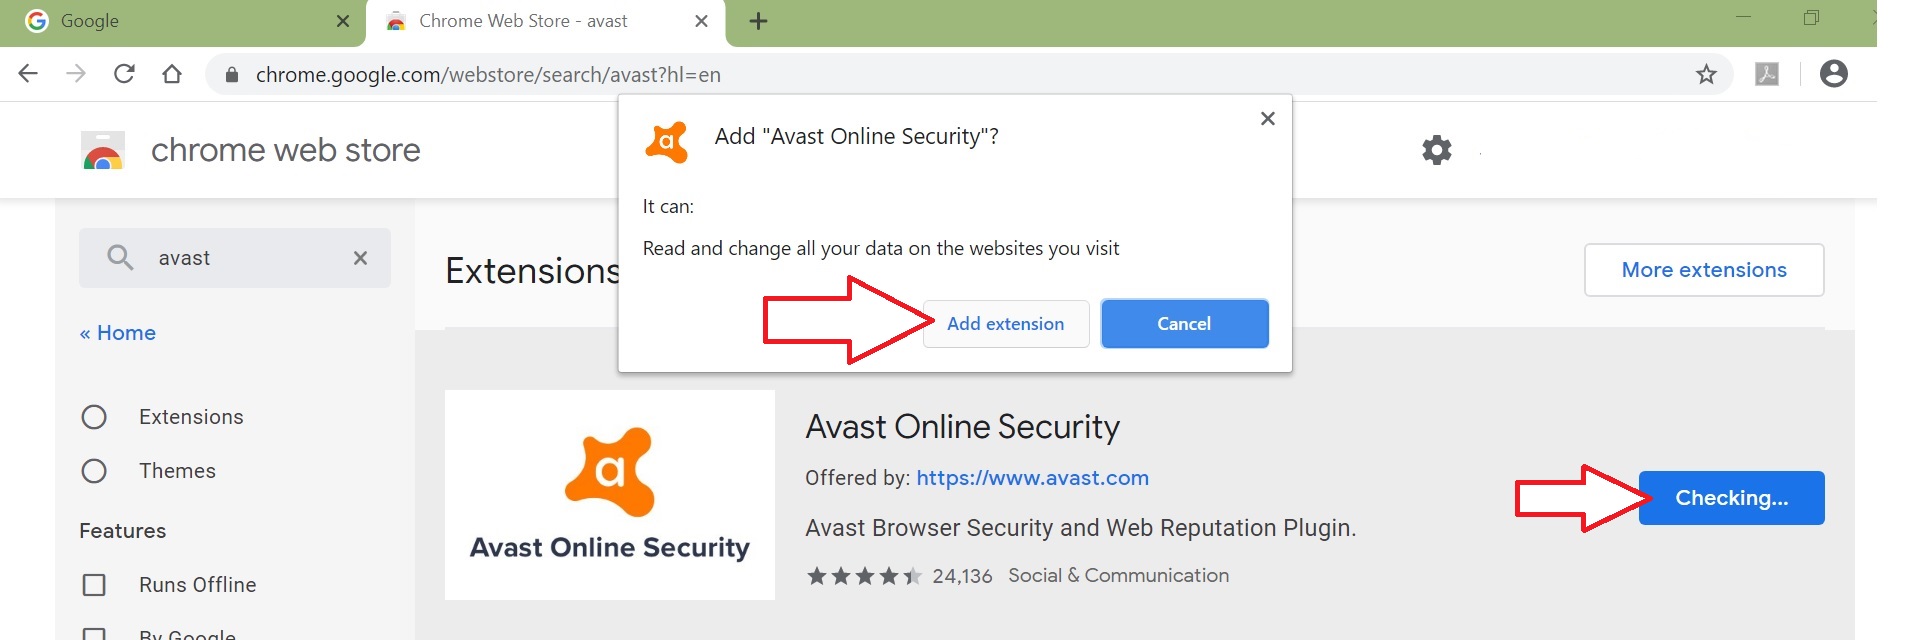
To install follow the directions below.
Click here to return to top.
If you need to change you AOL email password follow the steps below.
Open your Internet browser (Firefox, Google Chrome, Edge, etc).
Then click on your name in the top right if you are already signed into your aol account. If you are not signed in then you will be prompted to enter your email address & then your current email password.
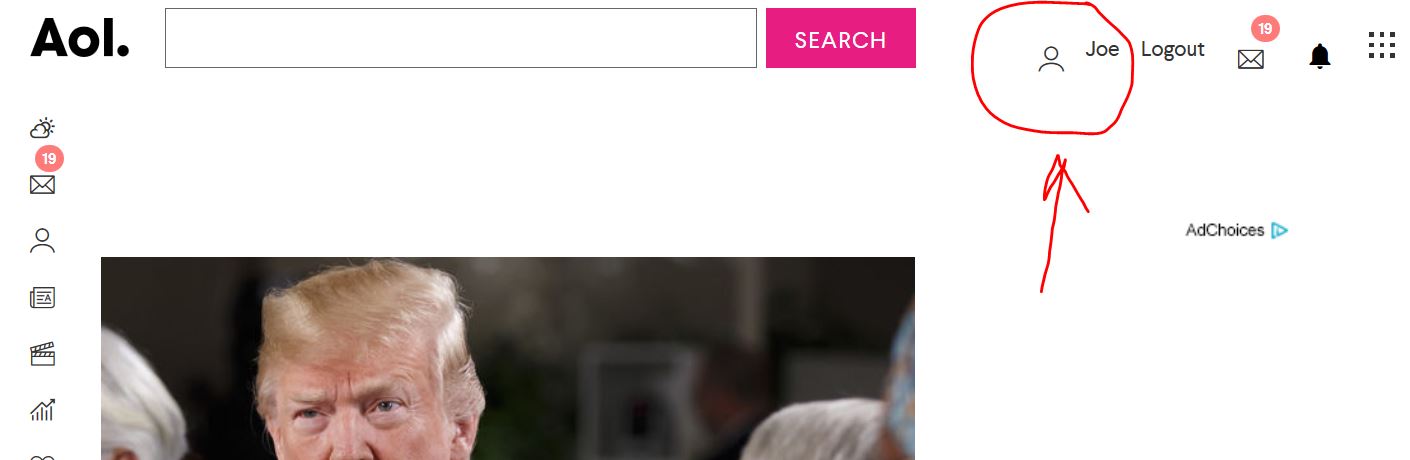

Once logged in click on Account security then click on Change password. Then follow directions to change your password. Make sure that you right down your password in your password book. Include the date that you changed it. If you have text services on your phone I recommend that you also click on Add recovery phone number to be used if you ever get locked out of your aol email account.
Click here to return to top.
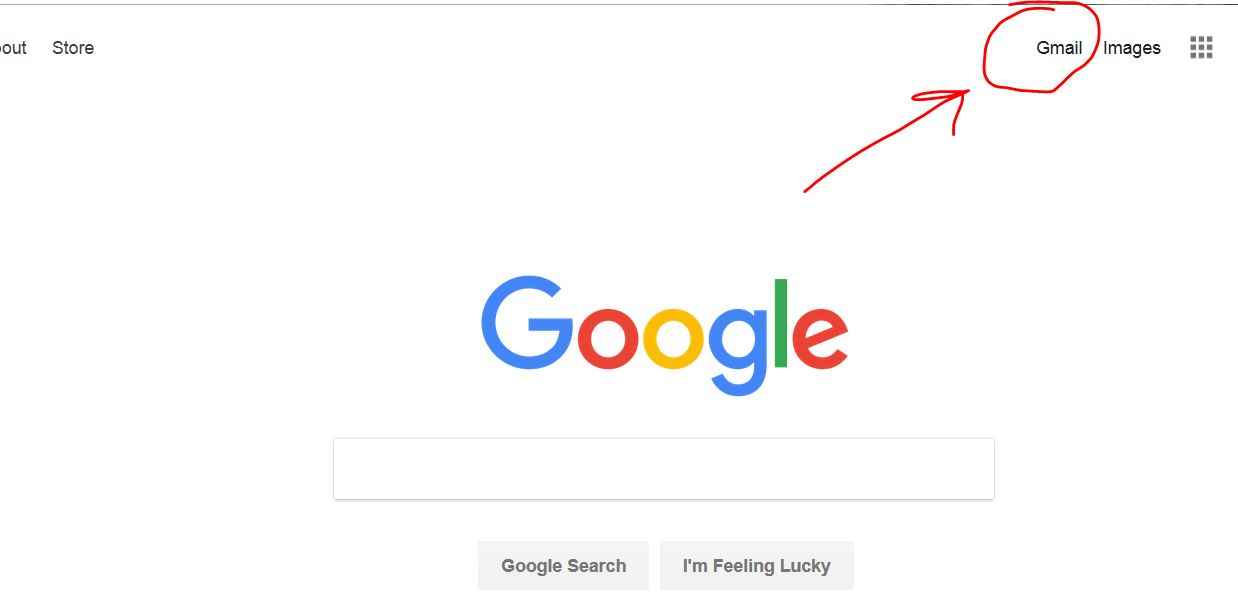
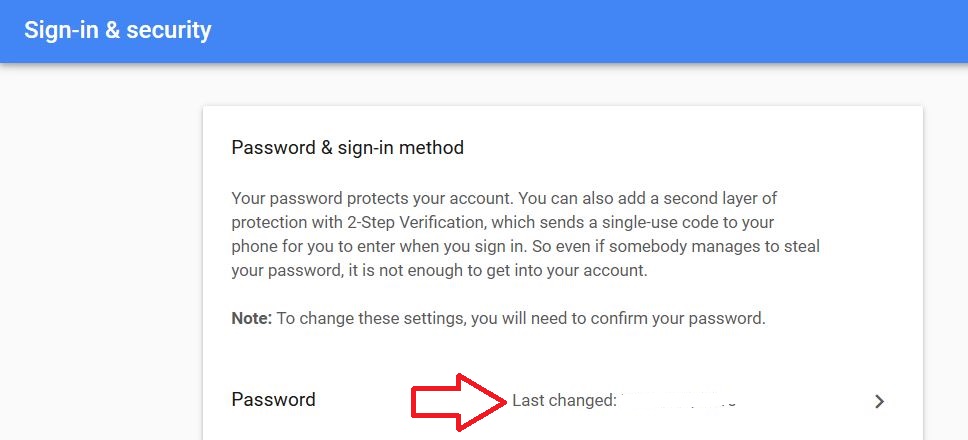
If you use gmail email here are the steps to take to change your email password.
Open your Internet browser then go to this website - https://www.google.com
Then click on the word gmail in the top right. If you are not signed in the you will be prompted to type in your email address then your current password.
When the email loads click on the letter in the top right corner (my name is Joe so the letter is a J). Then click on the blue My Account button.
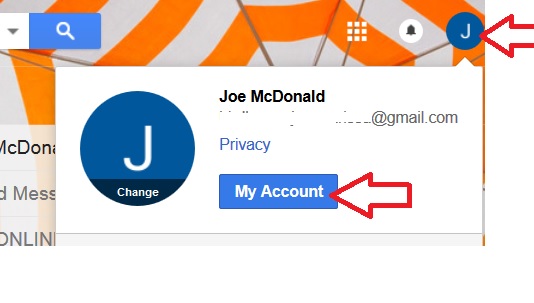
Then click on Signing in to Google link.

Type in your current password then click on Next

Then type in your new password twice. ![]() Click
on this icon to show your password as you type it into the windows. This will
change *** to type so you can see what you are typing.
Click
on this icon to show your password as you type it into the windows. This will
change *** to type so you can see what you are typing.
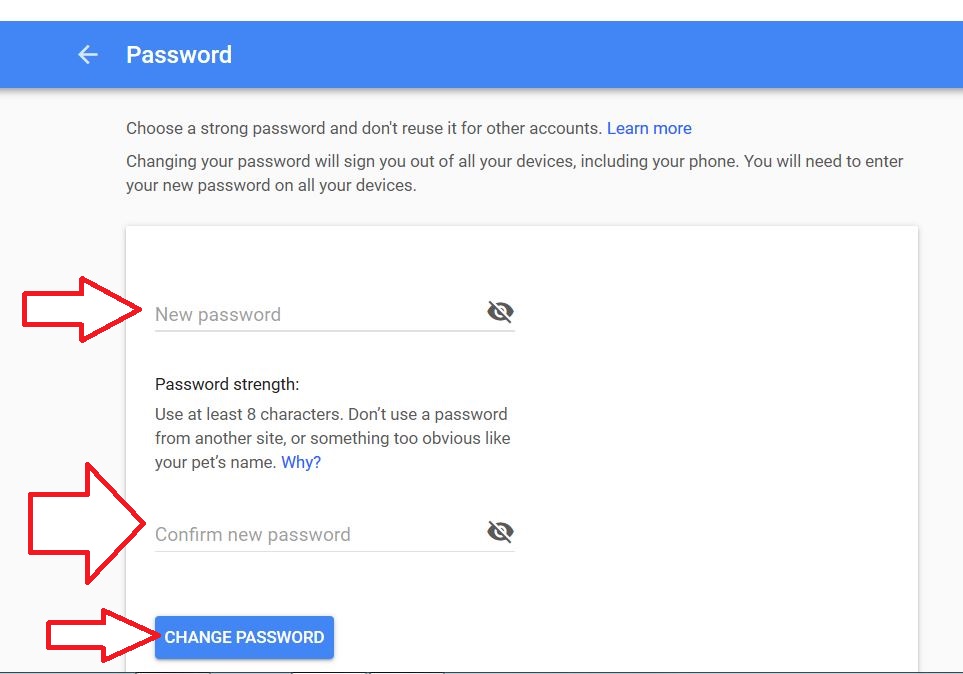
Make sure you write down your new password into your password book. You may be prompted to sign in on your computer, smart phone & tablet after you change your gmail password.
Click here to return to top.
If your email address ends in @cfl.rr.com then you are using Spectrum email. In the Fall of 2019 all of my @cfl.rr.com were slammed with spam. I have noticed the same exact emails showing up on my clients computers, tablets & smarts throughout Lake County, Fl. Its clear now that Spectrum is a victim of a huge spam attack.

The following steps have helped me to trim back on the level of spam arriving on my devices by blocking it on the Spectrum webmail email server.
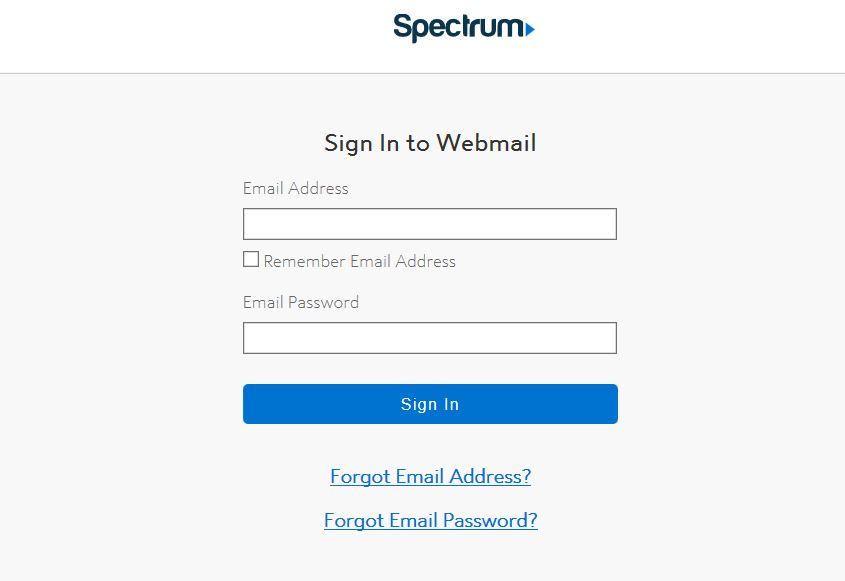
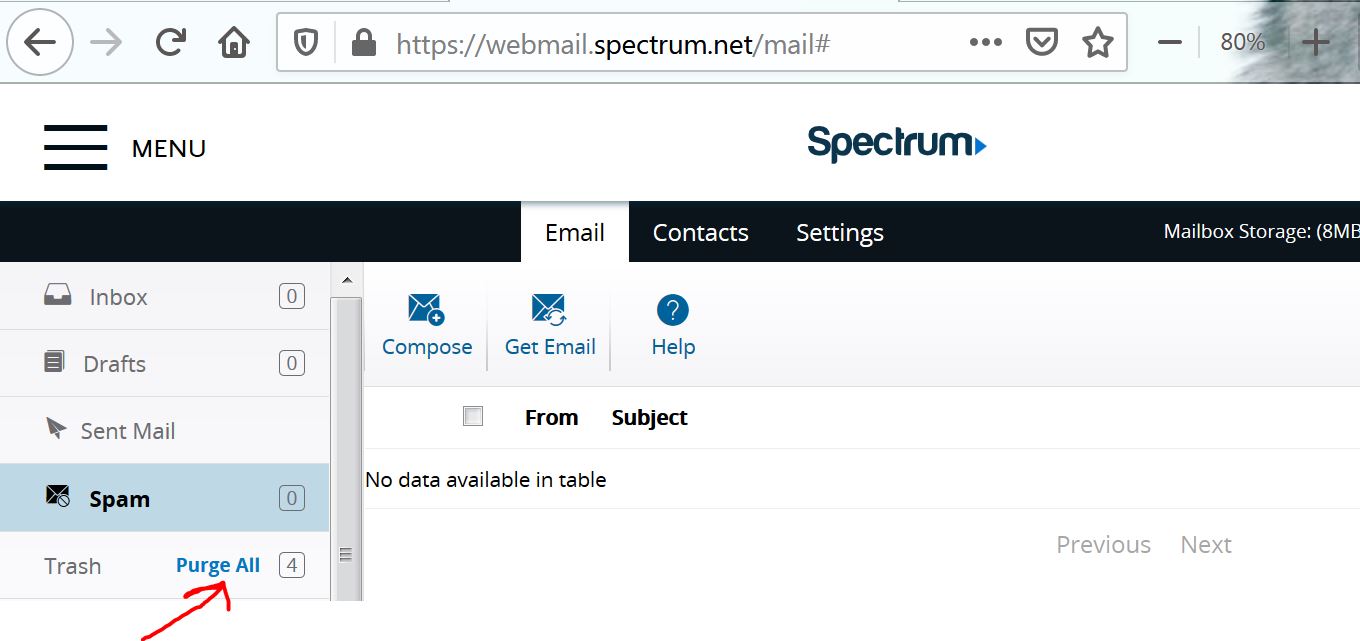
Step 1 - go to this website (https://webmail.spectrum.net) & sign in with your email address & email password.
Step 2 - Put a check in the box for every email that you do not want in your inbox. Do this in small groups, 10 at a time.
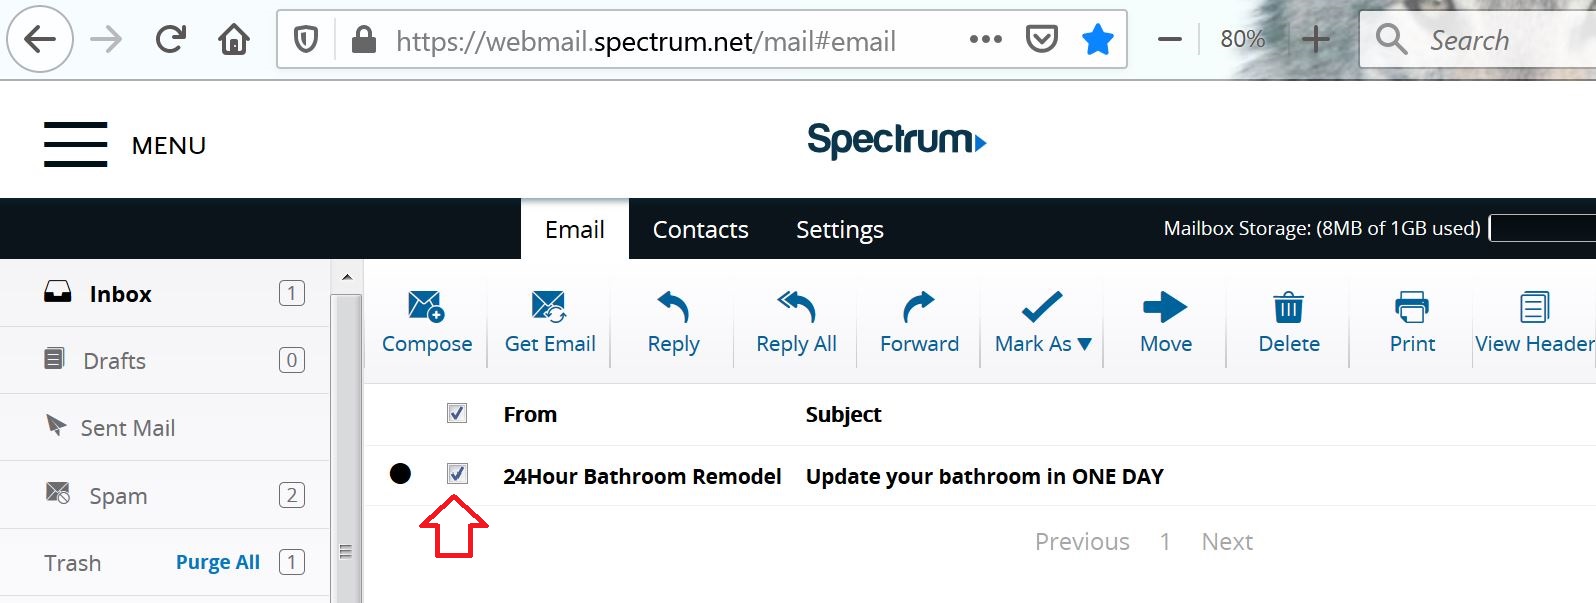
Step 3 - After you selected 10 emails, click on the Mark as button then click on Block sender from the menu.
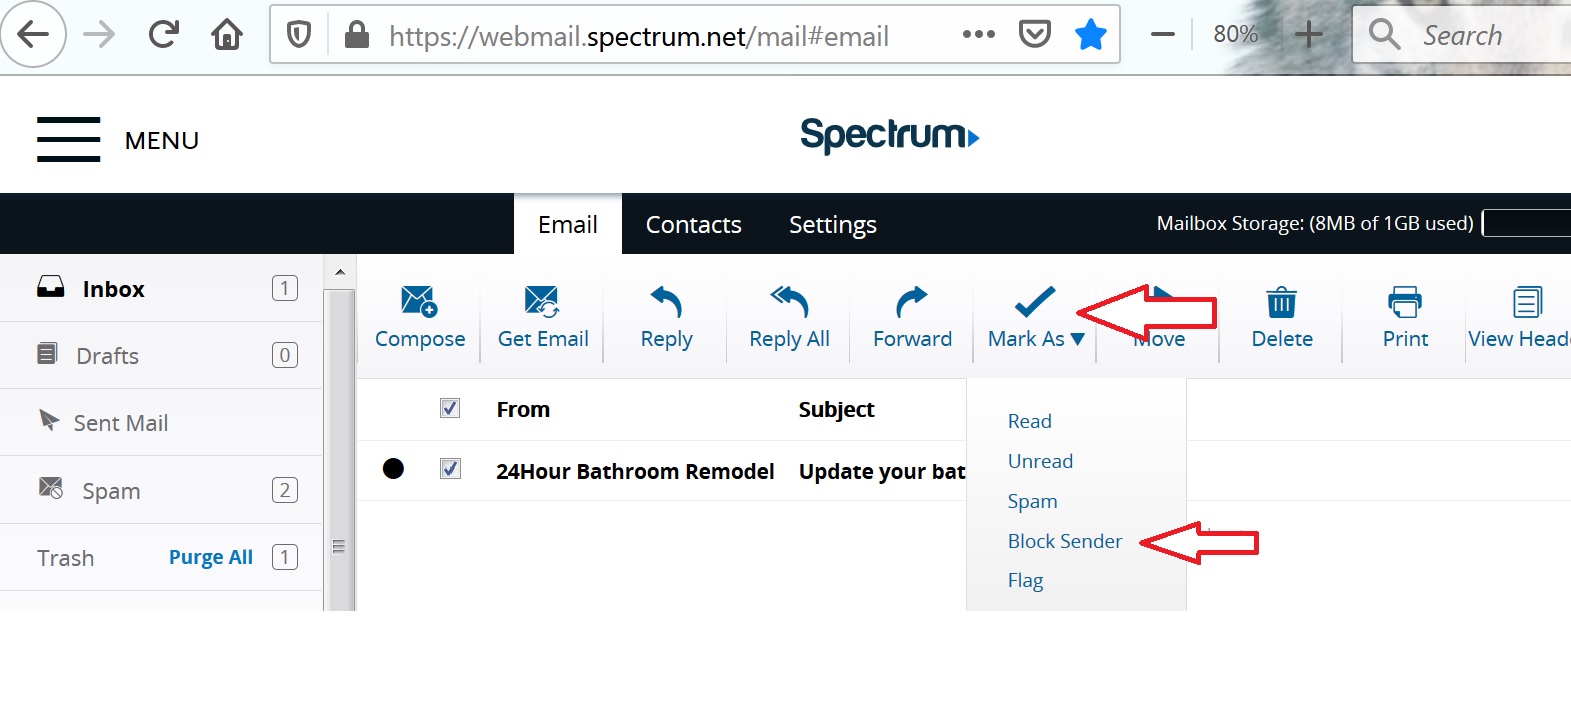
Step 4 - Click on the blue Block button. You will then get a message at the top of the window that the emails were added to the block list.

Step 5 - While you 10 emails are still selected (check mark in the box) click on the Mark as button again then click on the Spam text in the menu.
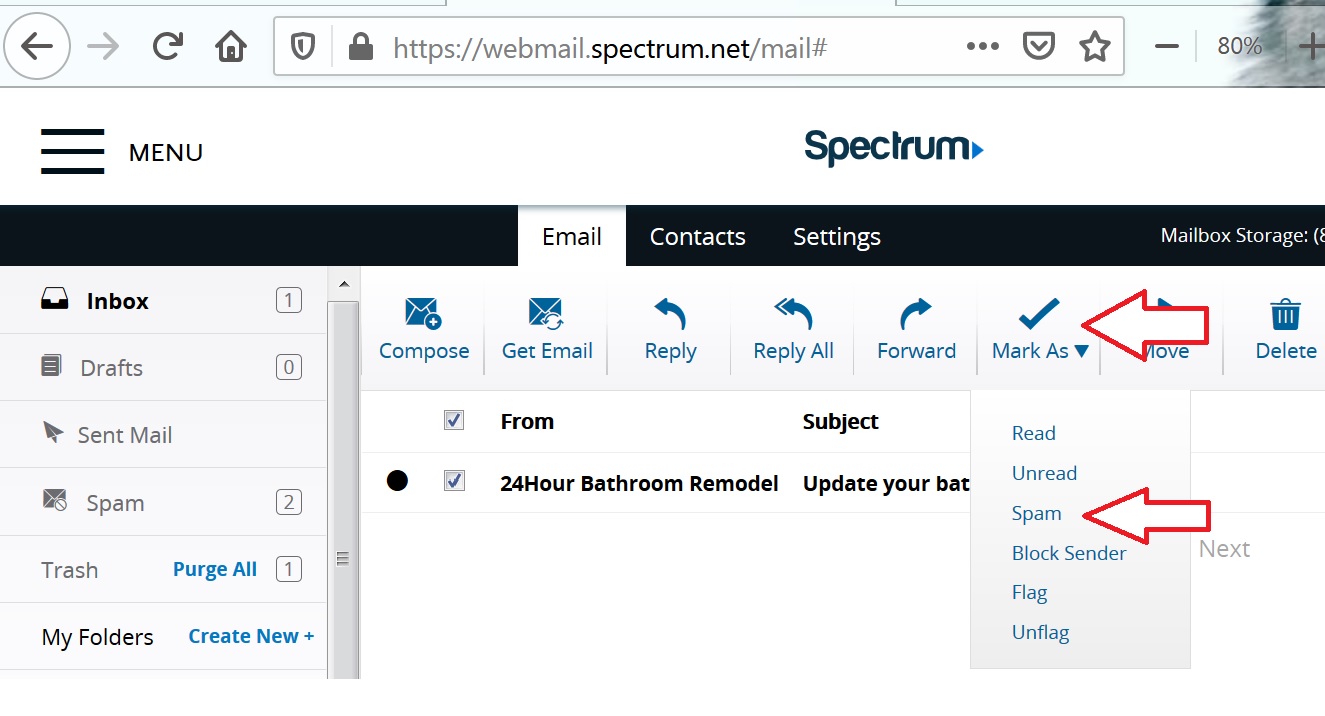
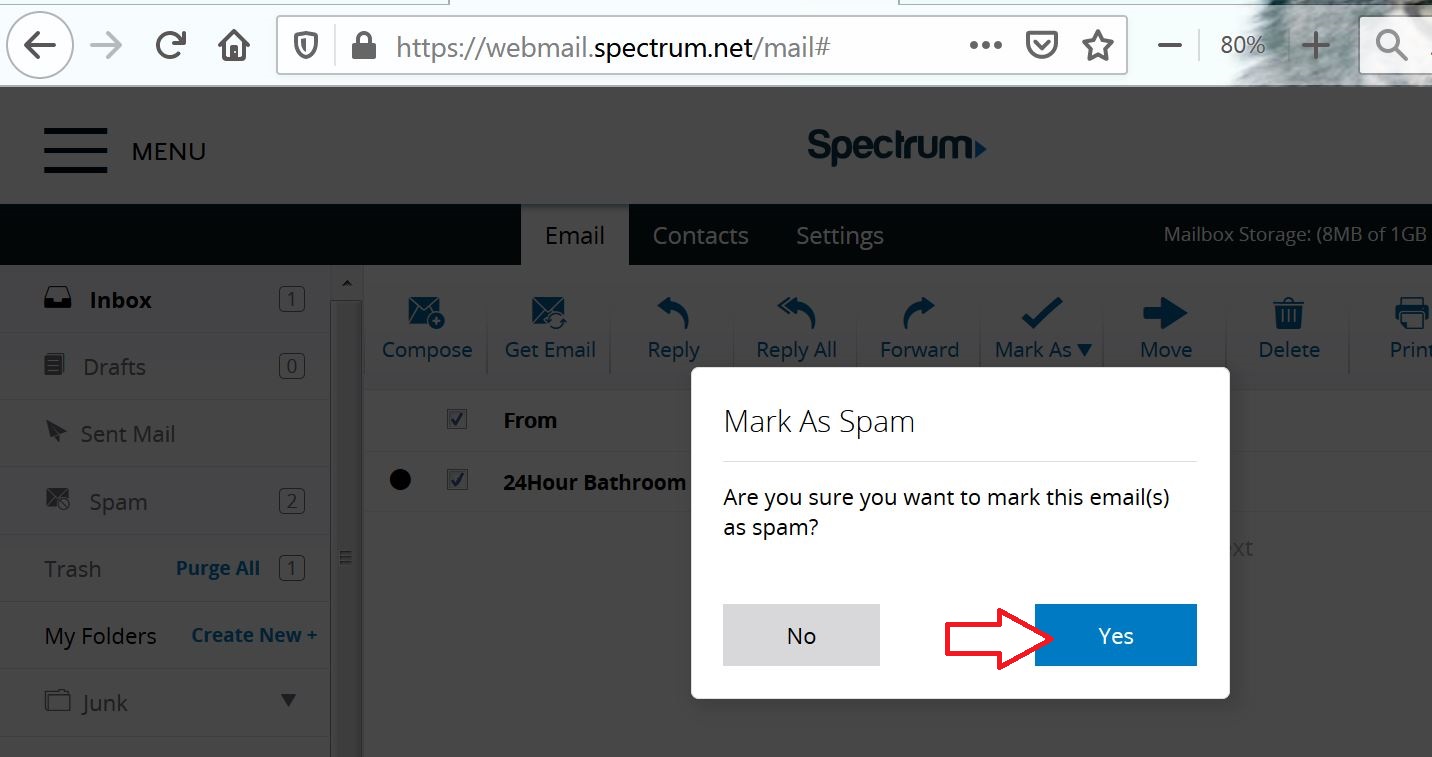
Step 6 - Then click on the Blue Yes button to mark these emails as spam. Then these emails will be moved to your Spam folder.
Step 7 - Then click on your Spam folder on the left side of the window. Put a check in the top box which will then put a check in all the boxes in the spam folder. Then click on the Delete button at the top.
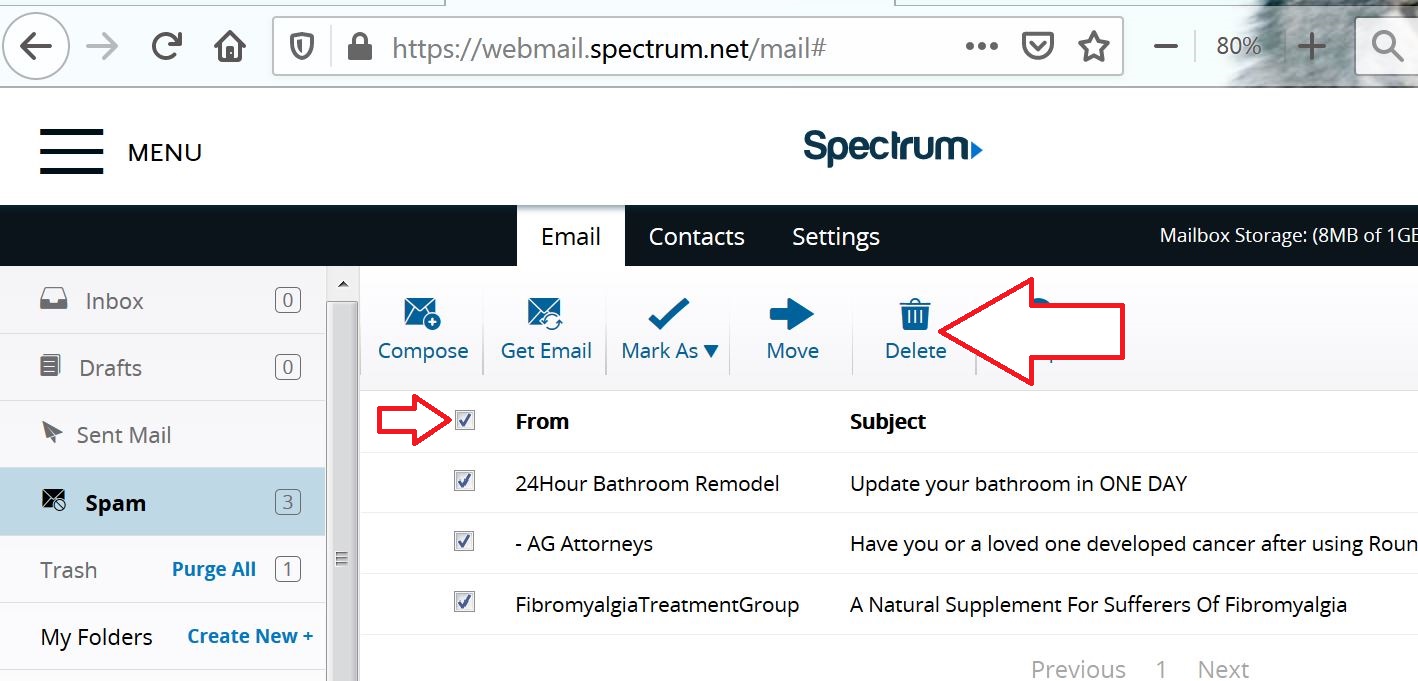
Final step - Click on the Purge All button which will delete these emails off the Spectrum email server. These steps will then sync with your computers, tablets & smart phones & the bad guys emails will be history.
If the above steps are too much, another option is to stop using your Spectrum email & switch to another email provider (gmail, aol, yahoo, etc.)
Click here to return to top.
You can record audio from Youtube website then save as MP3 file. Then you can burn the music to a CD disk (see below). Here are the steps.
Step 1 - you will need a free recording program called Audacity. The software is available for both Windows & Apple Mac Computers. Click here to download the program & install it on your computer.

Step 2 - Click on View then click on Toolbars then click on Device Toolbar
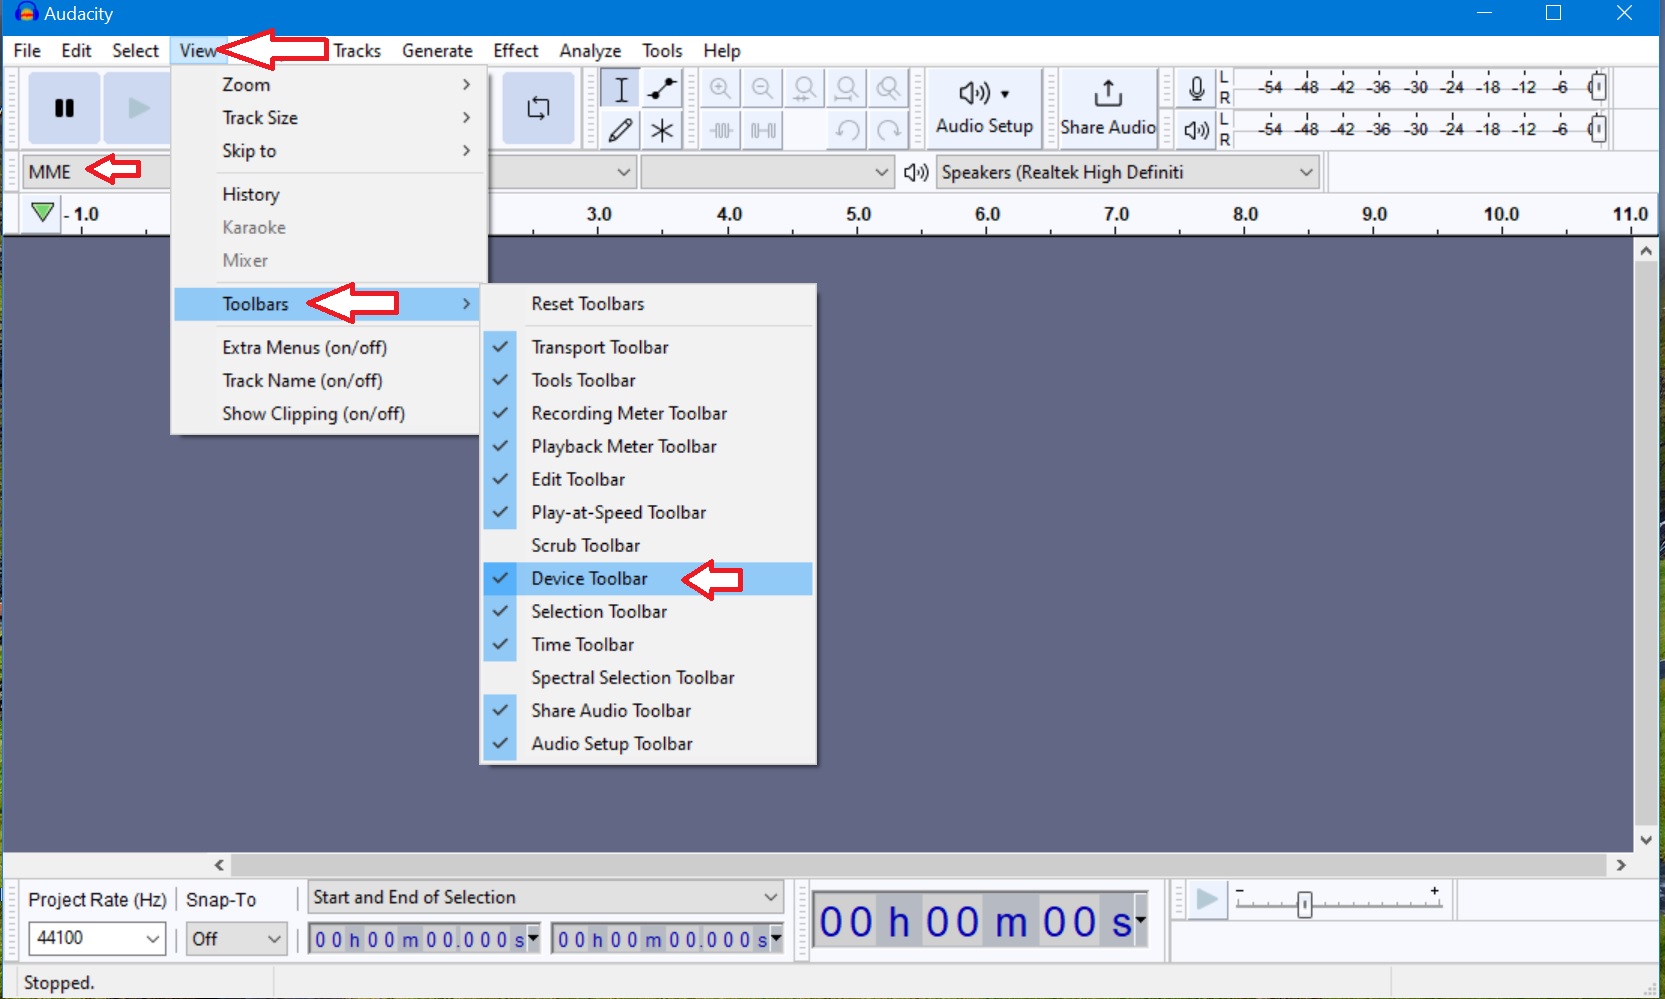
Step 3 - Open the program & make one import change (see next step).
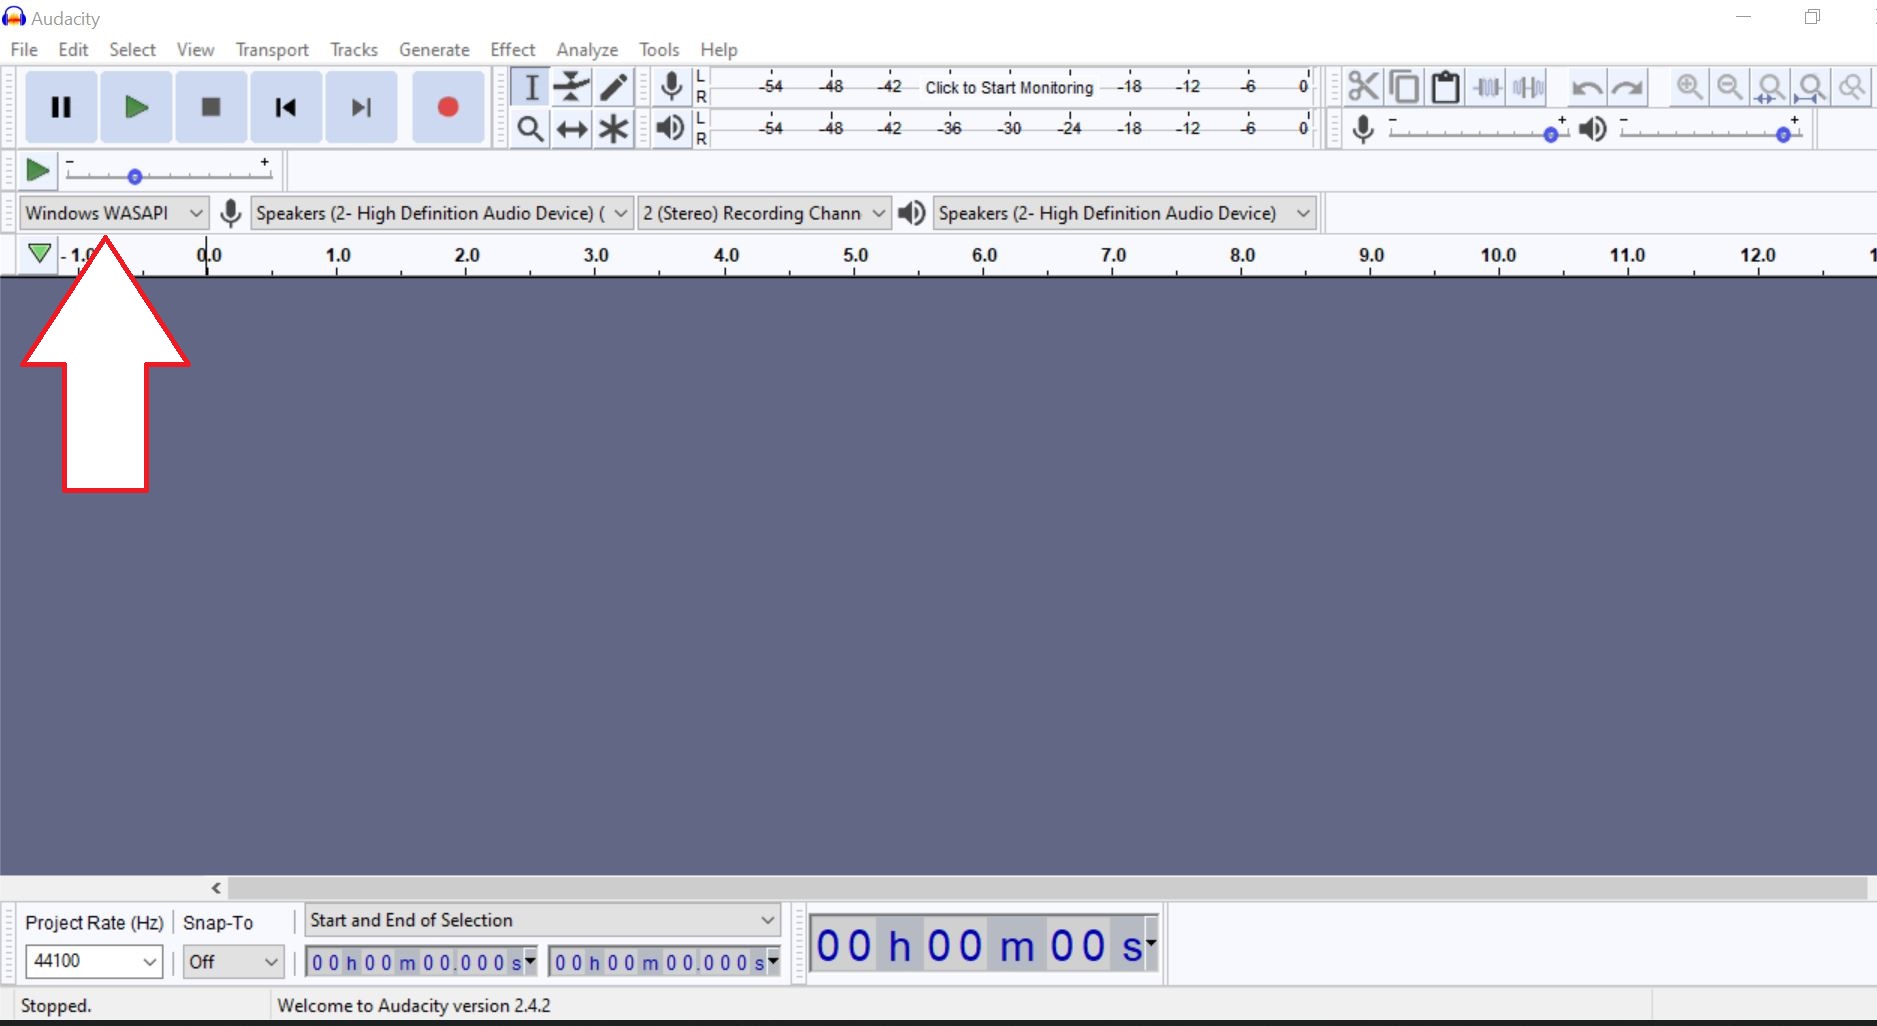
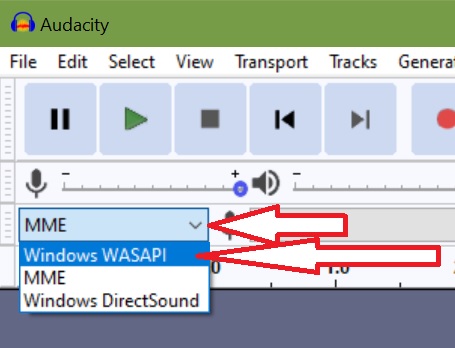
Step 4 - Click on MME & change to Windows WASAPI setting. Any other setting will not work for this process.
Step 5 - Open your Internet browser & go to the Youtube website - Click here.
Search for a song that you would like to record. I found the Theme for the old TV show Wild Kingdom which I am using for this demonstration. If the song starts playing pause it then drag the scroll bar at bottom back to the beginning of the video.
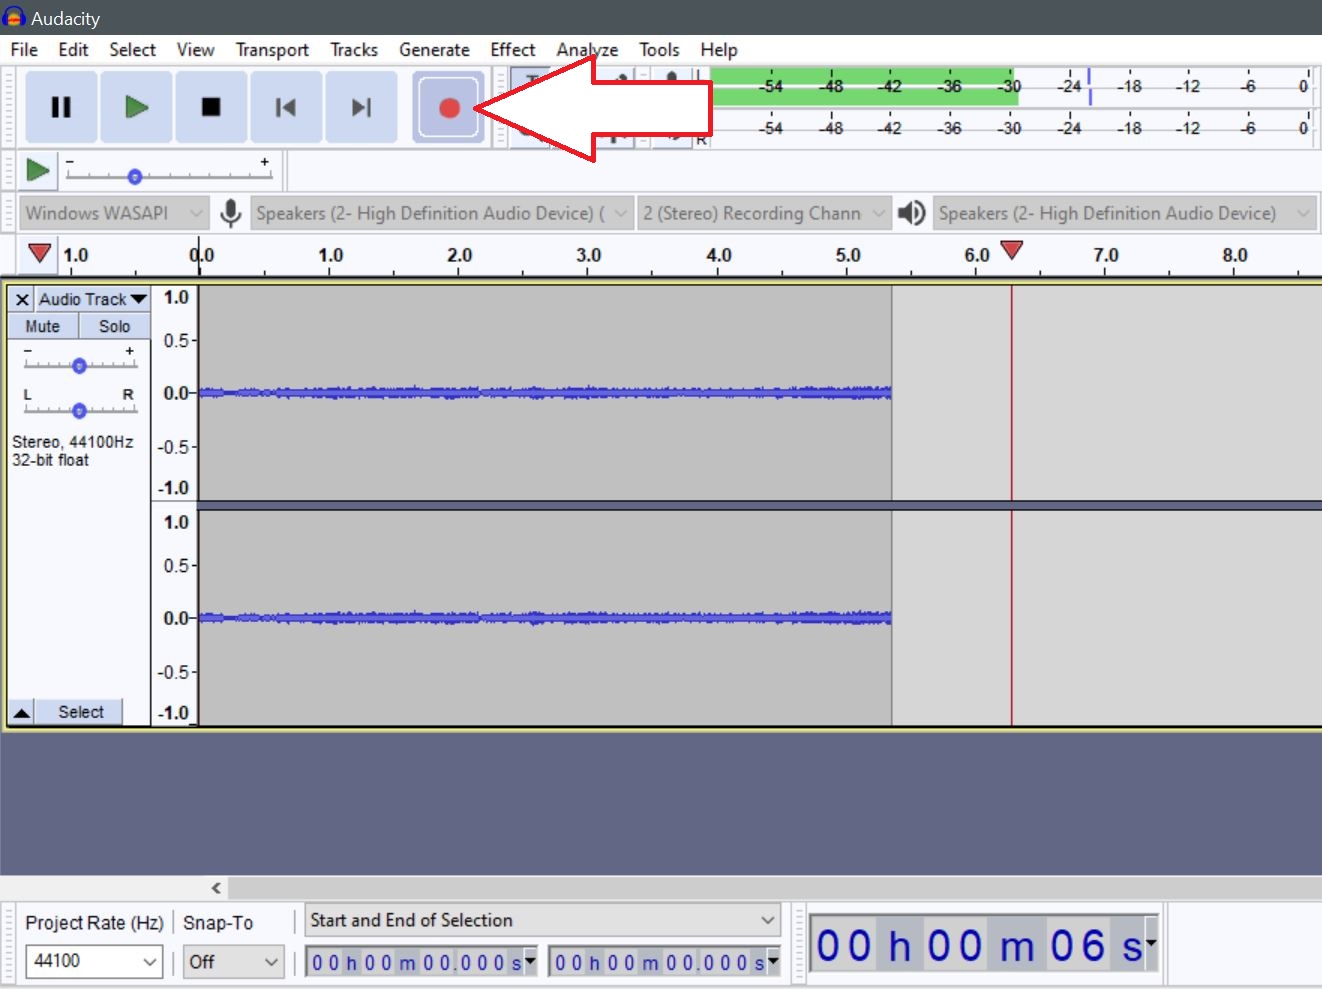
Step 6 - Click on Record button on Audacity then quickly click on Play button on Youtube video.
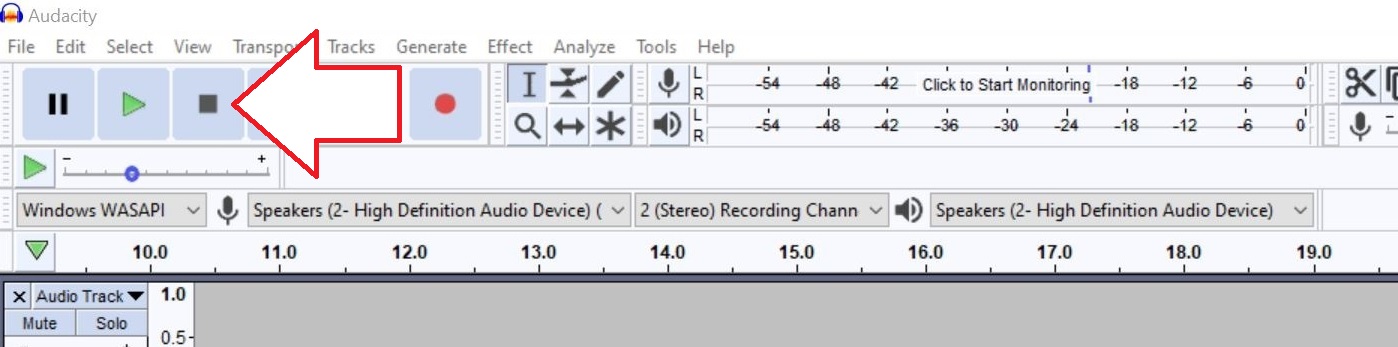
Step 7 - Listen for the end of the song & just before it ends click on the Stop recording button in Audacity.
Step 8 - Now you are ready to create a MP3 music file. Click on the File menu then click on Export then click on Export as MP3.

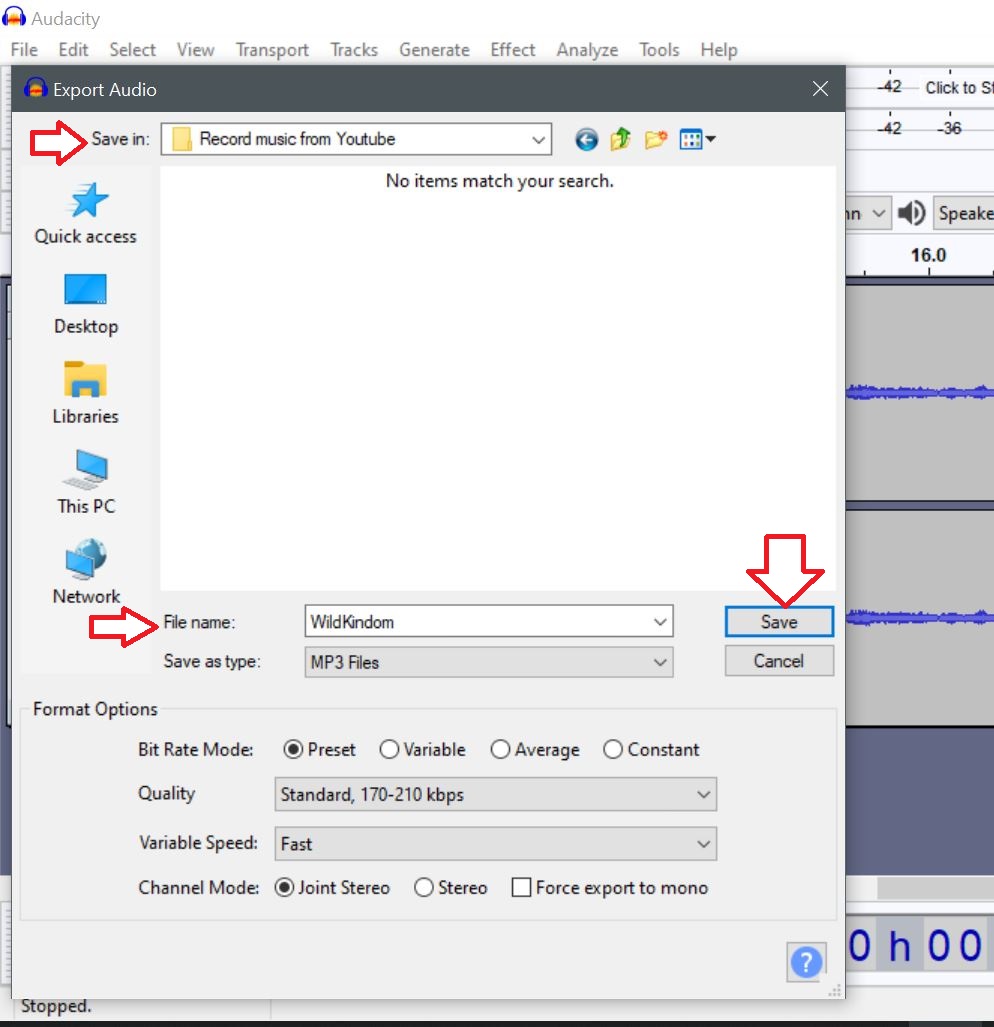
Step 9 - In the Export Audio window click on the place on your computer where you want to save your Song to. I recommend a folder on your Desktop. Then Type in the Name of your Song. Then click on the Save button. Do not change any other settings in this window!
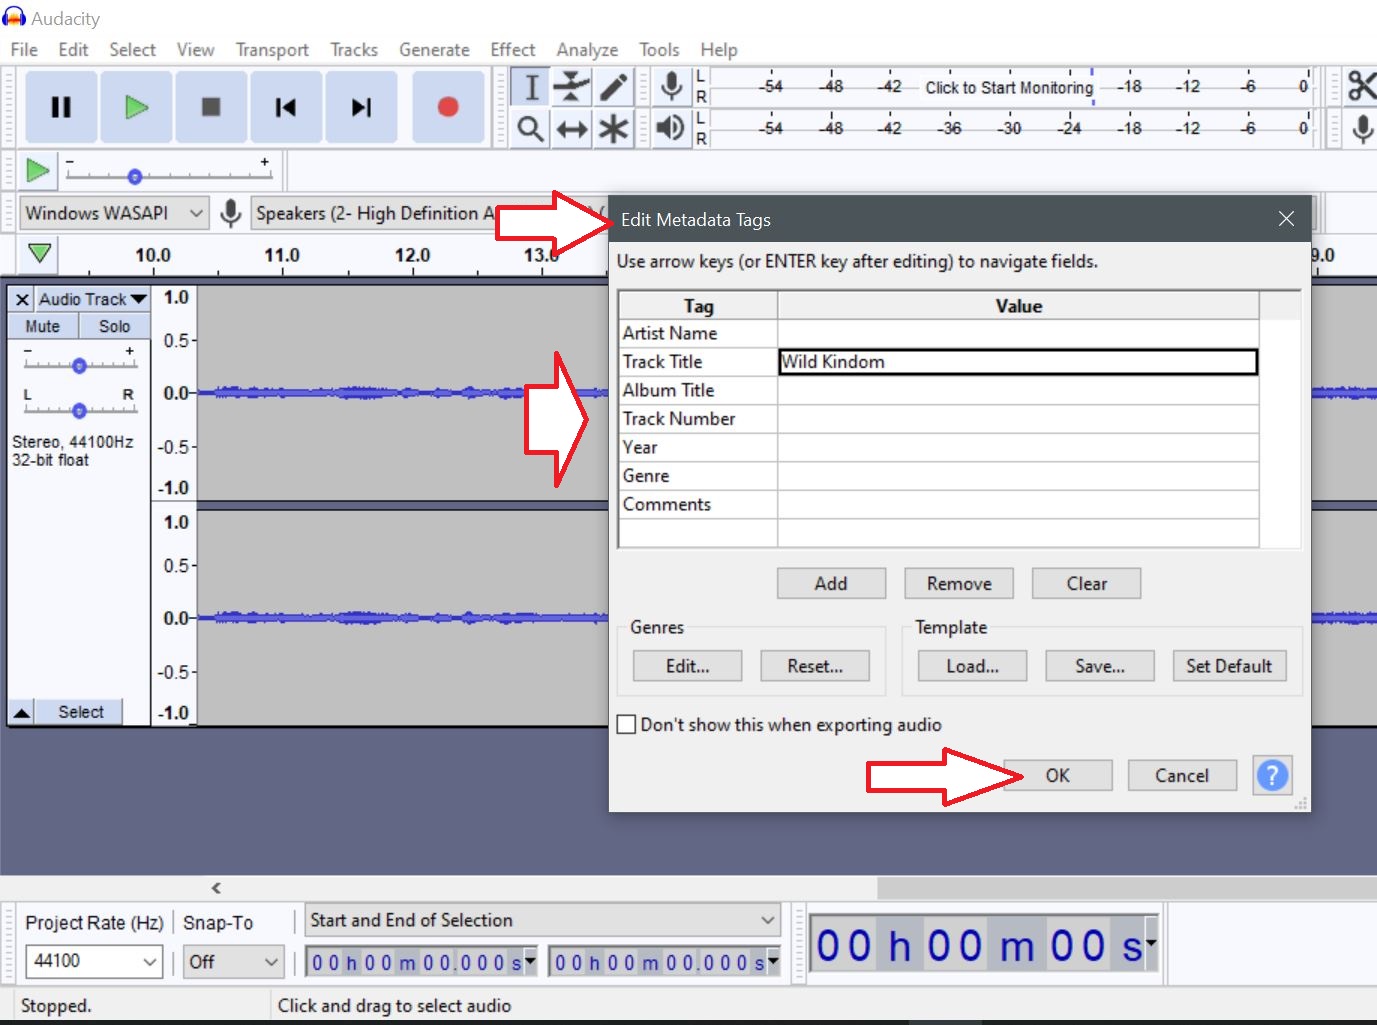
Step 10 - In the Edit Metatags window type in as much information as you would like. These details will show up when you look at the Properties on your song.
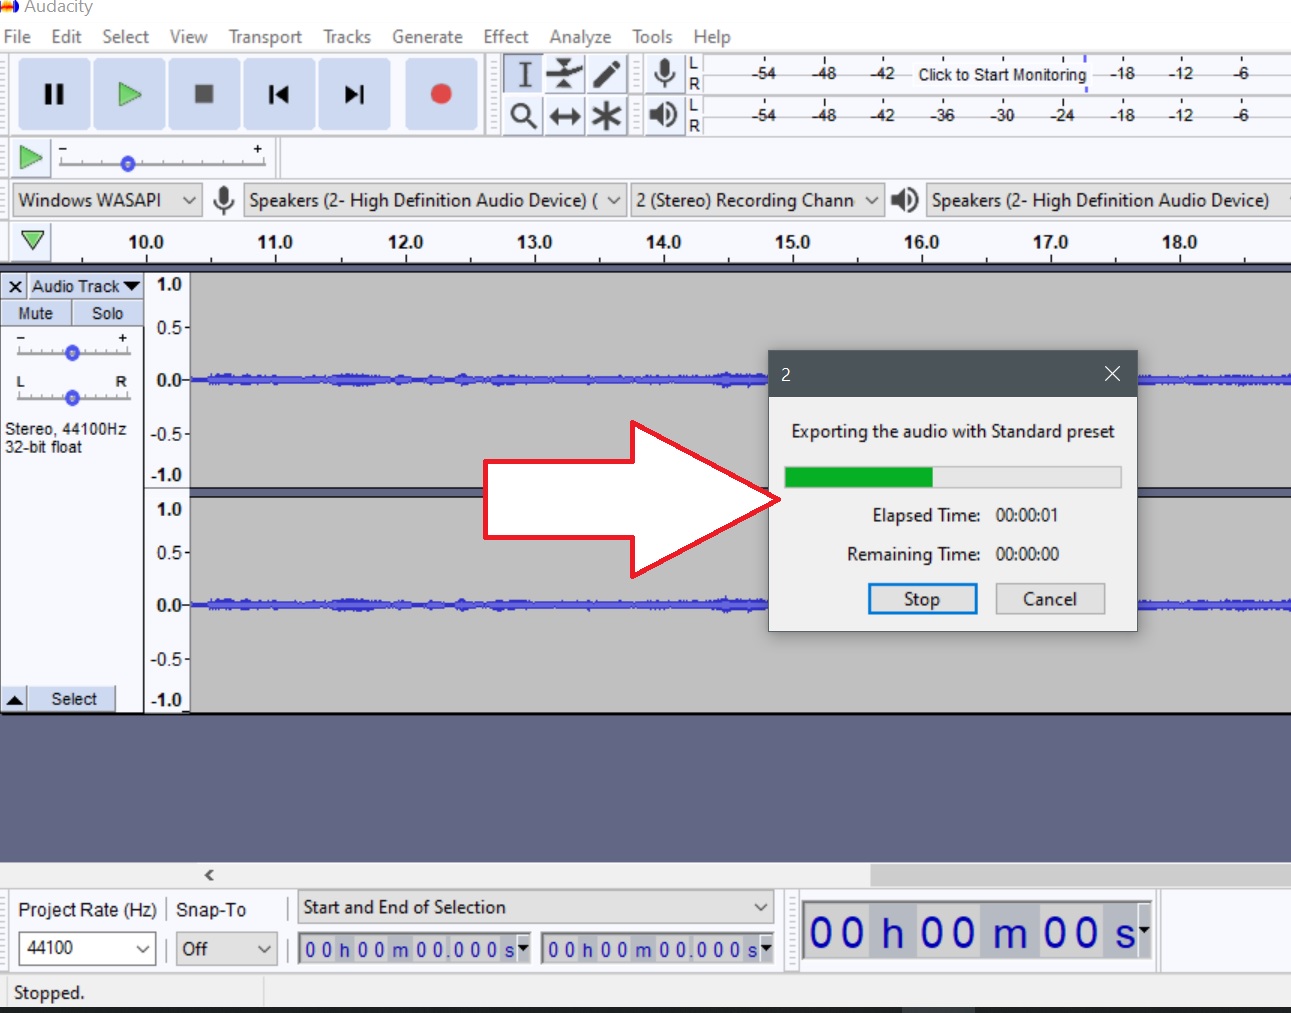
Step 11 - You will see a quick window appear that includes a run bar of the Exporting/Creating your MP3 file. Its its a long recording the window will stay open longer. When the file is done the window will disappear. Then you are done.
To record additional songs just repeat these steps for each song. Click here for steps to burn your songs to a CD disk.
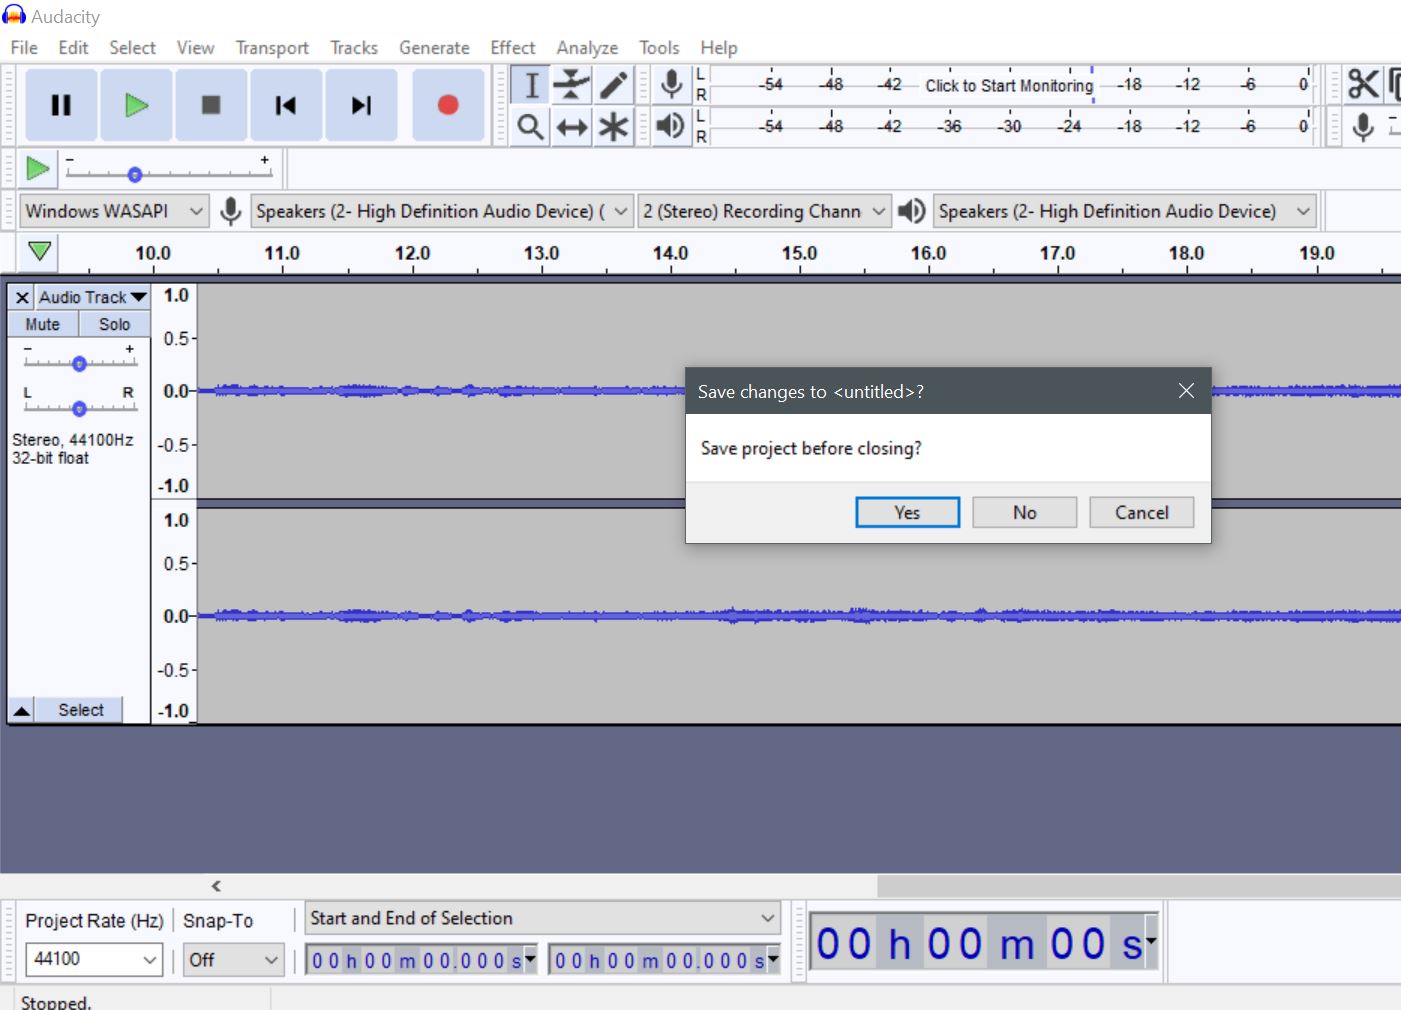
Step 12 - Save or discard - When you are done & close Audacity you will see this window appear. You do not have to save the project. This is for people who make lots of changes to the settings during their recordings. Since we do not make any changes then we do not need to Save, just click on the No button & the program will close.
Click here to return to top.
 Click
here to download this free program to burn
music to CD disks on a PC computer.
Click
here to download this free program to burn
music to CD disks on a PC computer.
It comes with a 30 day trial for the bells & whistles of the program, then it reverts to the start window with options to Buy or use Free version. You must create an account to use the program. Click on Quick Registration then type in your email address & create a password (make sure you write down your password). Then a verification email will be sent to your email address. Open your email & click on the link to verify your email address. Then open the program & sign in, click on Remember me box so you do not need to sign in every time you use the program.
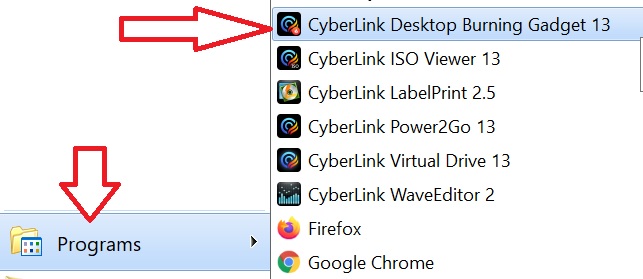
After its installed go to Programs on the Start menu then click on Cyberlink Desktop Burning Gadget 13
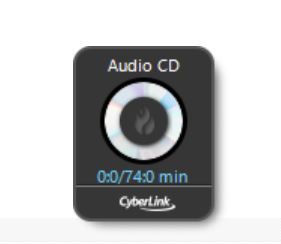
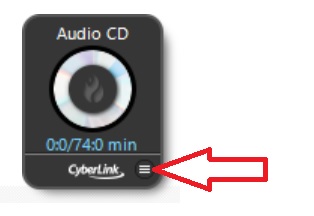
The small program will open, click on the right arrow until Audio CD appears. Then click on the 3 lines in the bottom right corner of the program then a new window will appear.
Then drag the songs you want to burn to disk into the Power2Go window. Watch the bar on the bottom so you do not put more songs then can fit on a disk. Stop at 60 minutes, 70 minutes is max. When you are ready click on the Burn disk button.
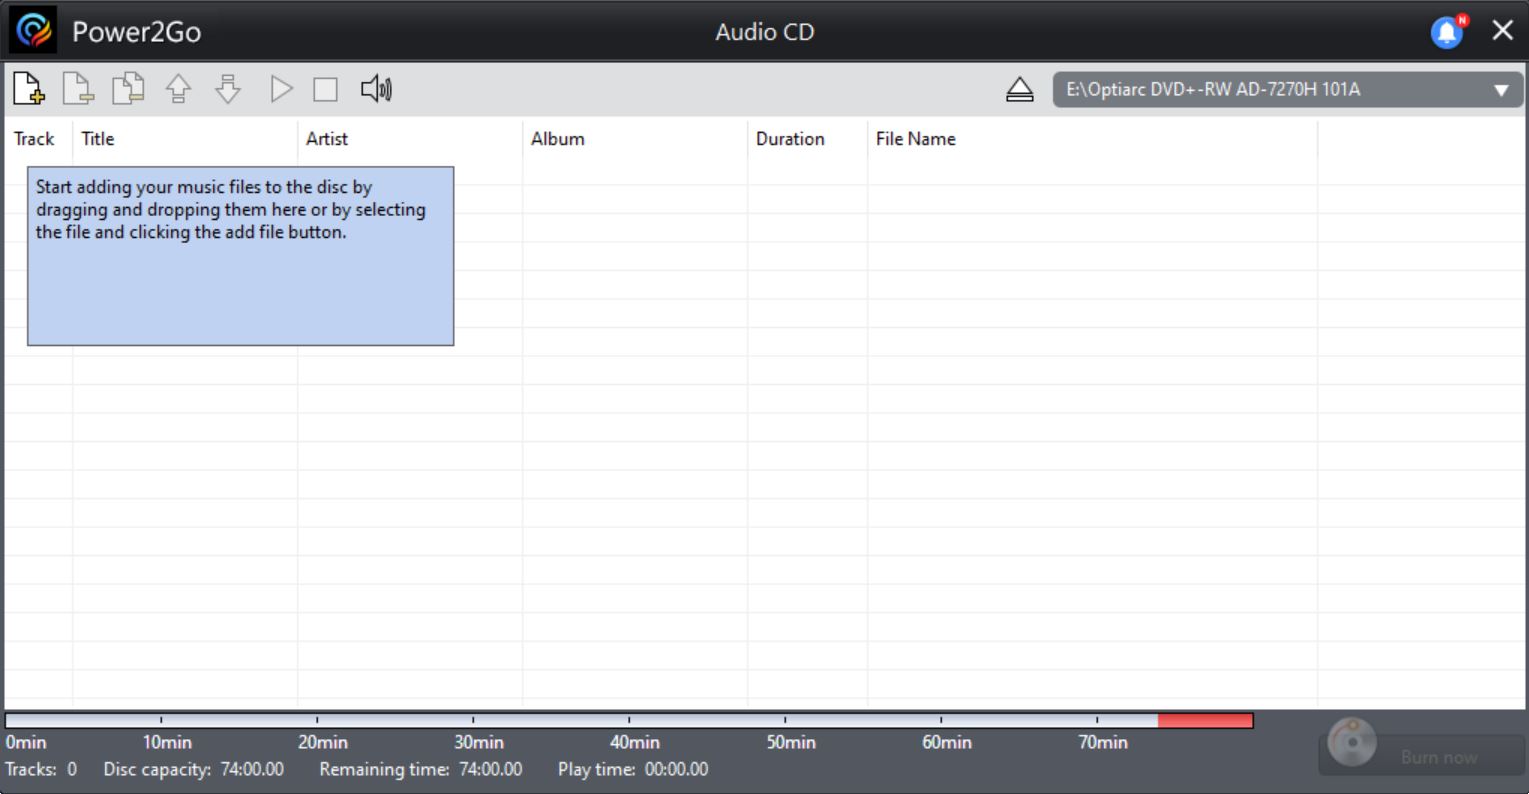
When the disk is done the CD tray on your computer will open.
Click here to return
How to reset the Google Chrome Internet browser
Sometimes Internet browsers do not behave & you must reset the browser to fix it. It might be full of ads & malware, the steps below will clean up the browser & return it to normal.
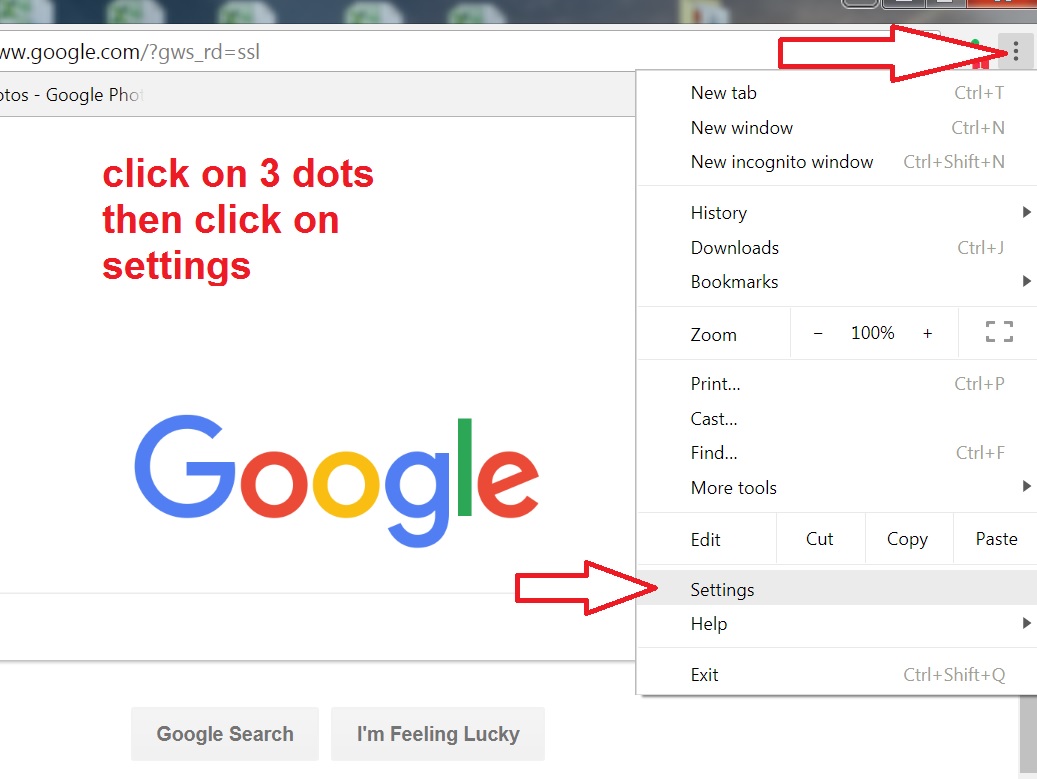
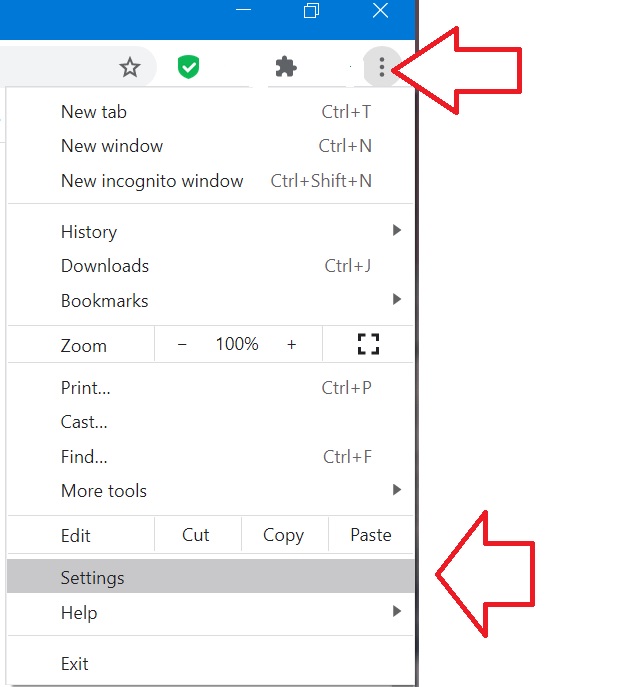
Step 1 - Open Google Chrome browser then click on the 3 dots in the top right corner then click on Settings on the menu that appears.
Step 2 - Scroll down to the bottom of the page then click on the word Advanced. This will show additional settings.
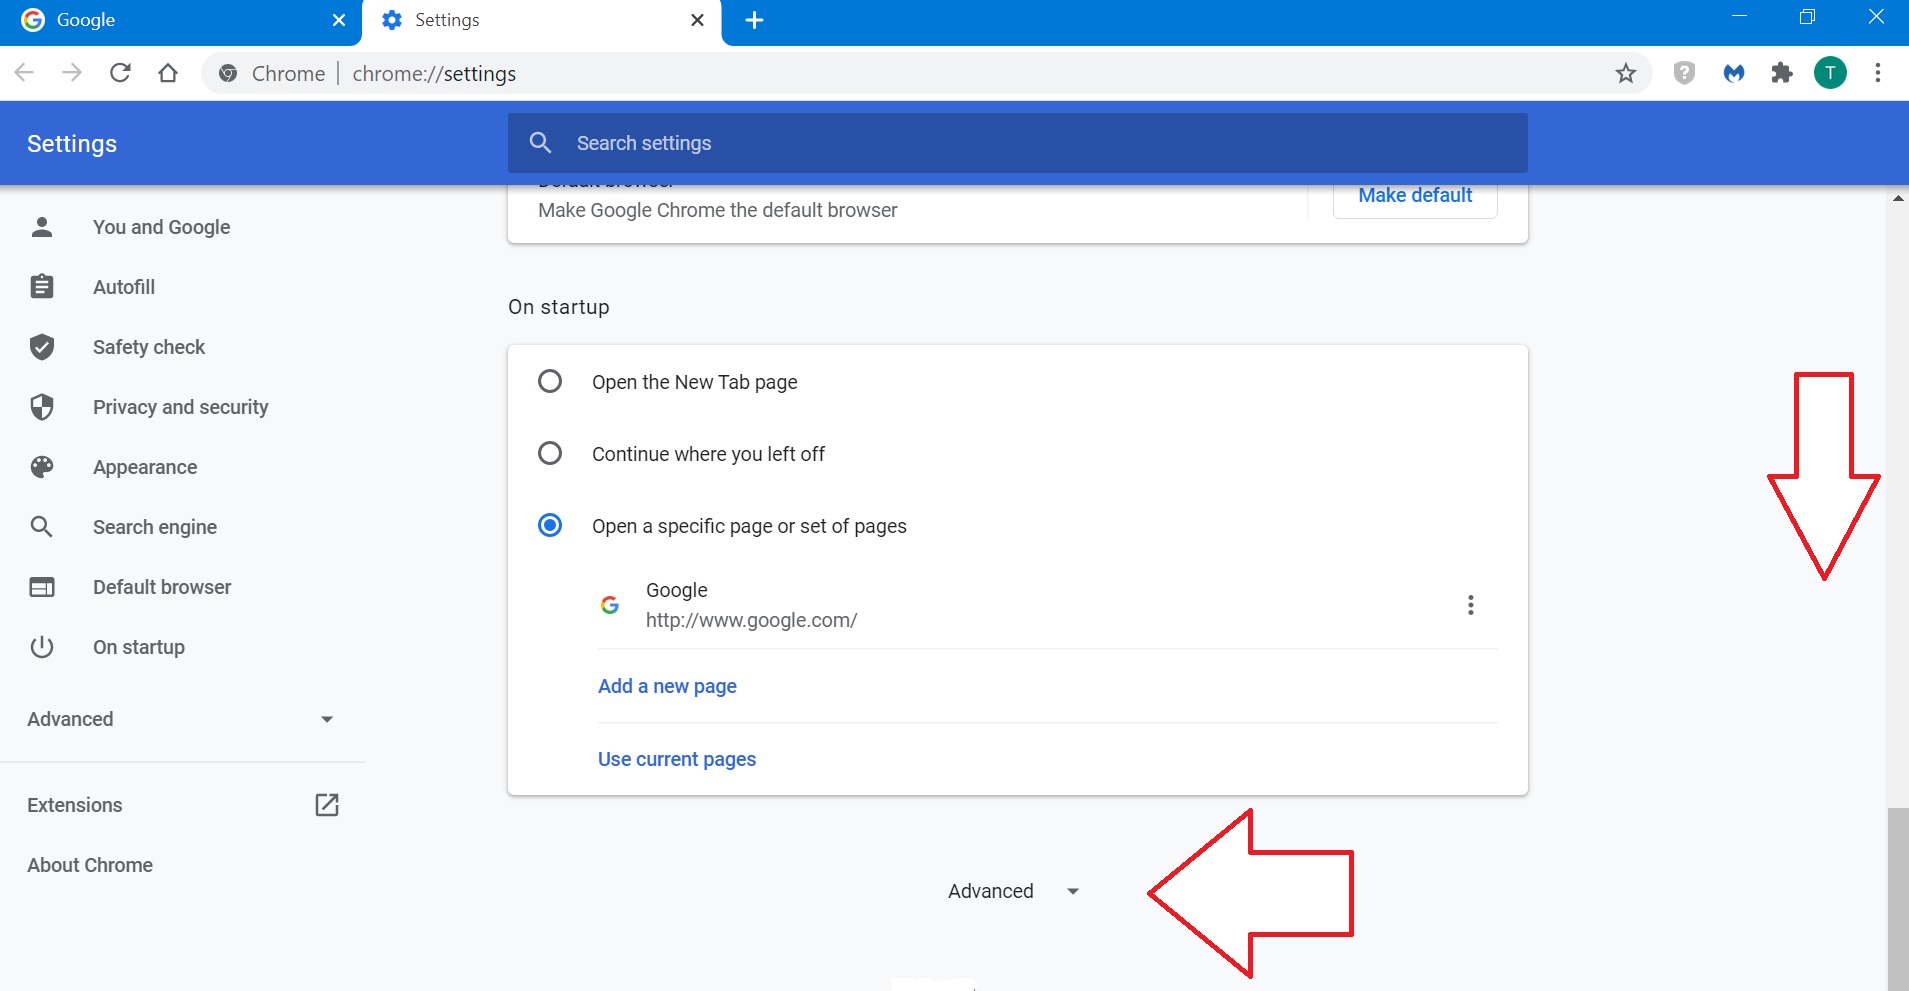
Step 3 - Scroll down again to the bottom of the screen then click on "Restore settings to their original defaults"
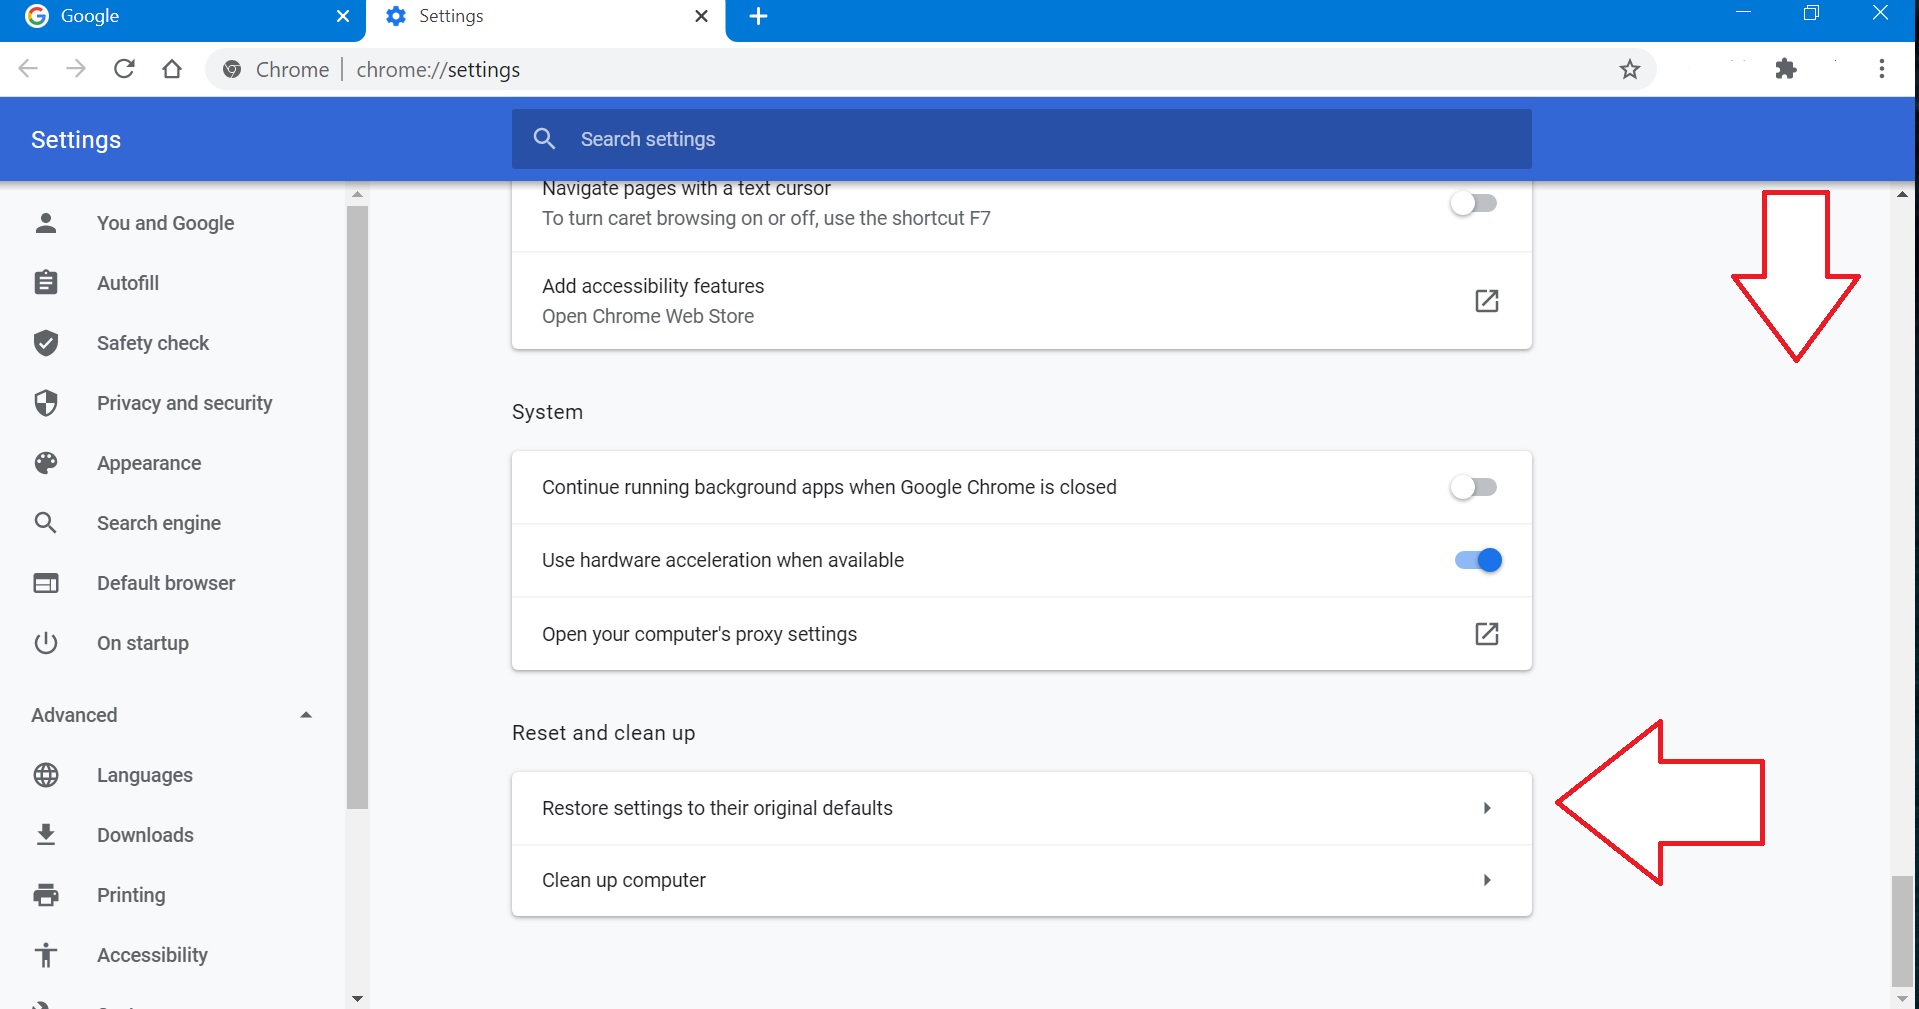
Step 4 - Un-check the box the "Help make GC better" (they just want to steal your browsing history). then click on the blue Reset settings button. It will take some time to reset the browser. When its done scroll back to the top or if the browser closes then click on 3 dots then Settings again (see next step).

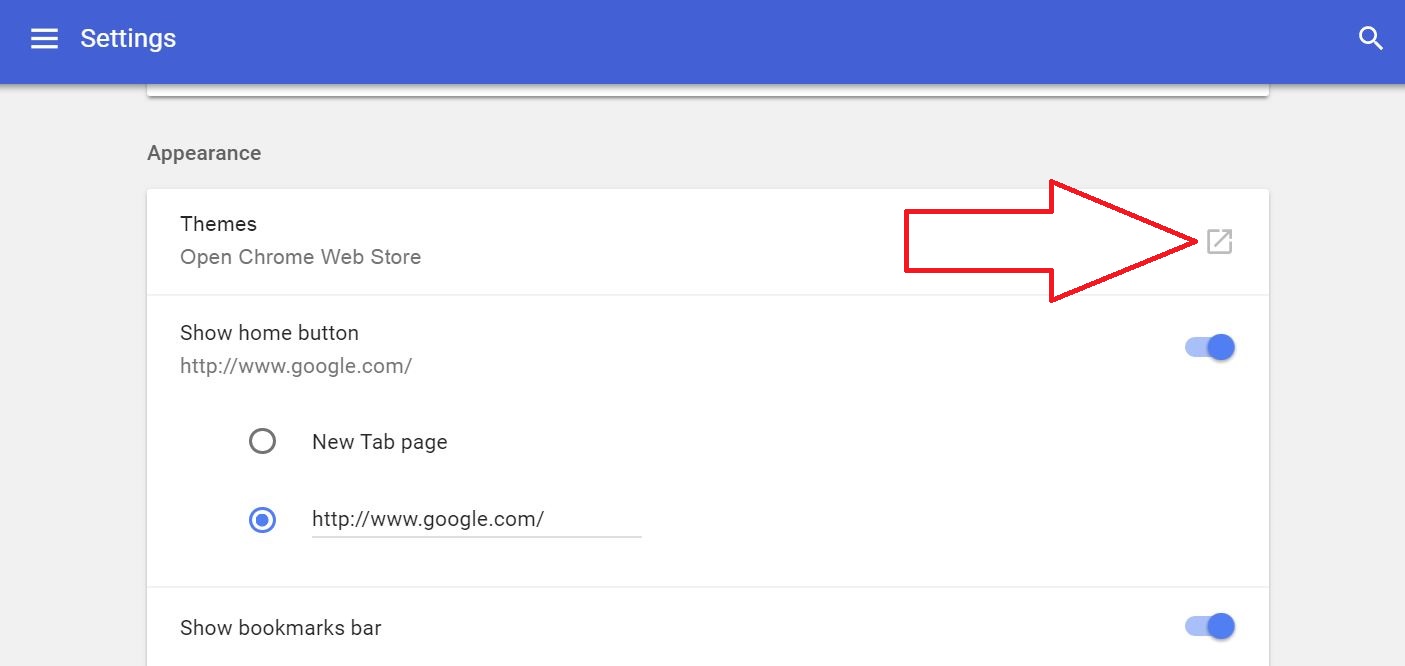
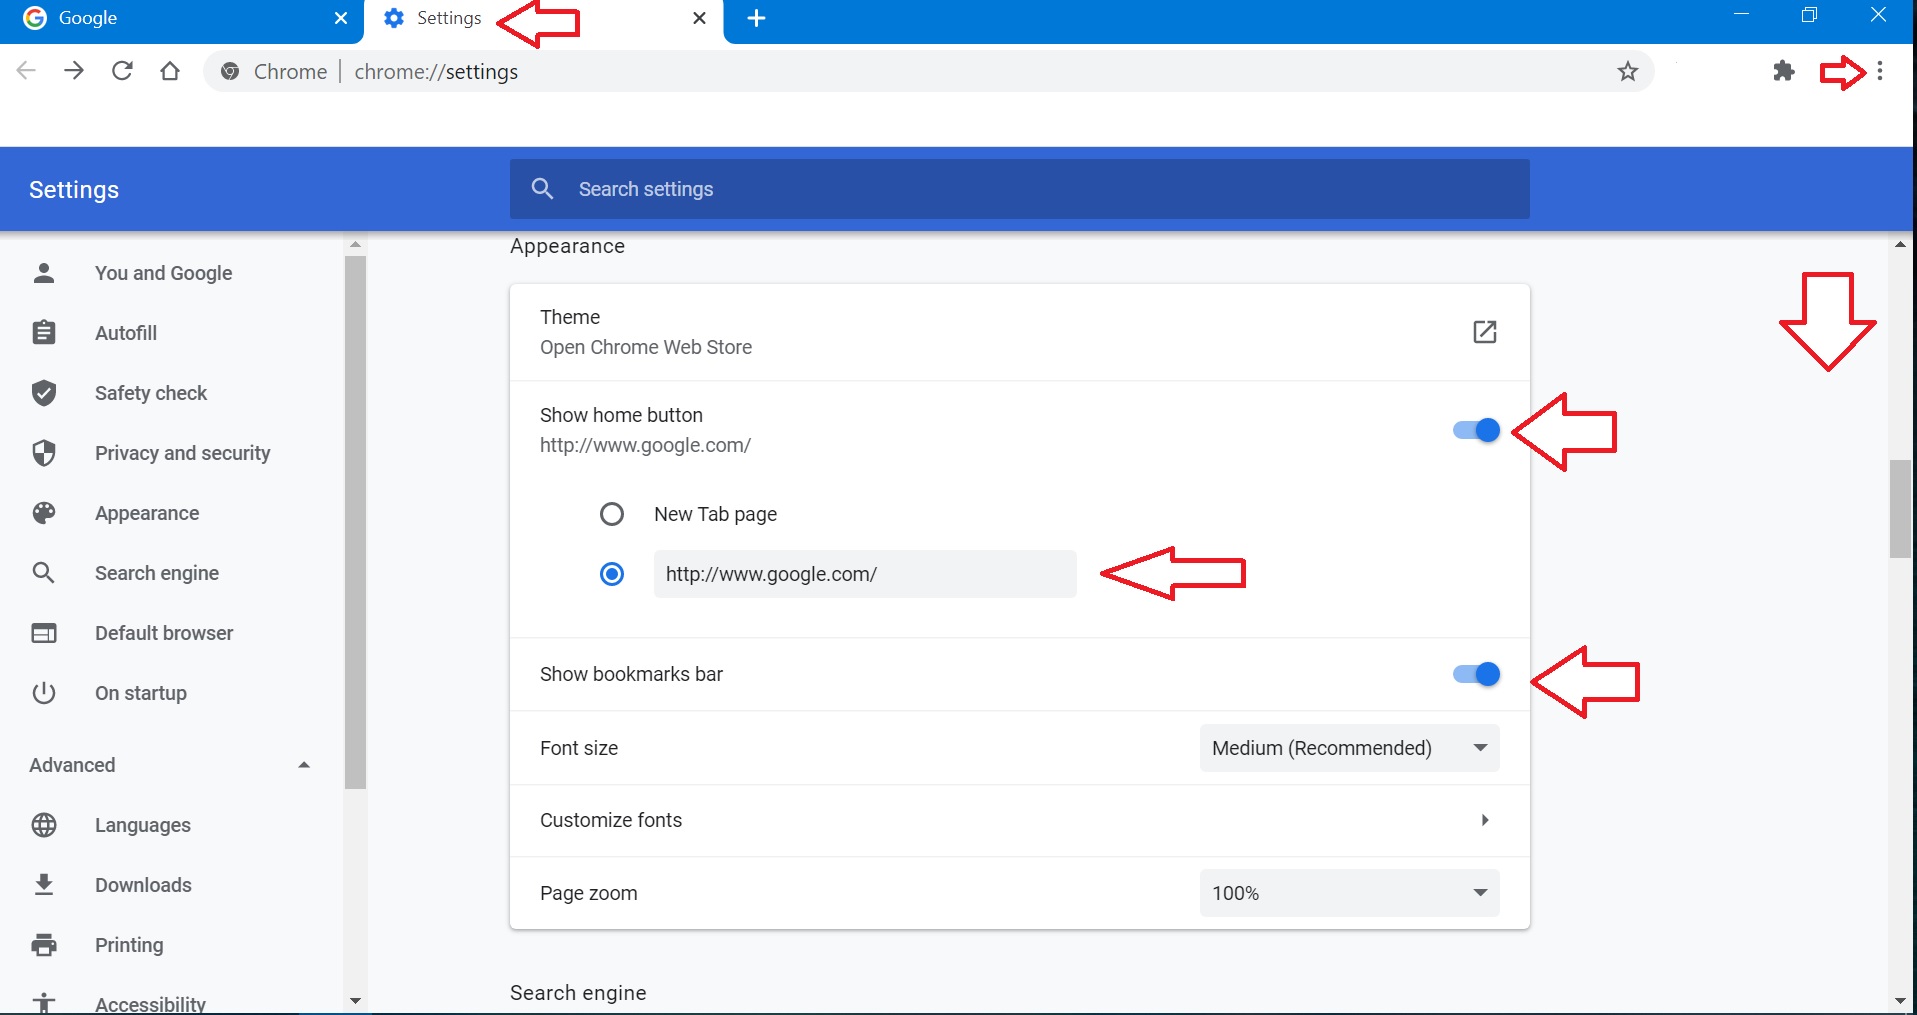
Step 5 - Turn on Show home button then type in the website that you use for your home page. If you are not sure what it was (aol.com, yahoo.com, msn.com) then type in google.com. Also turn on the Show bookmarks bar button.
Step 6 - Then scroll to bottom then click on "open a specific page or set of pages". Then click on Add new page (blue type) then type in your home page then click on Add button.
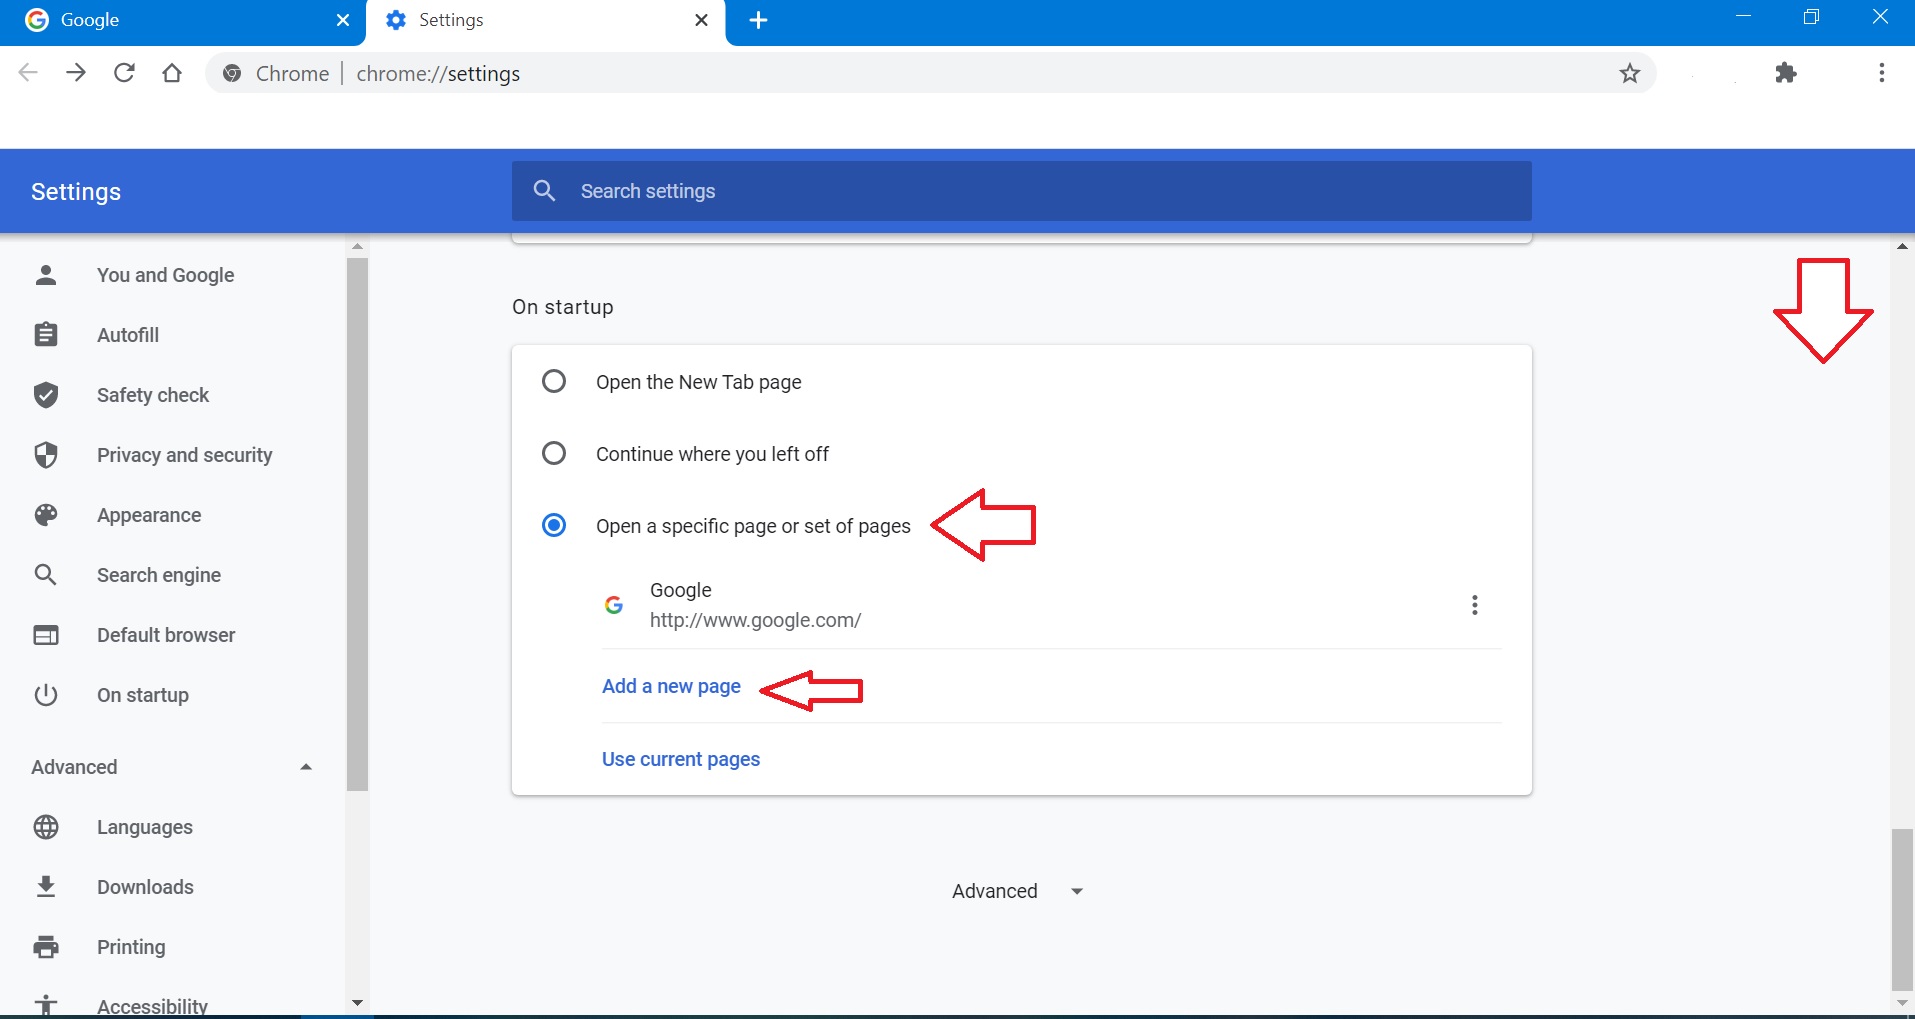
Then close Google Chrome & reopen it & you should be back to normal!
Click here to return to top.
Google Chrome Scaling - Tiny text
Sometimes as you type you accidentally trigger a change in your settings. If you tap on the alt key on your keyboard as you type you may trigger a change (IE: alt + k). A certain key combination may change the scaling (size) of type that prints out of the Google Chrome browser. Below are the steps to fix only this issue.
Step 1 - right-click a Google Chrome shortcut and click on Properties from the menu.
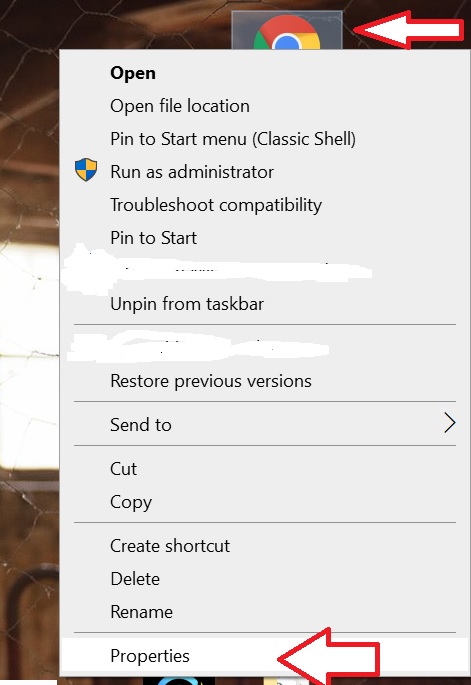
Step 2 - Click the Compatibility tab then click on Change high DPI settings
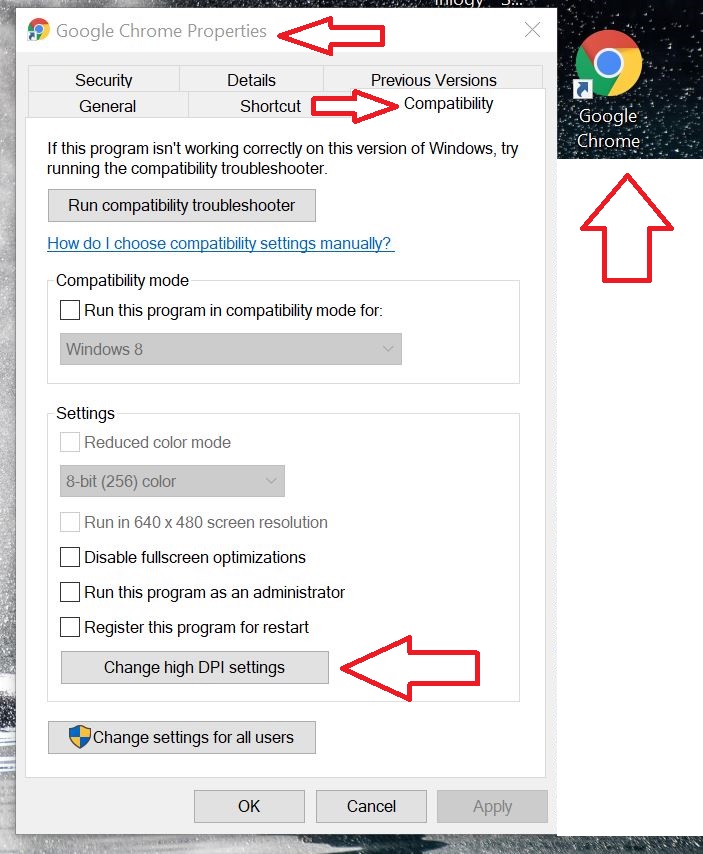
Step 3 - Put a check in the box to Override High DPI Scaling Behavior then click on OK. Then click on Apply button in the next window.
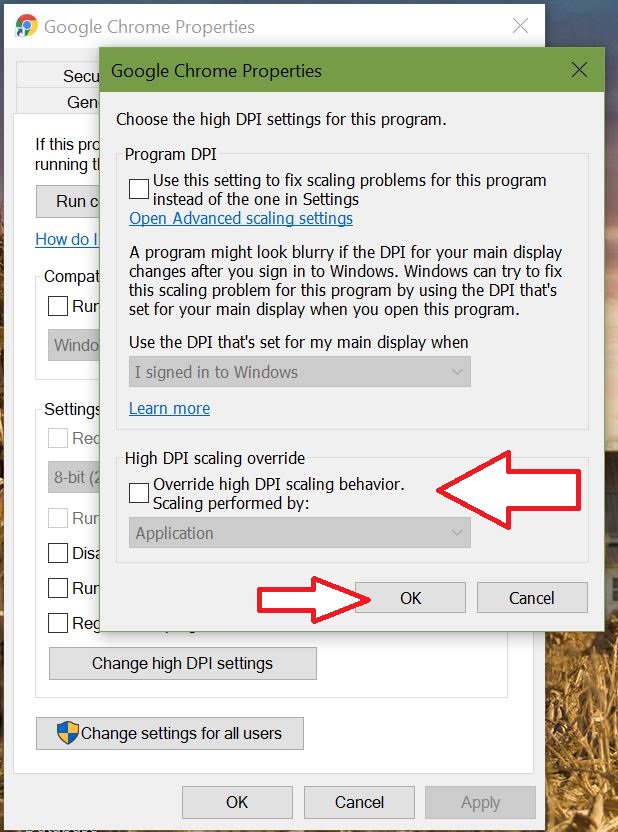
Then open the Google Chrome browser & print again. The text should print normal.
Click here to return to top.
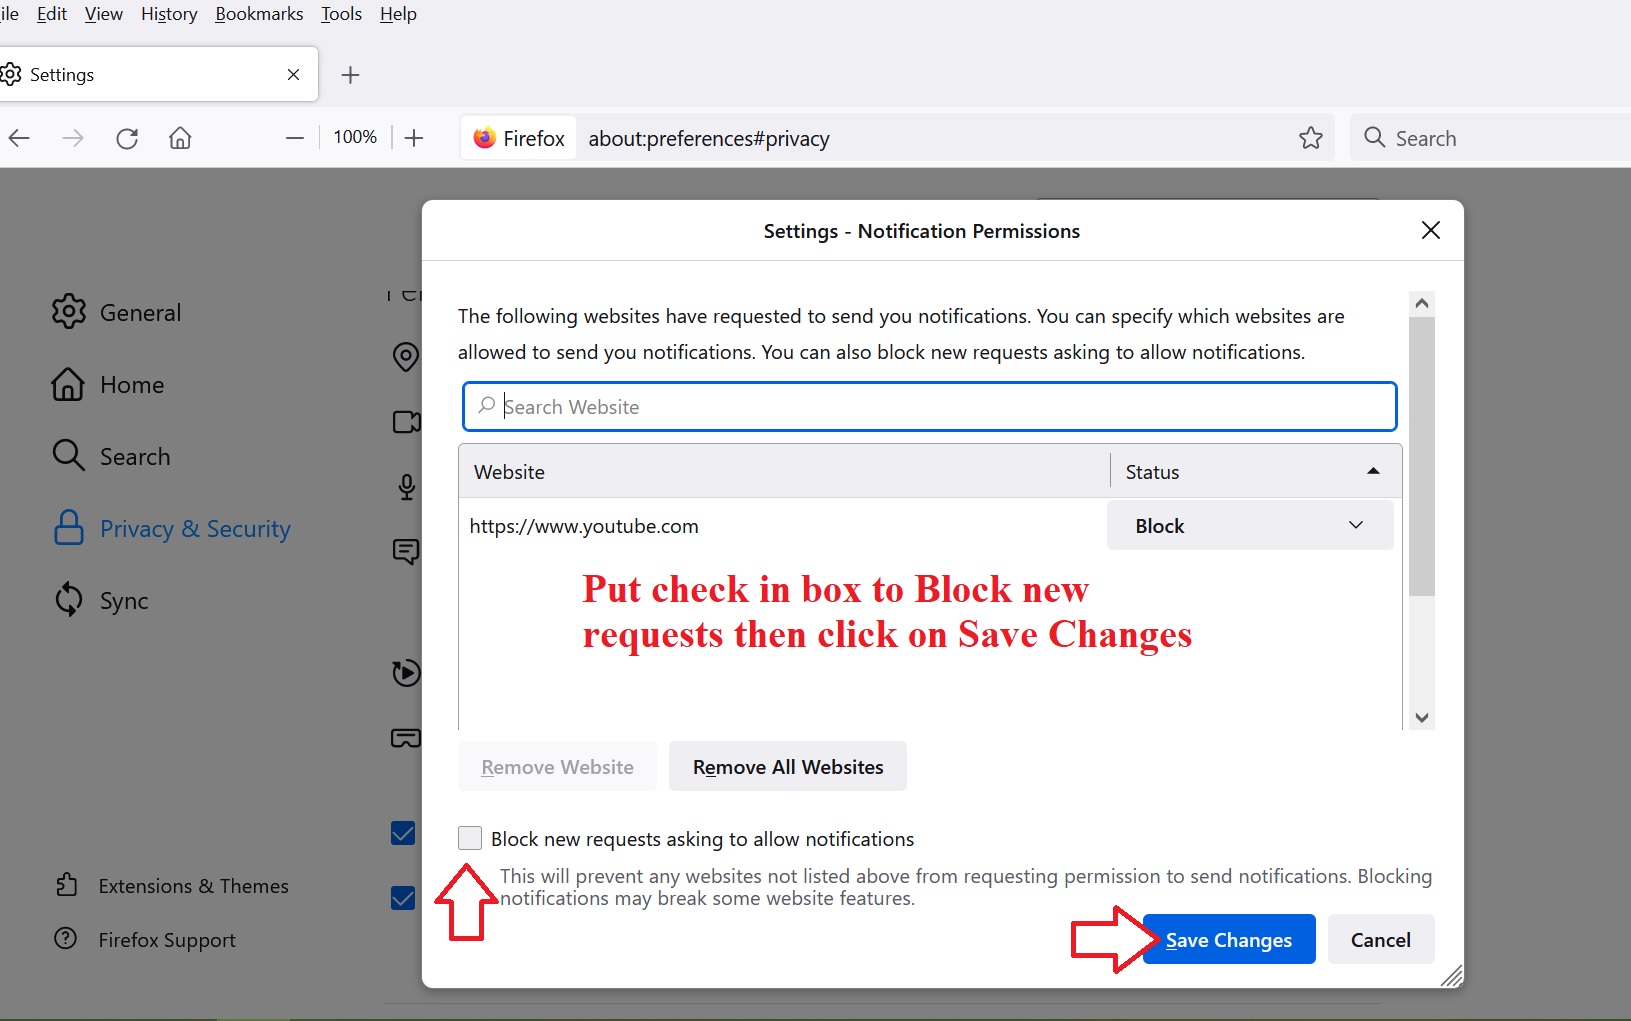
Turn off Google Chrome Notifications - When you visit a new website using Google Chrome the website will ask you if you want to allow or block notifications. I recommend that you always choose the Block option since most notifications are just ads that pop up in the bottom right corner of the screen. Follow these steps will stop all those annoying ads.
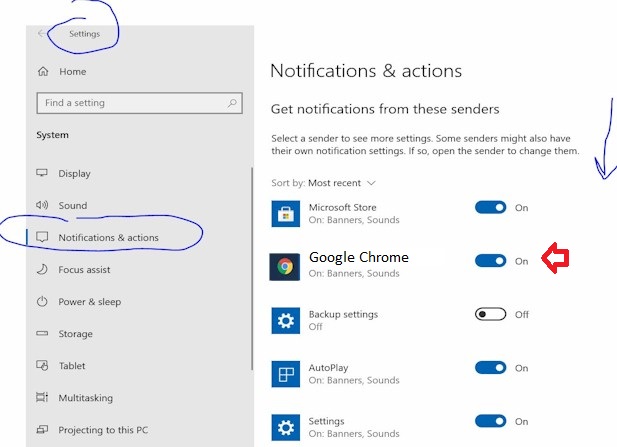
Click on the Start button (word Start or 4 white windows) then click on Settings. Then click on System then click on Notifications & actions. Scroll down to Google Chrome & click on the left side of the On button to turn it off (gray color). Then close the Settings window & you are all set.
Click here to return to top.
Click here to return to top.
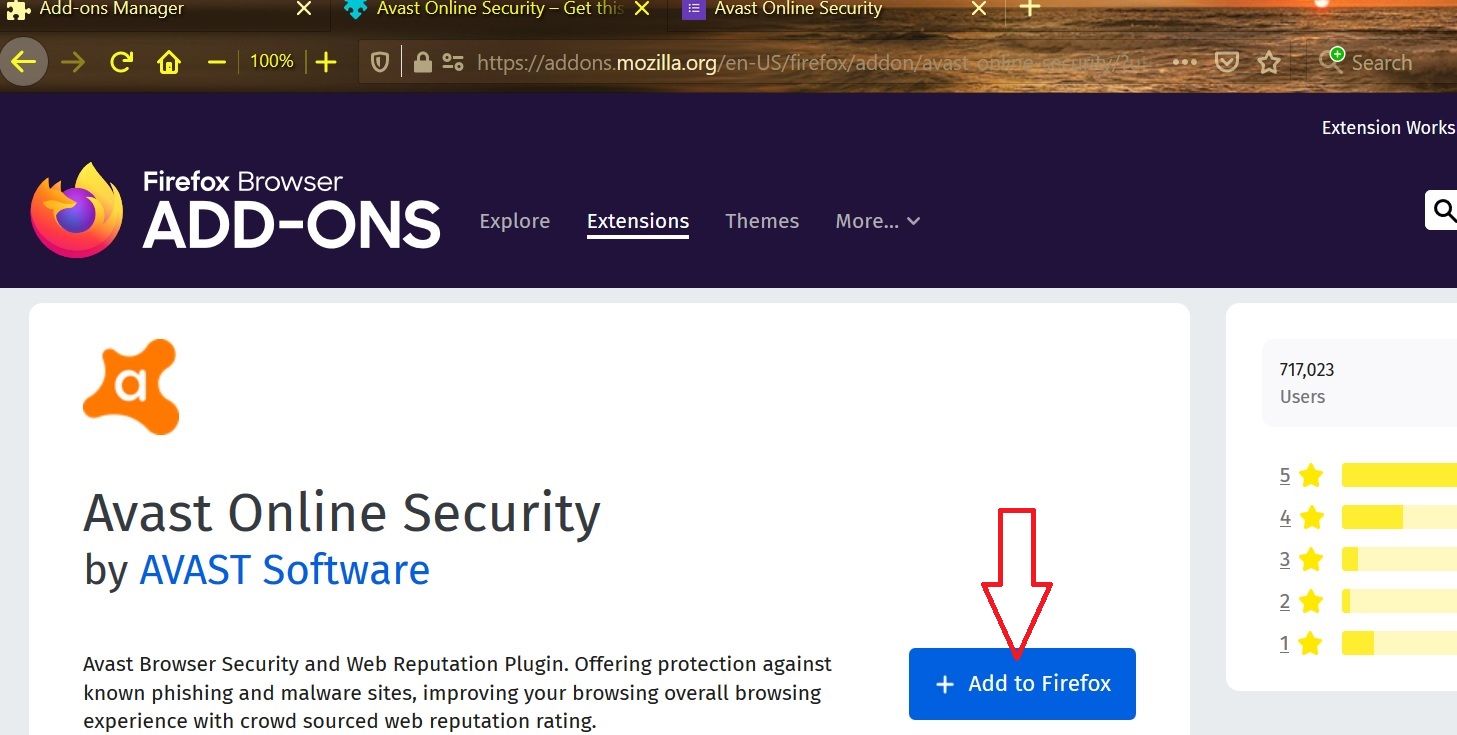
The Avast add on adds features to your Internet browser. Here are the steps to add Avast to the Firefox browser.
Open Firefox then click on Tools menu then click on Add-ons. Then in the search window type in Avast. Then click on Avast Online Security.

Then click on the blue Add to Firefox button.
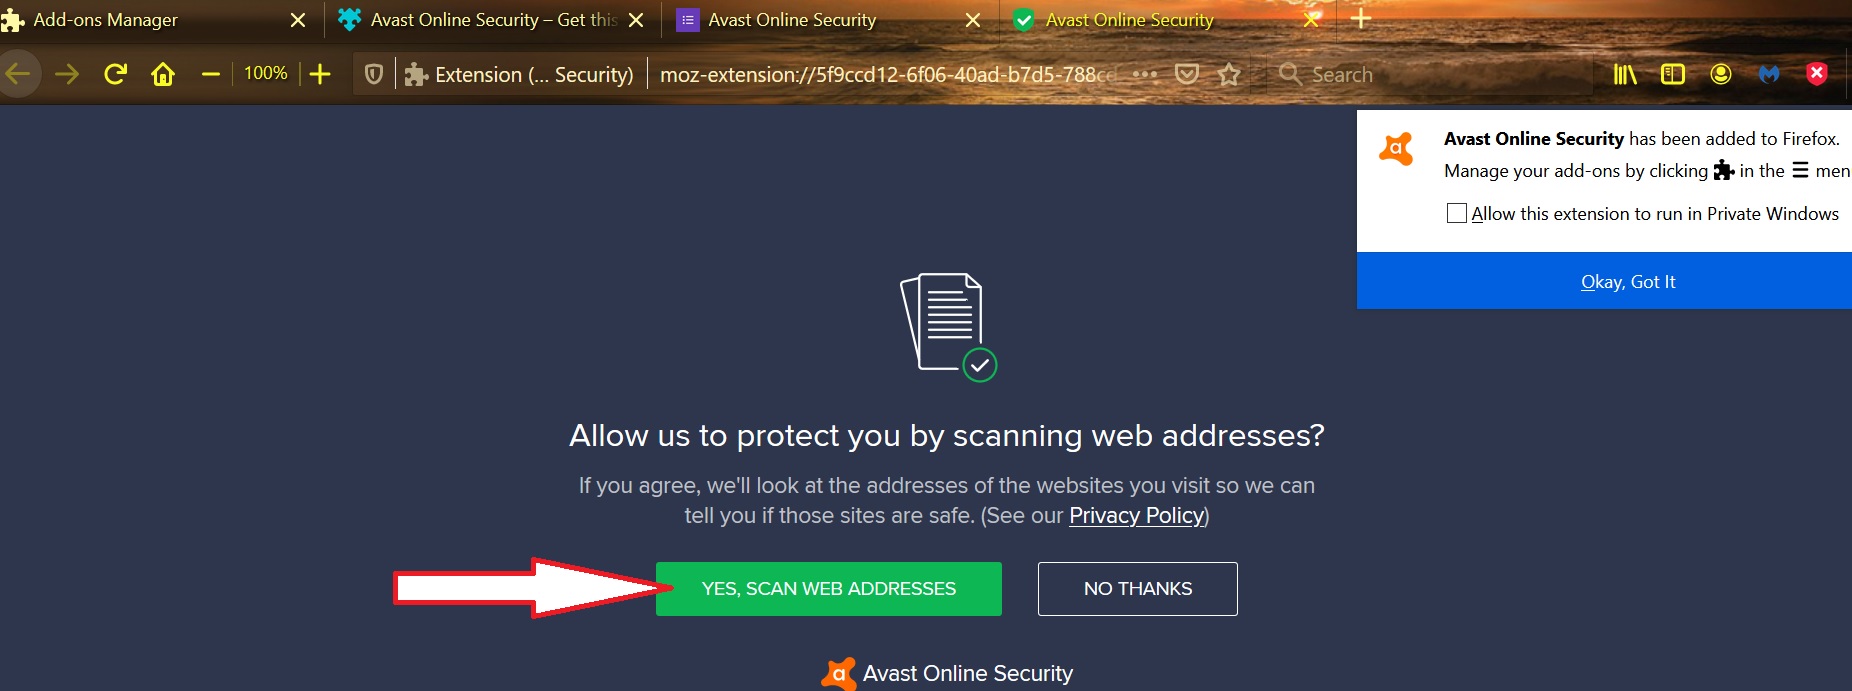
Then click on the blue Add button

Click on green Yes scan web addresses button
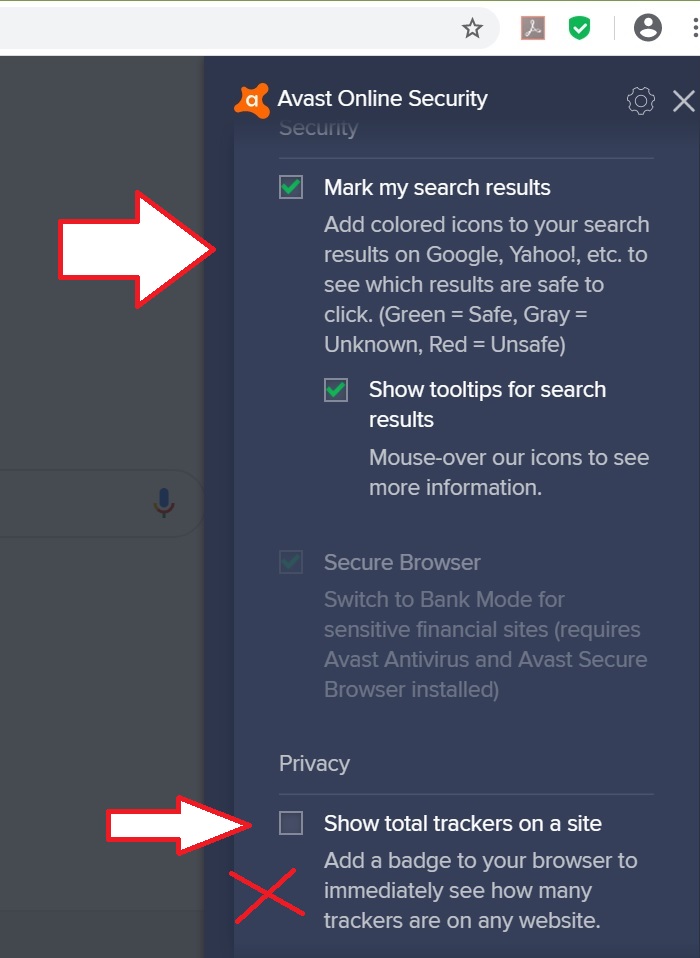
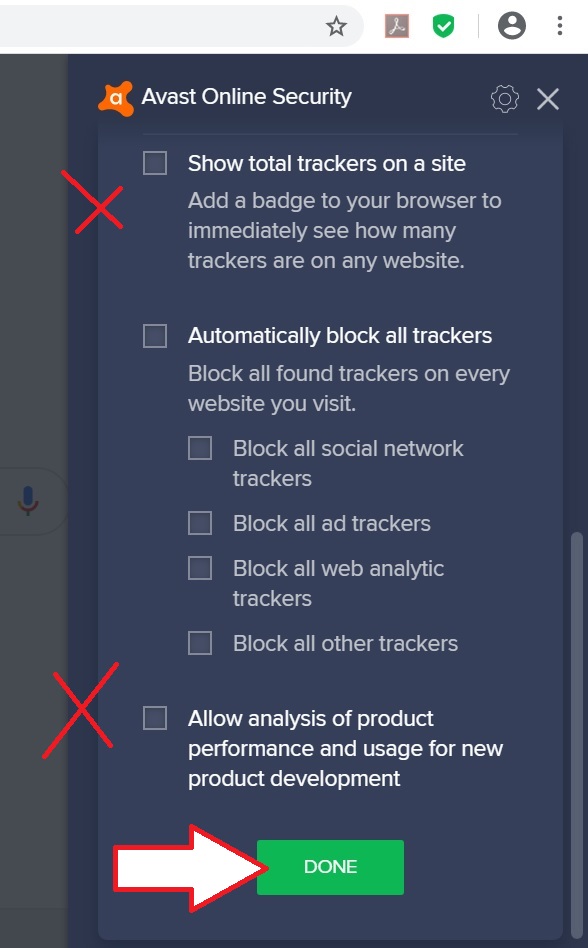
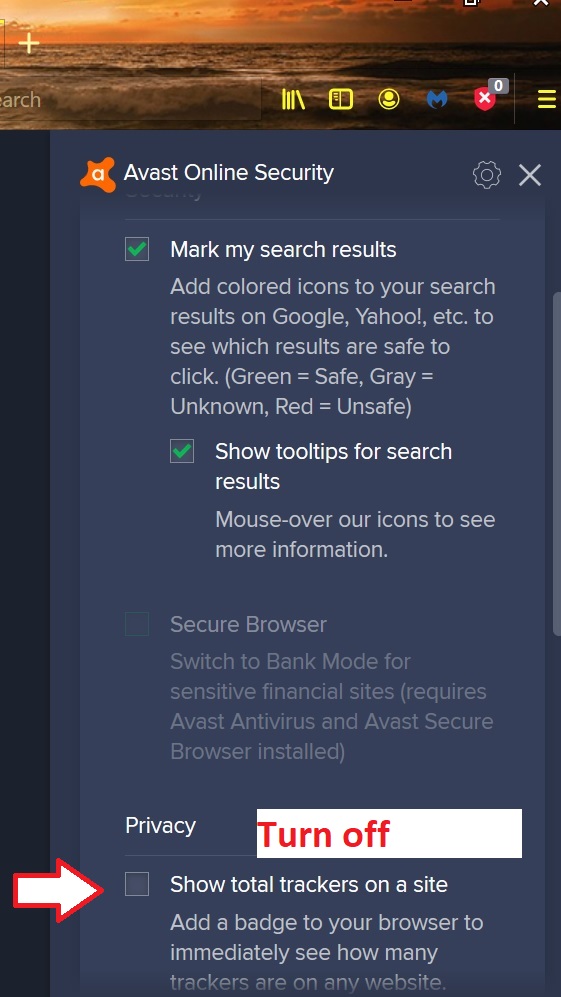
Put check in box to Mark my search results & Show tooltips - This option puts a green check mark next to websites that are safe to visit & an orange or red x next to bad websites.
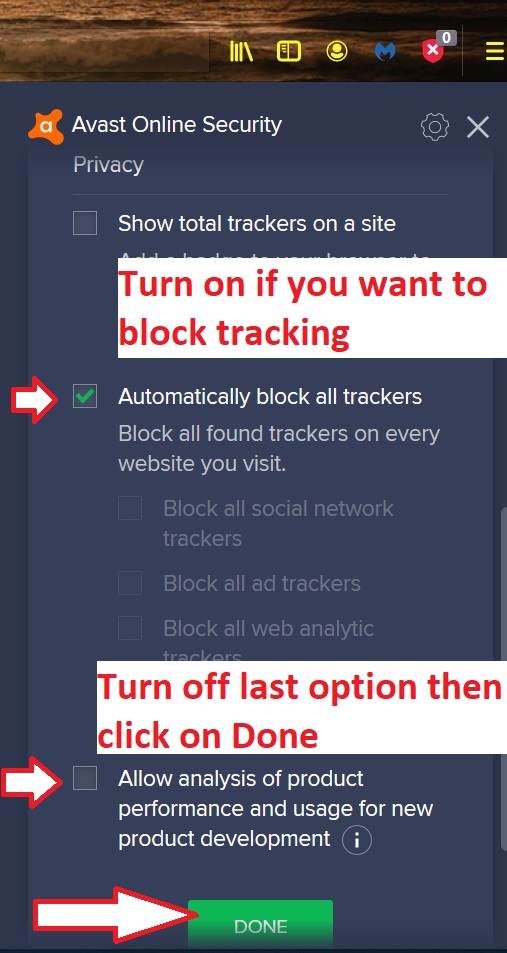
Turn off - Show trackers on website option. That hides the number that will show in the top right corner above the Avast icon.
When you visit a website a tracking cookie is created on your computer. Then as you click on various links on that website that information is added to the tracking cookie. As you leave that website the owner gets a copy of the tracking cookie. It may include your email address & the links that you clicked on their website. Then they may target your for spam or ads in your browser based on the links you clicked on.
Turning on the Automatically block all ad trackers option then the tracking cookies will not be created. Note, that ads on website will also be blocked. Email like aol, yahoo & msn(outlook.com) are free in exchange for you viewing ads on the email website. If you turn on the feature your email may not load.
Turn off the last option to allow data sharing. This is an invasion of your privacy.
Finally, click on the green Done button.
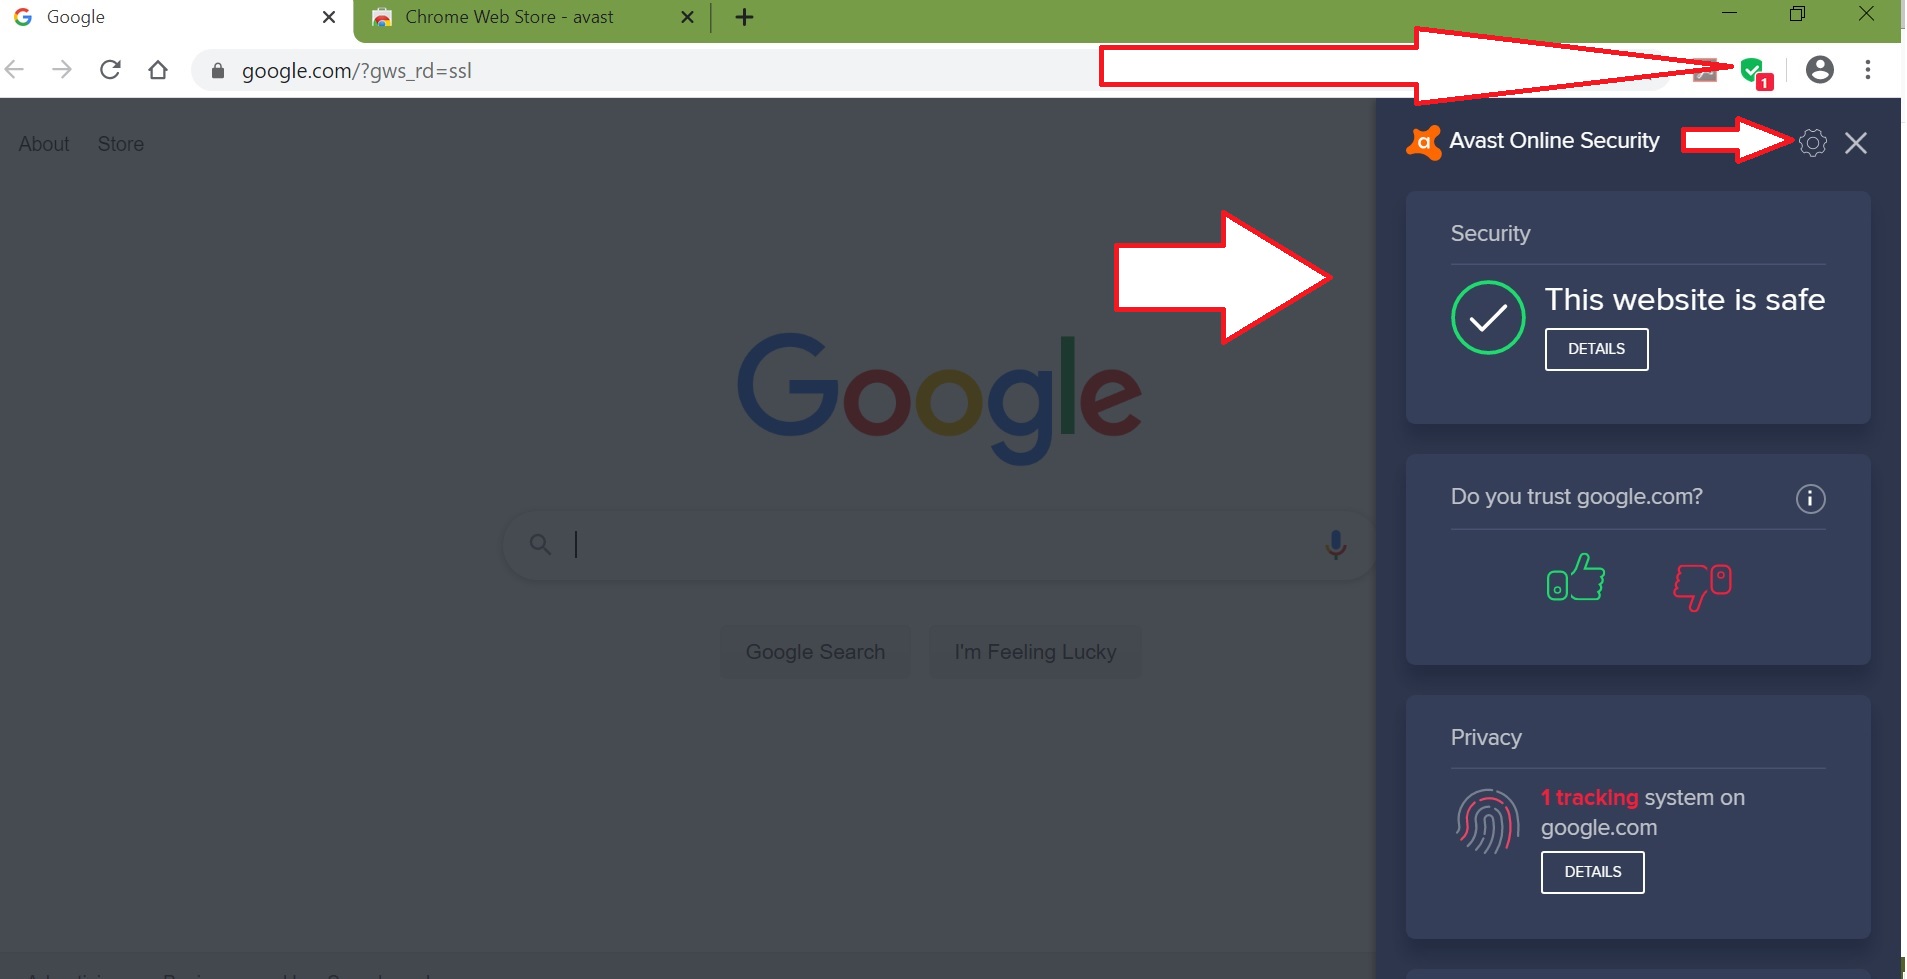
To test the program go to google.com & type a word into the search window. Then you will see green, orange or red marks next to each website in the list.
Click here to return to top.
How to create a Gmail email account.
Gmail is free email & you can create as many accounts as you want.
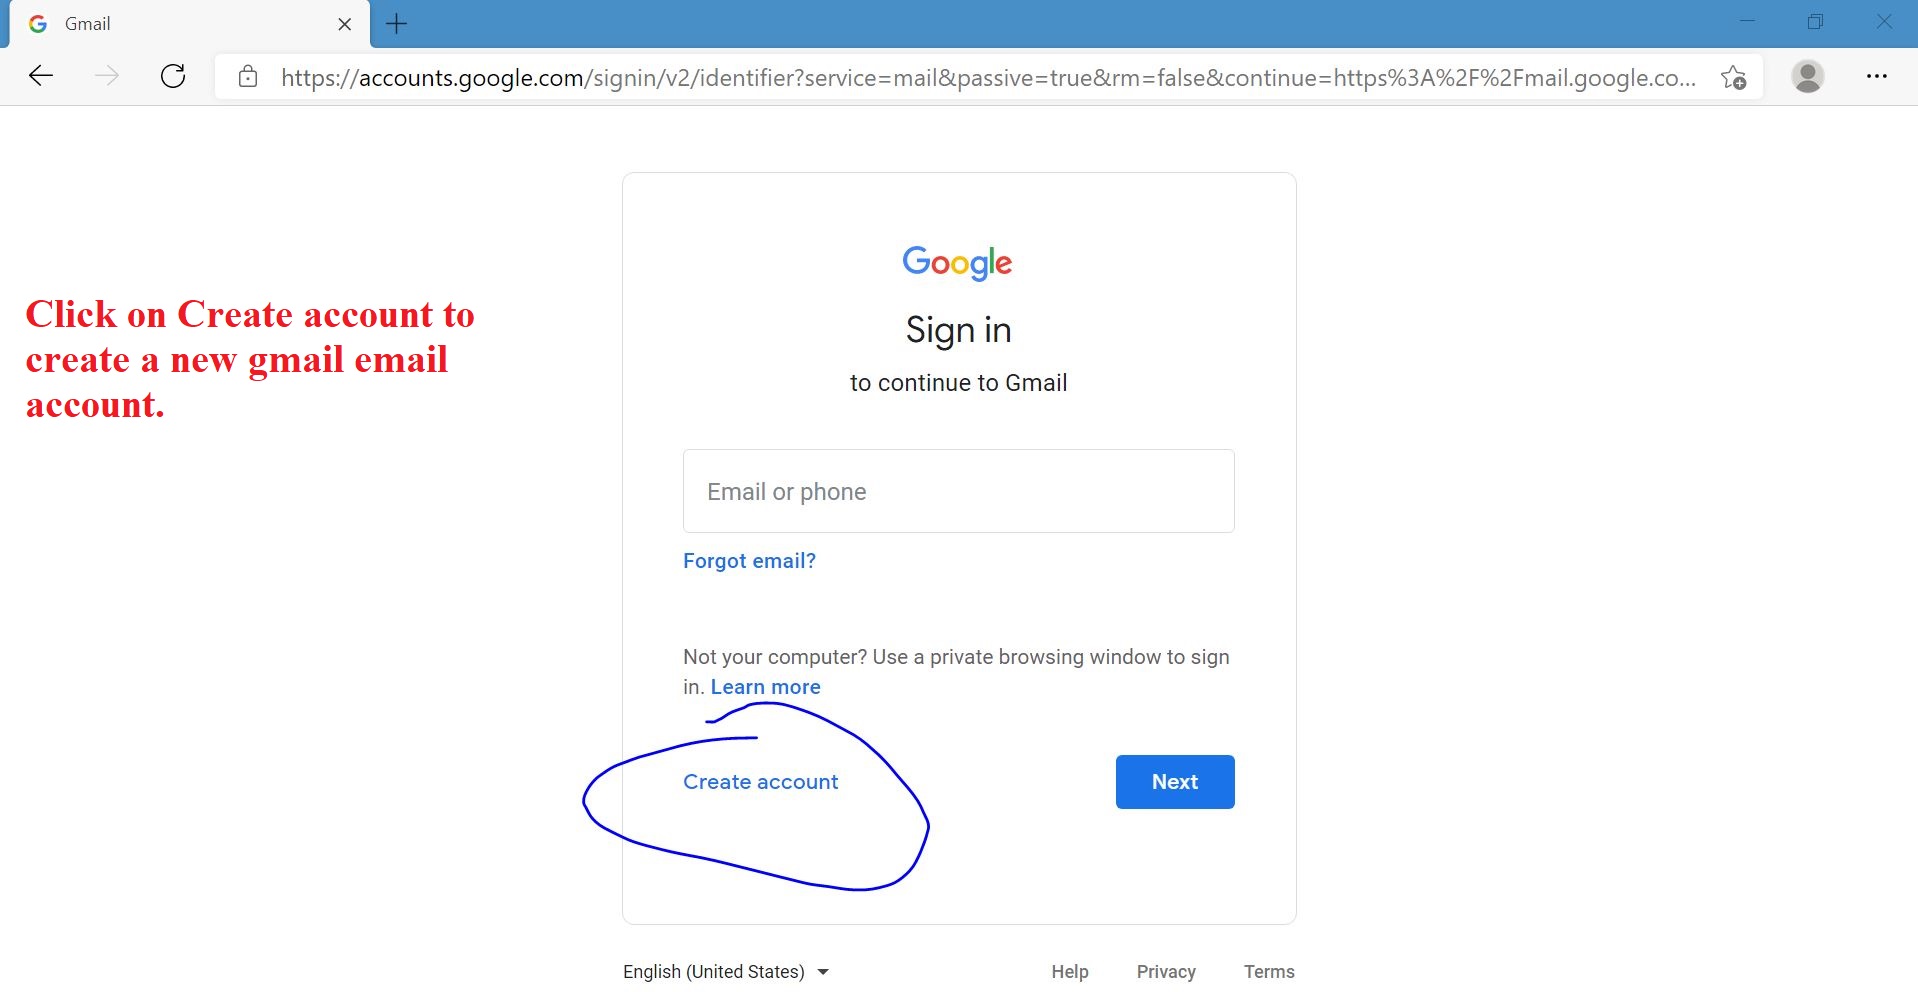
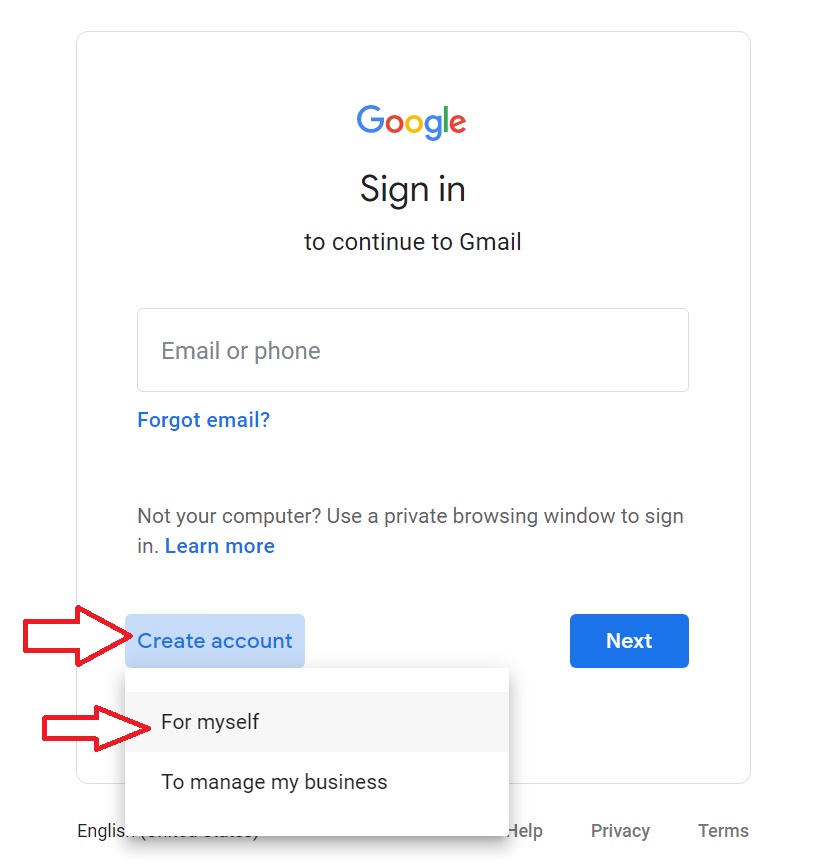

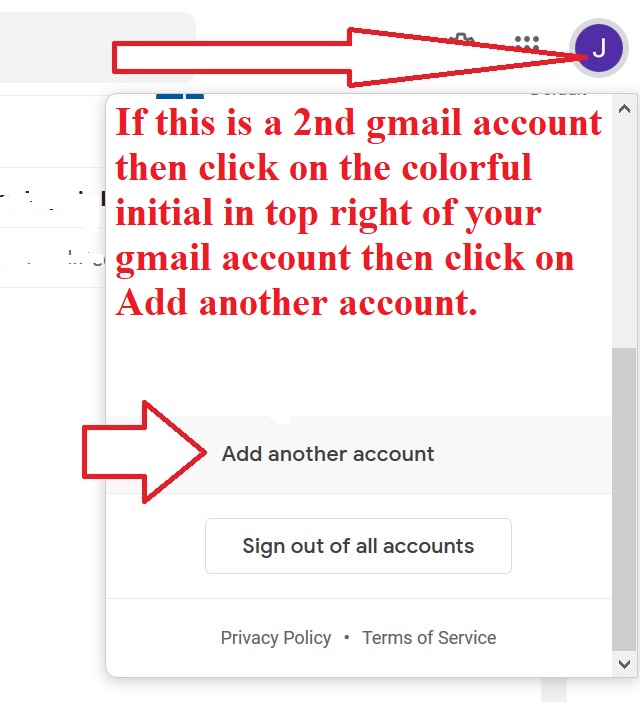
Then complete the account creation form as shown above.
Gmail email will then load. Click on the Settings (white gear) in top right to tweak the email to look & act the way you would like it to be. You can also use Themes option to put a photo into the background of your email, which makes it fun to use.
Click here to return to top.
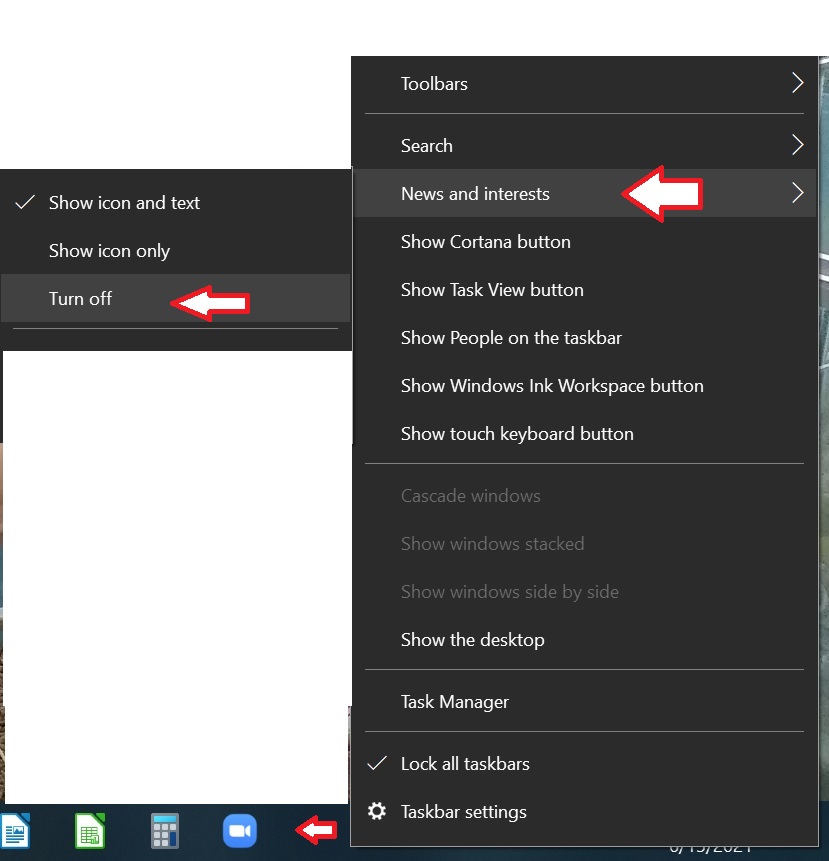
Turn off Weather Widget

If your mouse passes over this icon the window below will open.

To turn off right click on bottom bar (no icons area) then left click on News and interests. Then left click on Turn off.
Click here to return to top.
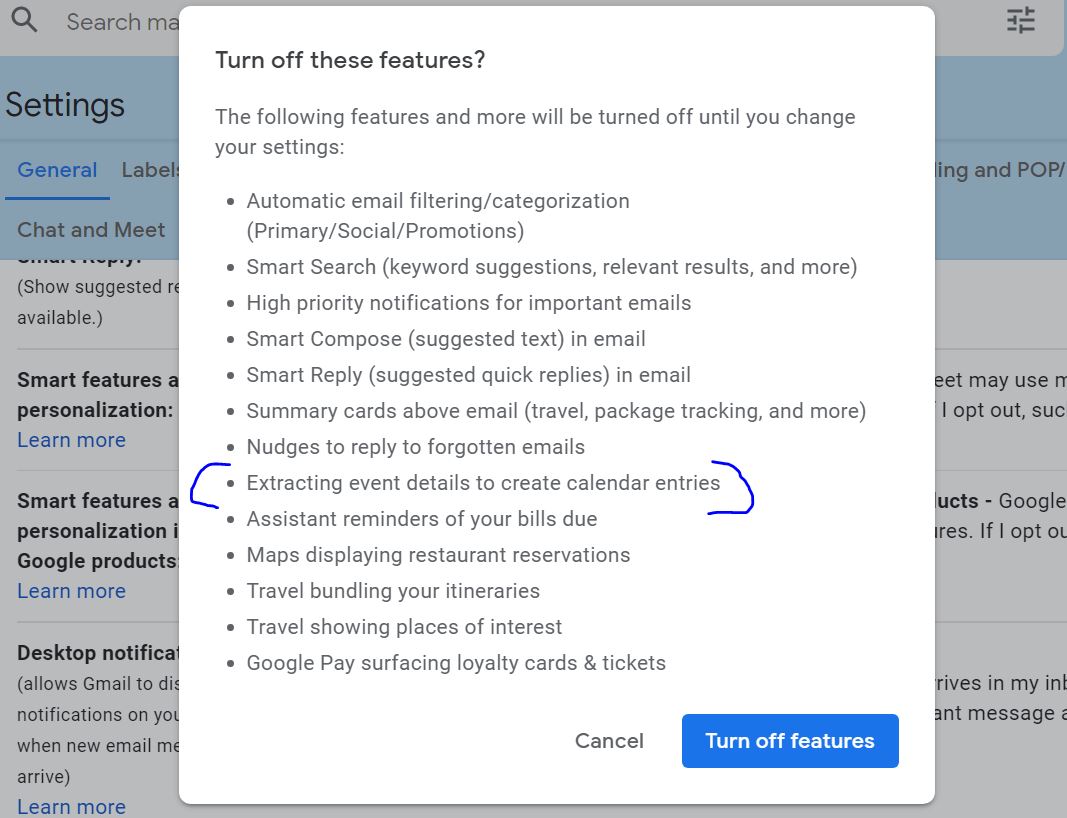
Google Calendar Phishing scam - As of August 2021, this scam has effected one of my clients. If you use Google Calendar I recommend that you follow these instructions & turn off this feature.
This is what happened: My client uses gmail for their email & Google Calendar. They received a fake email from McAfee telling them that their computer was hacked & they had to purchase McAfee to fix it. Gmail Smart Features picked up this email details & inserted it into their calendar as an "event". Then when the "event" day & time activated the client received pops ups telling them of the "attack". Then they spent hours changing passwords, etc. Then when the smoke cleared they realized that it was a fake alert in their calendar. I have now deactivated the smart features in my gmail accounts, I recommend it for all Google Calendar users. If you do not use Google Calendar you can leave these features on.
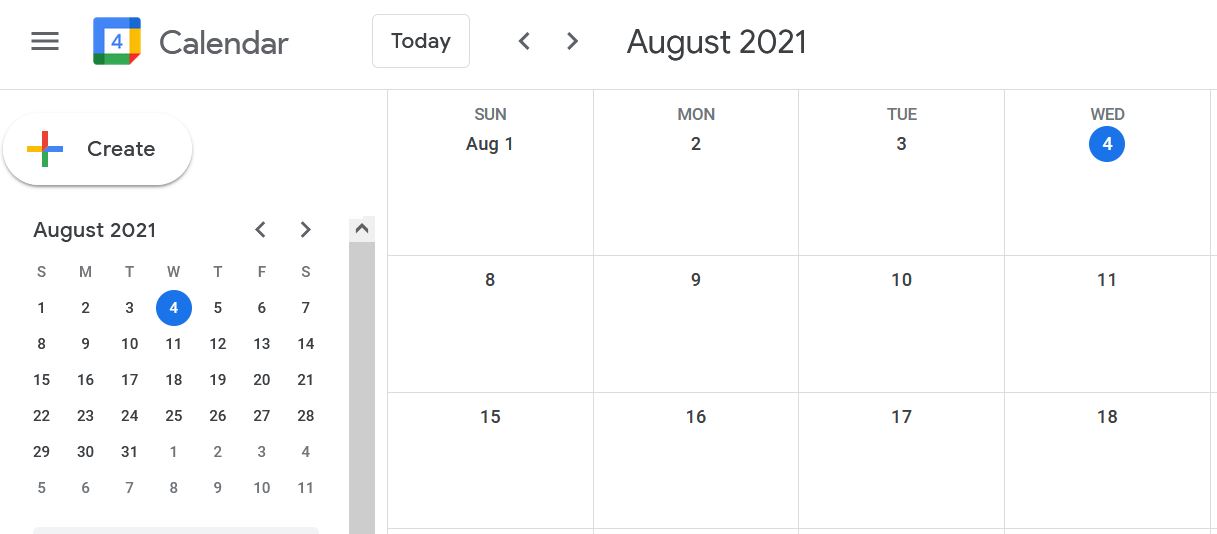
To turn off Smart Features & Personalization start in the google calendar.
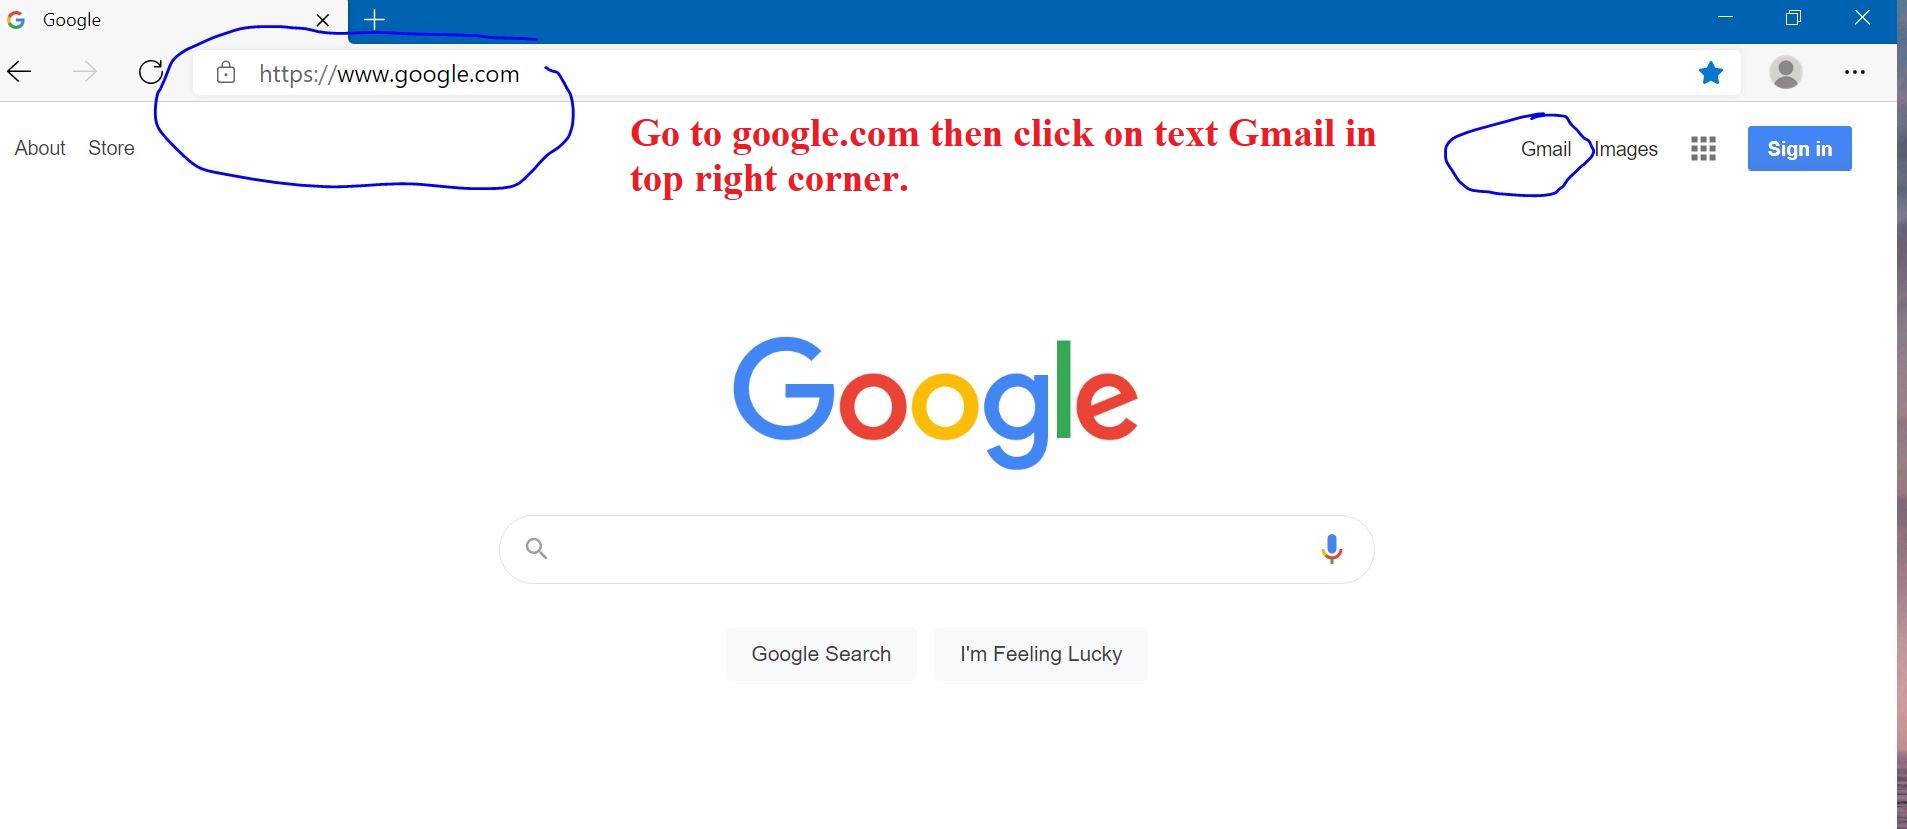
Open your Internet browser then go to google.com & click on the 9 black dots in the top right corner then click on Google Calendar. If it asks you to sign in, use your current gmail email address & password. Save it to your Internet browser.
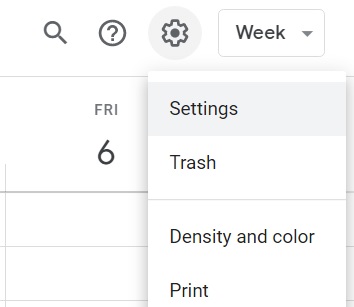
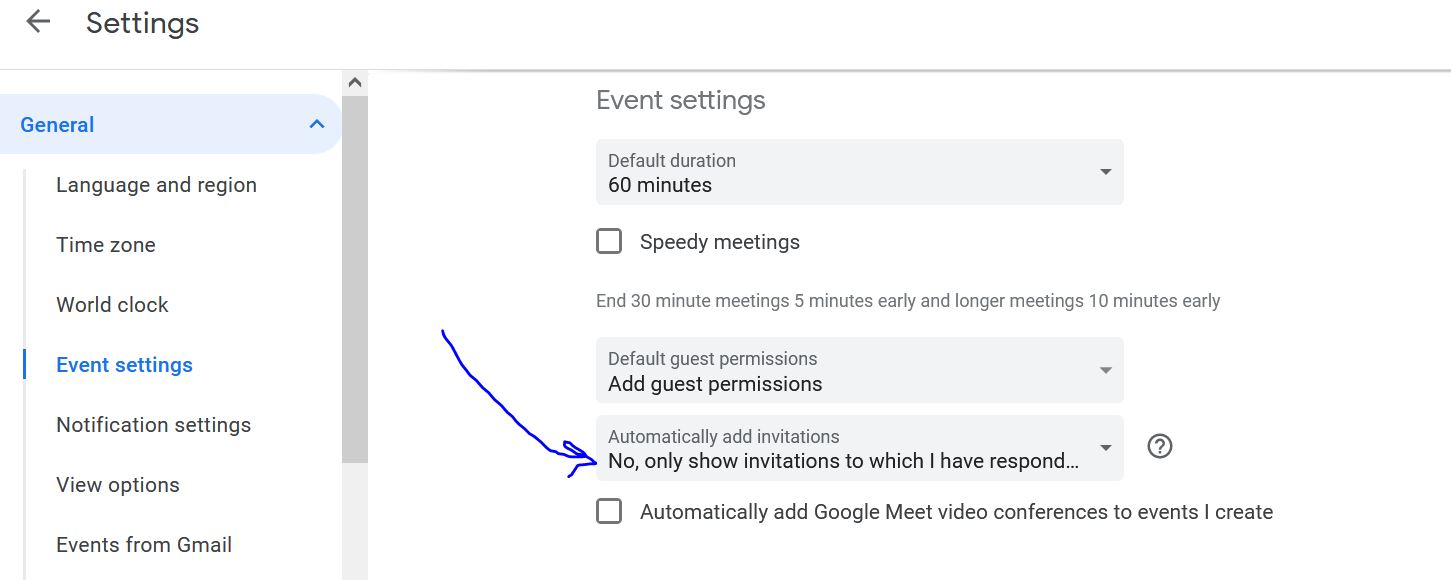
1 - After you sign in click on the gear in top right then click on settings
2 - turn off auto invites - click on Event settings then change Automatically add invitations to No, only show invitations to which I have responded.
3 - Turn off Events from email - un-check box - turn off Show events automatically created by gmail in my calendar.
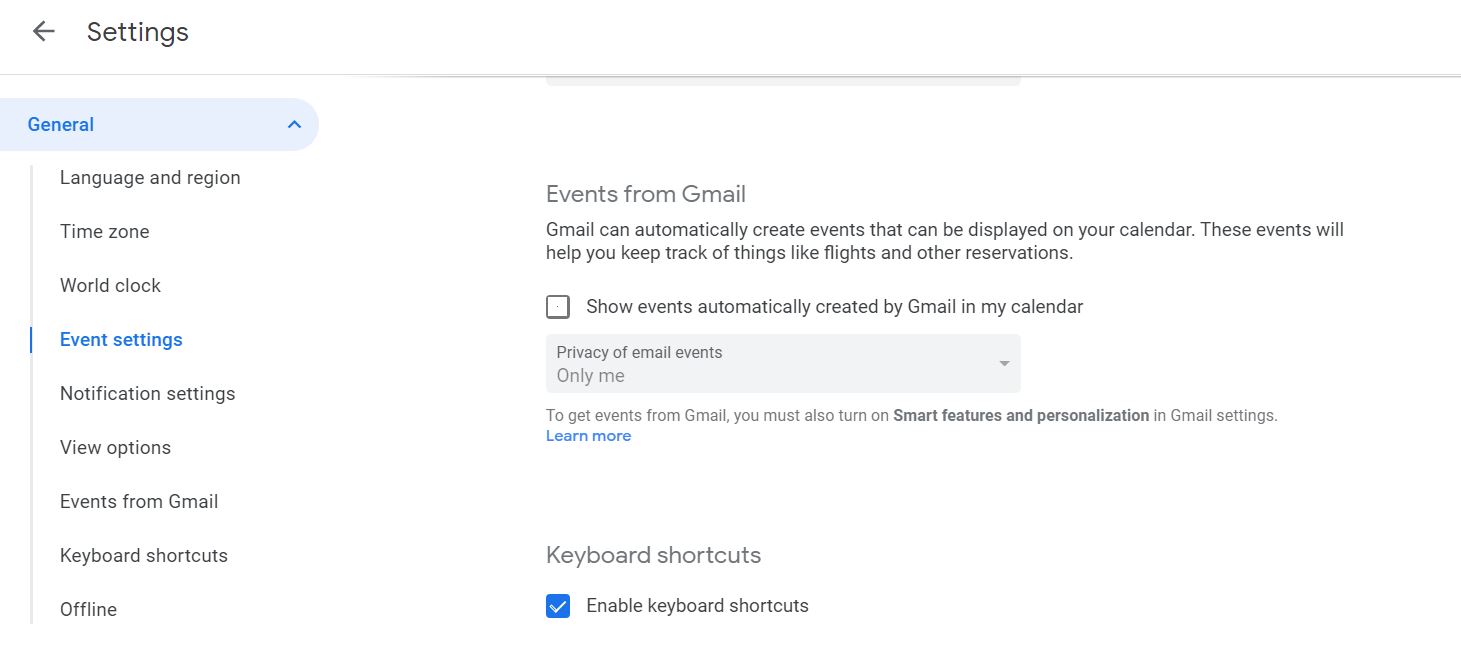
4 - This pop up will appear telling you that you must also make a change to your gmail settings (see below) & turn off Smart features and personalization. But the import issue is gmail will stop creating events from your email.

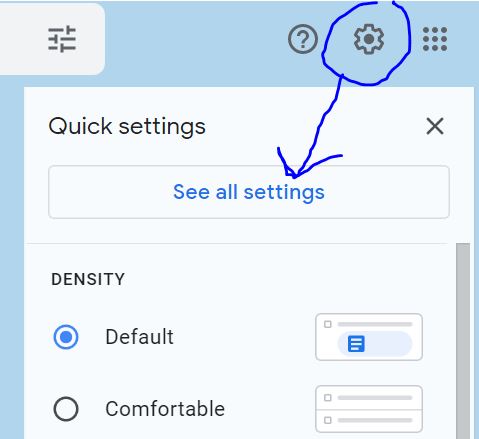
5 - return to google.com & click on gmail link in top right then click on gear in top right then click on See all settings
6 - Under the General tab scroll down to Smart features & uncheck the box
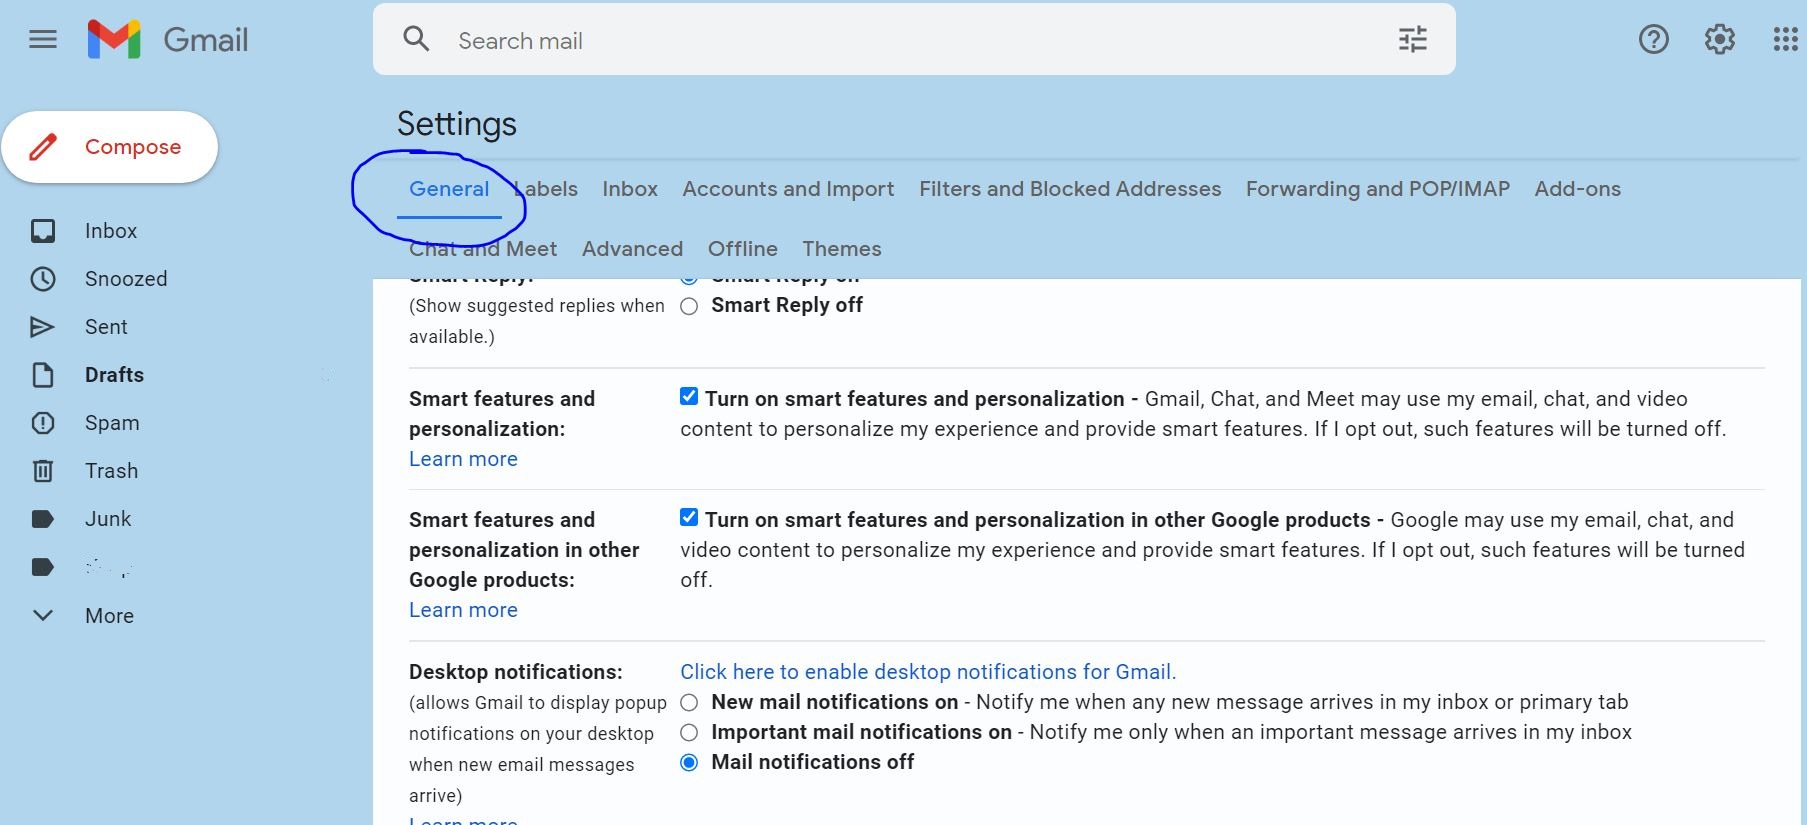
7 - You will then get this pop warning you of all the features that will be deactivated. Most import is "Extracting event details to create calendar entries will be turned off. Click on blue button to turn off these features.
Please let me know if you have any questions.
Click here to return to top.
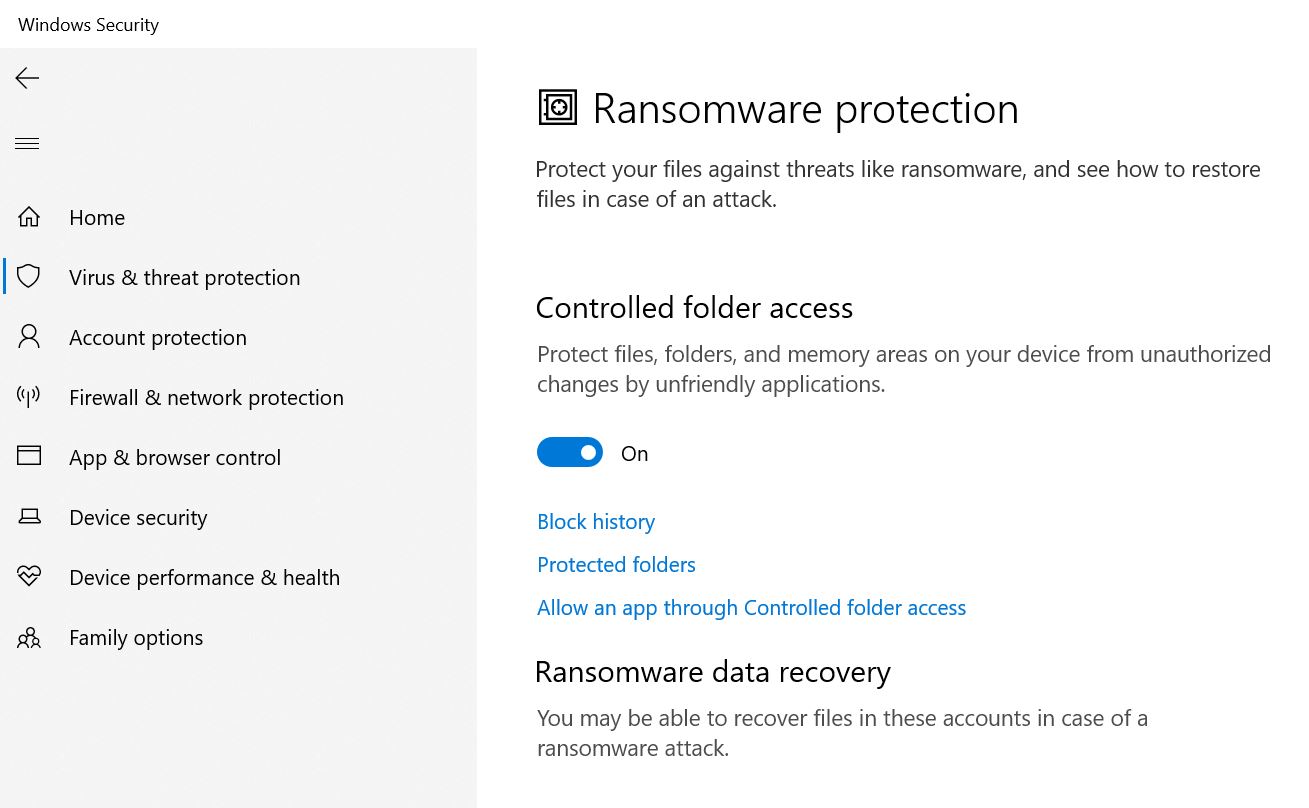
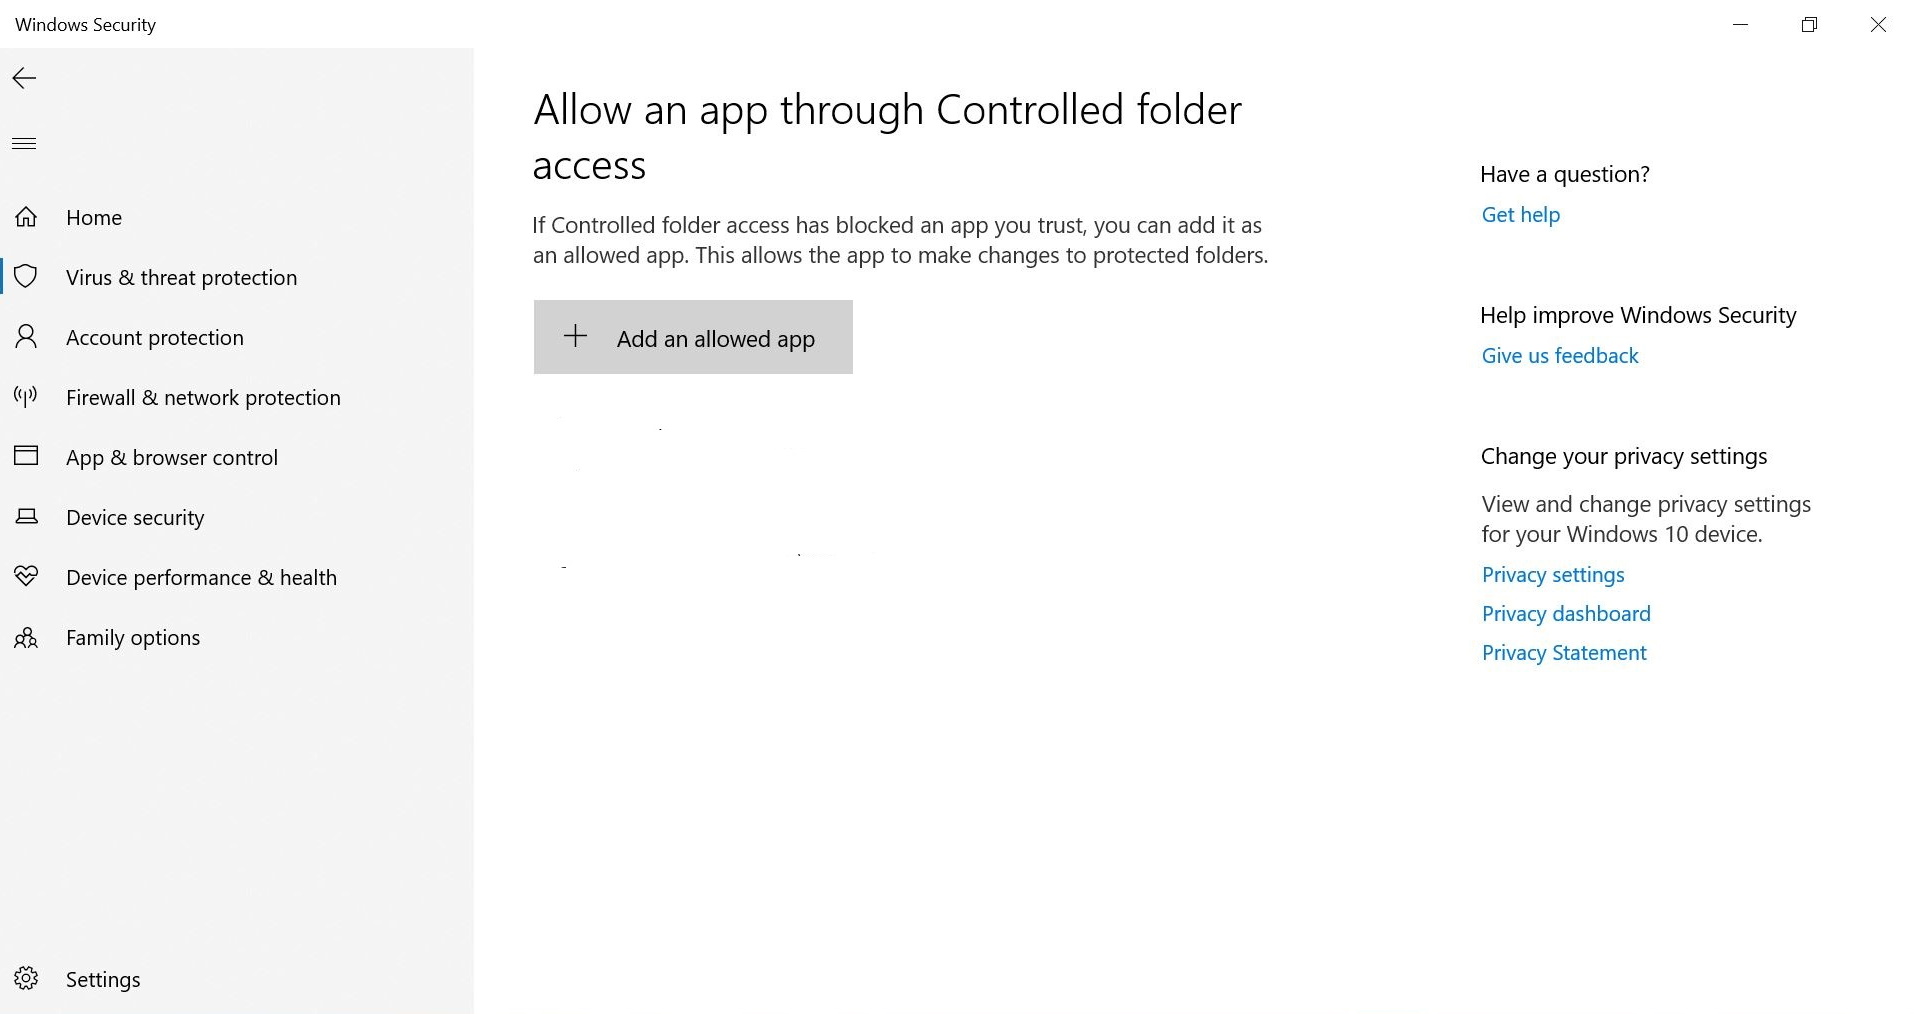
The Microsoft PC Windows Security Program is now offering free Ransomware protection for all users. In 2021 a gas pipeline was disabled by Ransomware, and the company had to pay millions of dollars to regain control of their computers. Most home users do not have "millions of dollars" to throw away, and what happened to that company can happen to us. Once activated, you will need to teach the program what is OK to run using the "Add or allow app" setting. Please contact me for additional questions, or if you would like to schedule an appointment with me to activate this new protection on your PC computer. Note, some virus programs do offer this feature built in. Most of the time you may have to pay extra to activate it.

Click here to return to top.
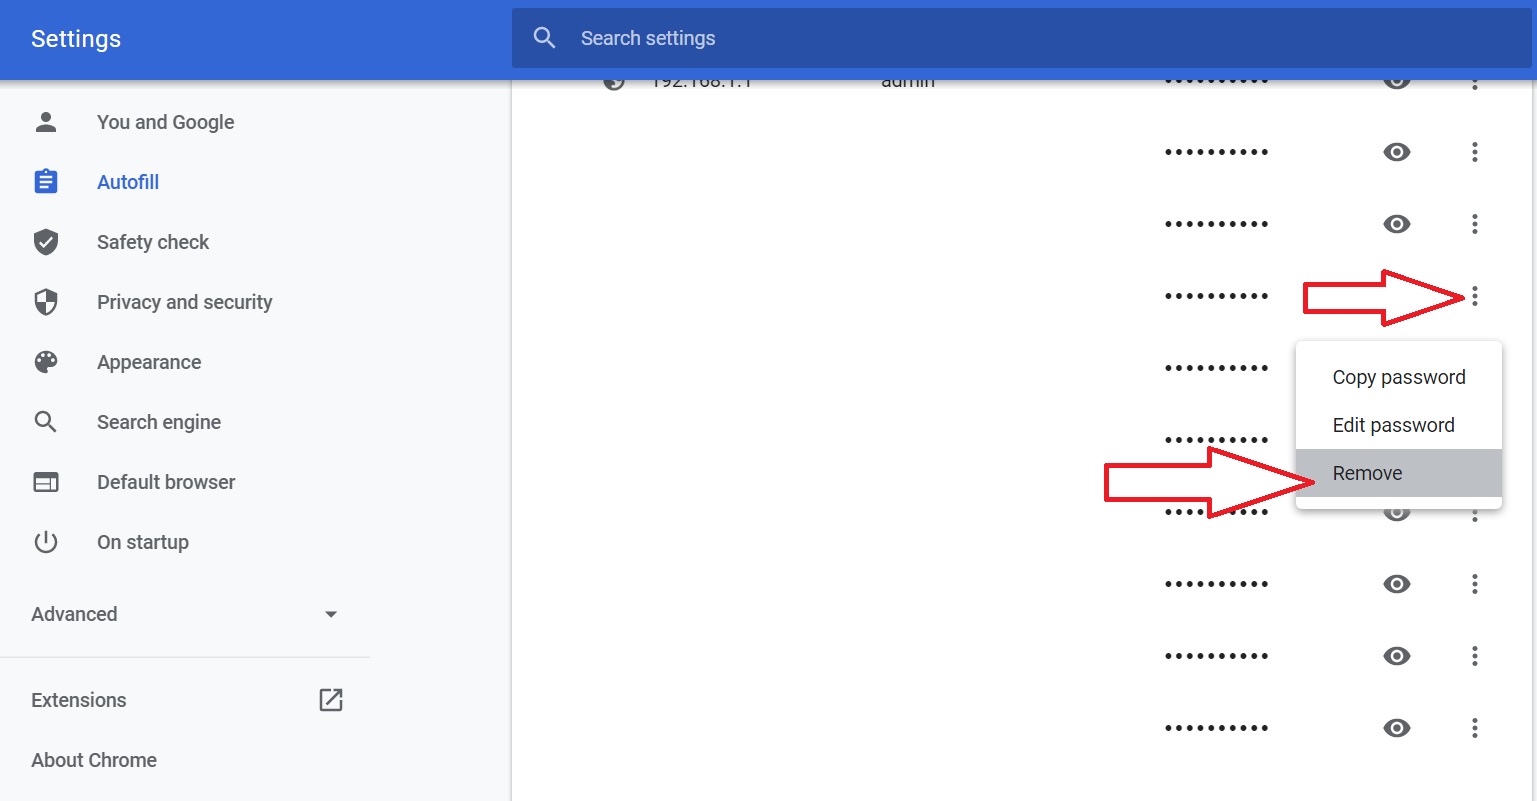
Delete Google Chrome Passwords
 It is safe to save
most websites, emails, facebook passwords to your Google Chrome browser. The one
exception is Bank Passwords or anything to do with money. Many people are
becoming victims of phone scams, where a fake technician requires access to your
computer. While on your computer they look for passwords to your bank websites.
If they are saved to your browser the bad guys can see them. For this reason you
should never save a bank password to your Internet browser. Below are the steps
to remove passwords from Google Chrome.
It is safe to save
most websites, emails, facebook passwords to your Google Chrome browser. The one
exception is Bank Passwords or anything to do with money. Many people are
becoming victims of phone scams, where a fake technician requires access to your
computer. While on your computer they look for passwords to your bank websites.
If they are saved to your browser the bad guys can see them. For this reason you
should never save a bank password to your Internet browser. Below are the steps
to remove passwords from Google Chrome.
Step 1 - open Google Chrome browser then click on the 3 dots in the top right corner then click on Settings

Step 2 - Scroll down then click on Passwords

Step 3 - Find the password that you do not want saved to your Google Chrome browser. Then click on the 3 dots to the right of the website then click on Remove password. If you click on the eyeball icon it will show you the password. The bad guys can see it the same way.
Click here to return to top.
Sometimes Microsoft Office fails, but there is a simple fix.

Click here to return to top.
Click here to learn more about Microsoft Windows Operating System

Windows 10 includes an excellent backup program, lately its been better then the programs included on the External Hard drives.
Follow the instructions below to setup then run manual backups using Microsoft File History program.
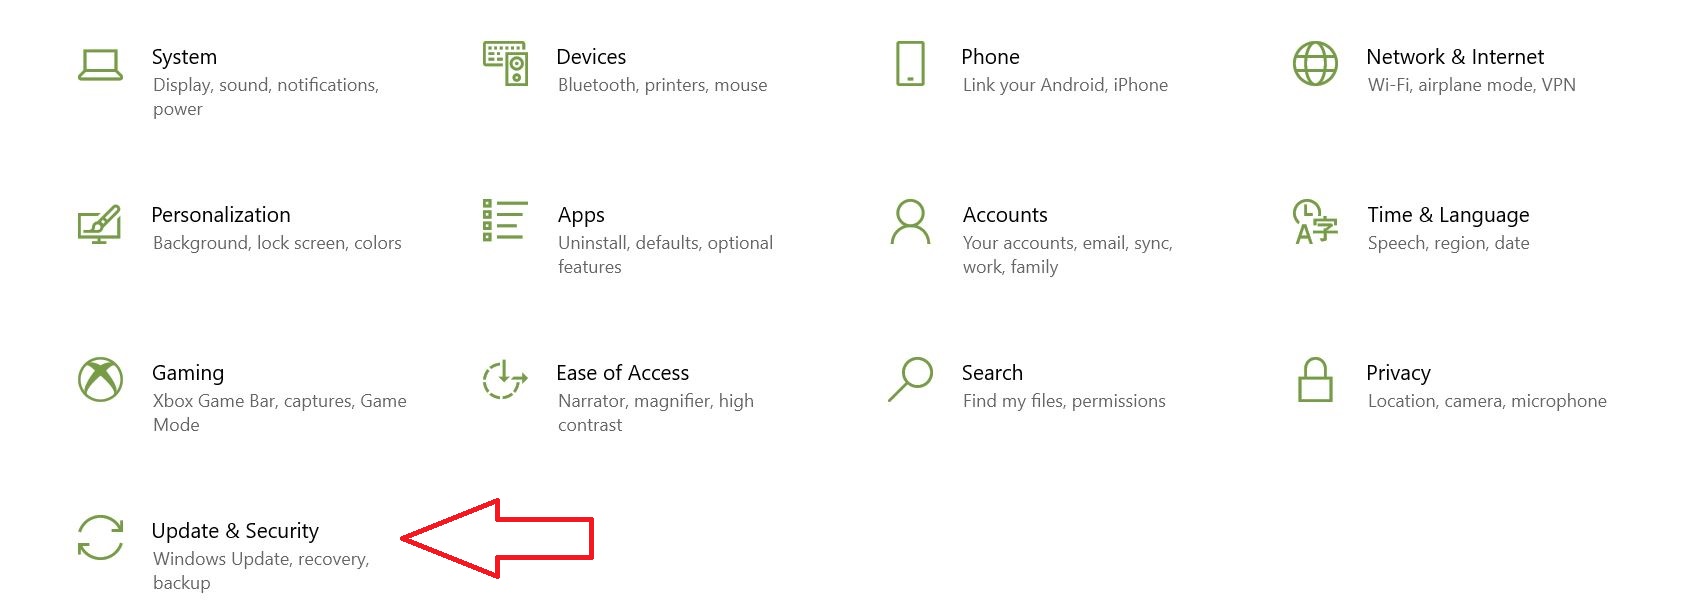
1 - Click on Start then click on Settings (Shell start menu - PC Settings)
2 - Setup 1st time or Manual backup
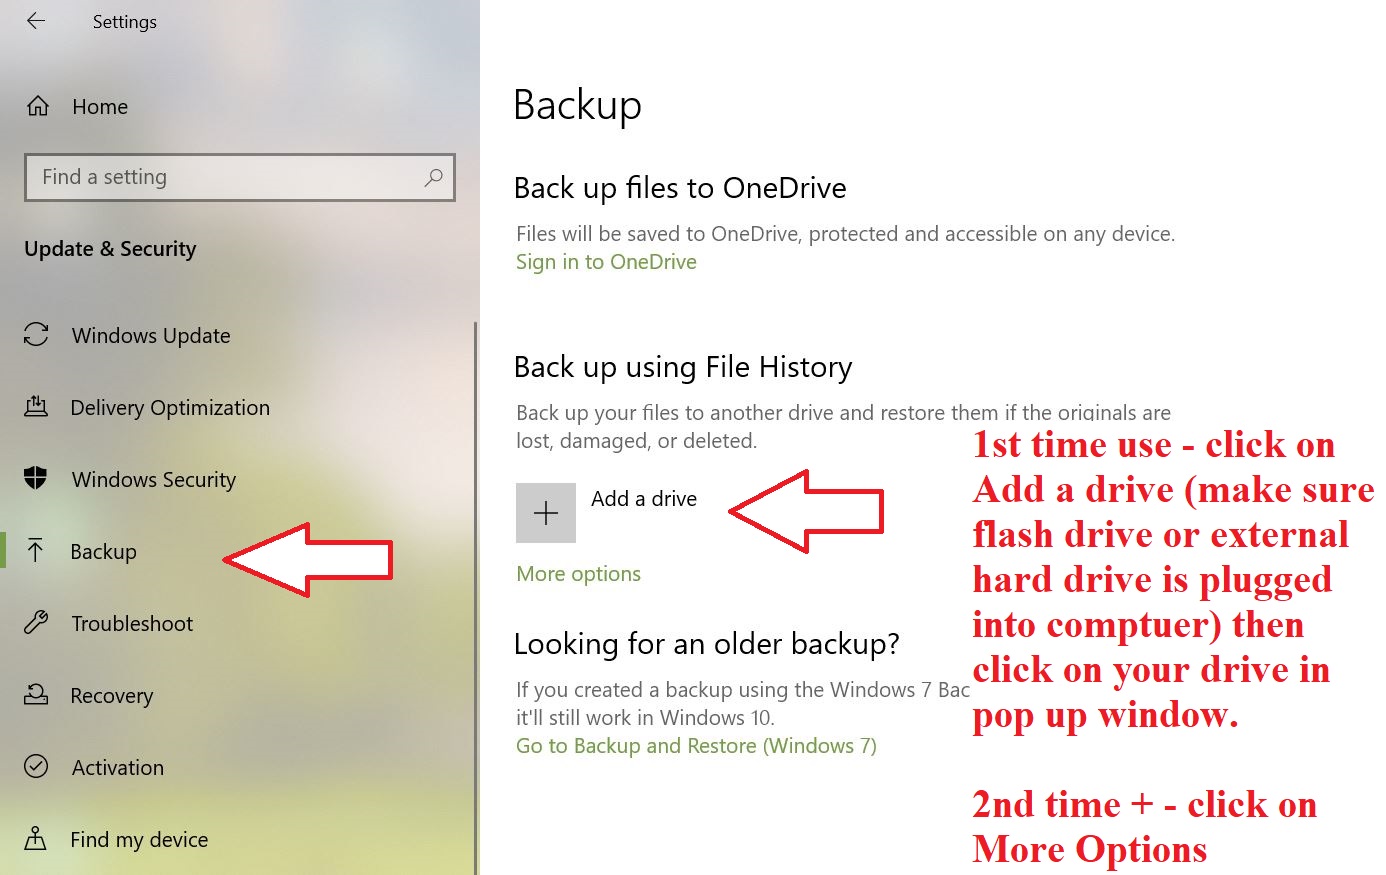
3 - Setup new drive
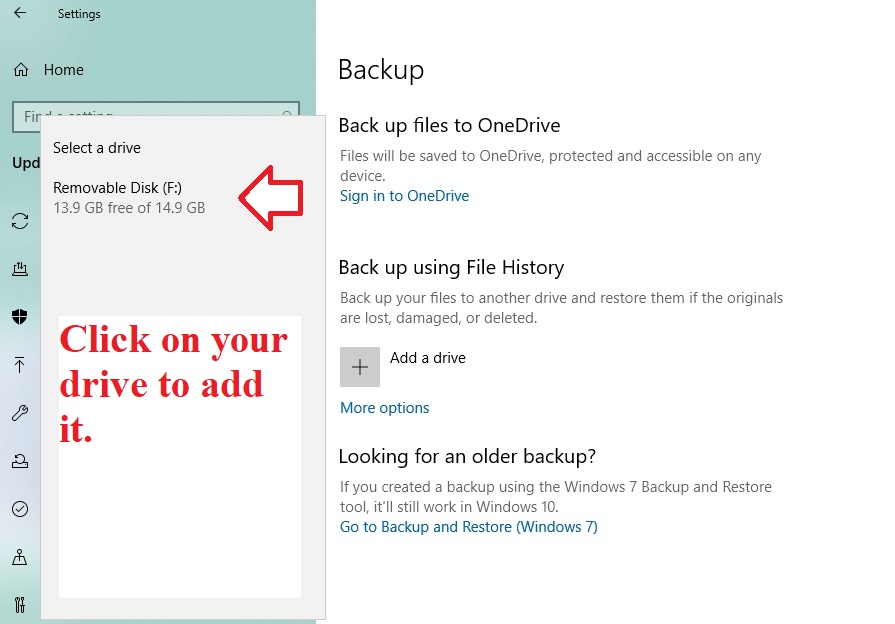
4 - 1st time setup
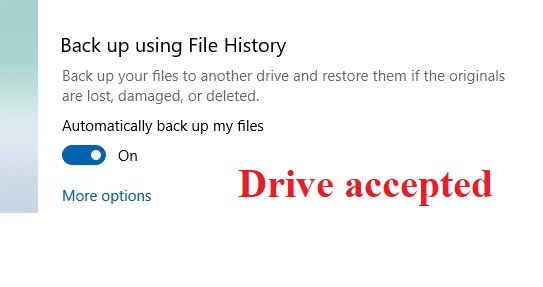
5 - Backup
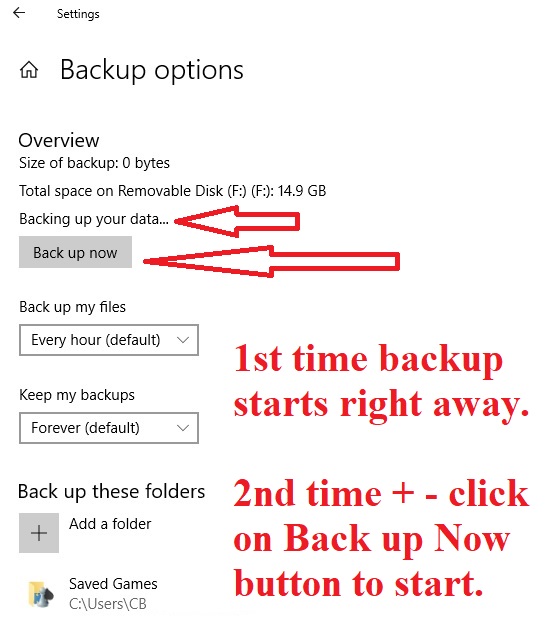
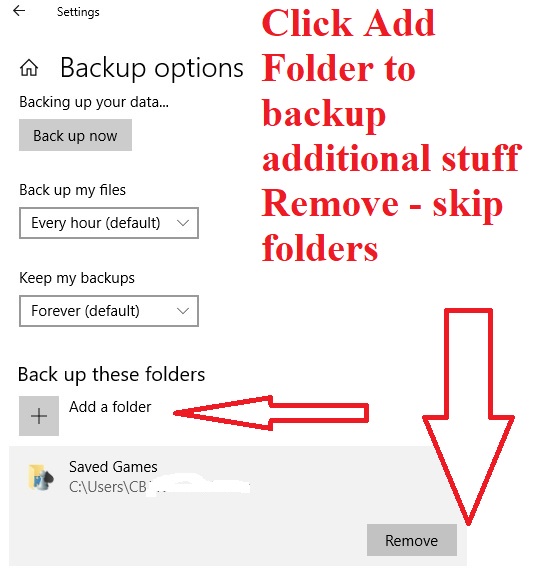
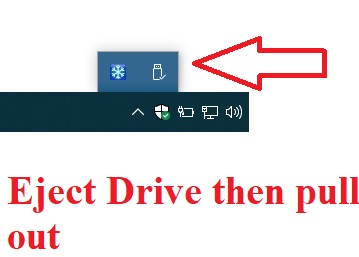
6 - Eject backup drive Before removing it from computer.
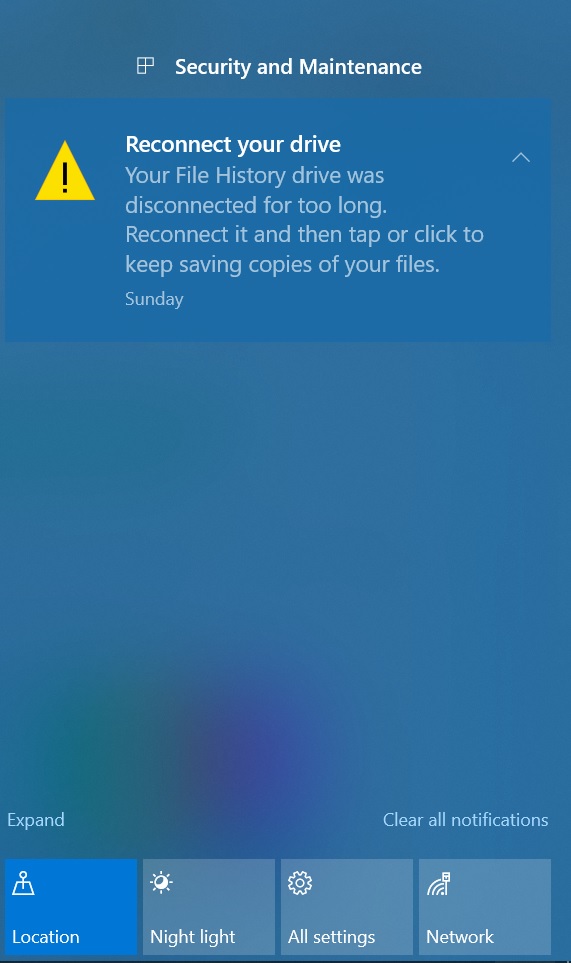
If its been over 30 days since your last backup you may get the alert below. It will appear in the bottom right corner of your computer screen. Its a reminder that its time to backup.
Click here to return to top.
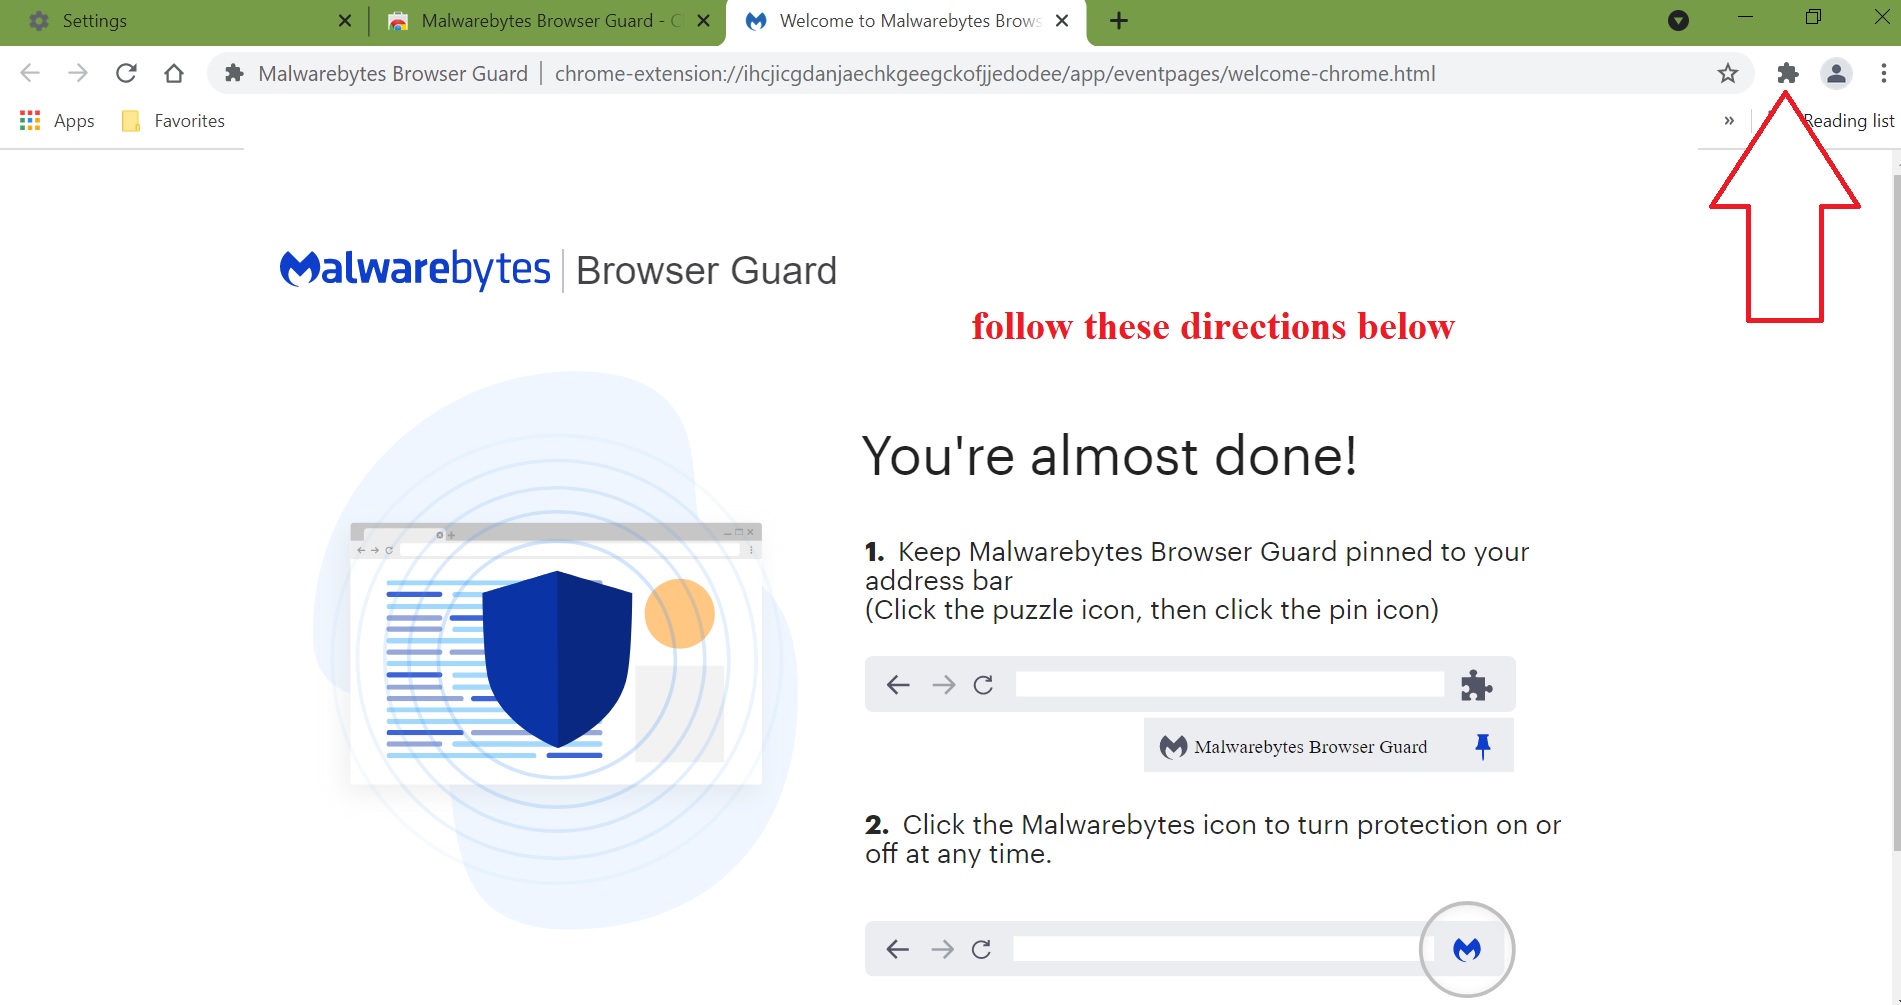
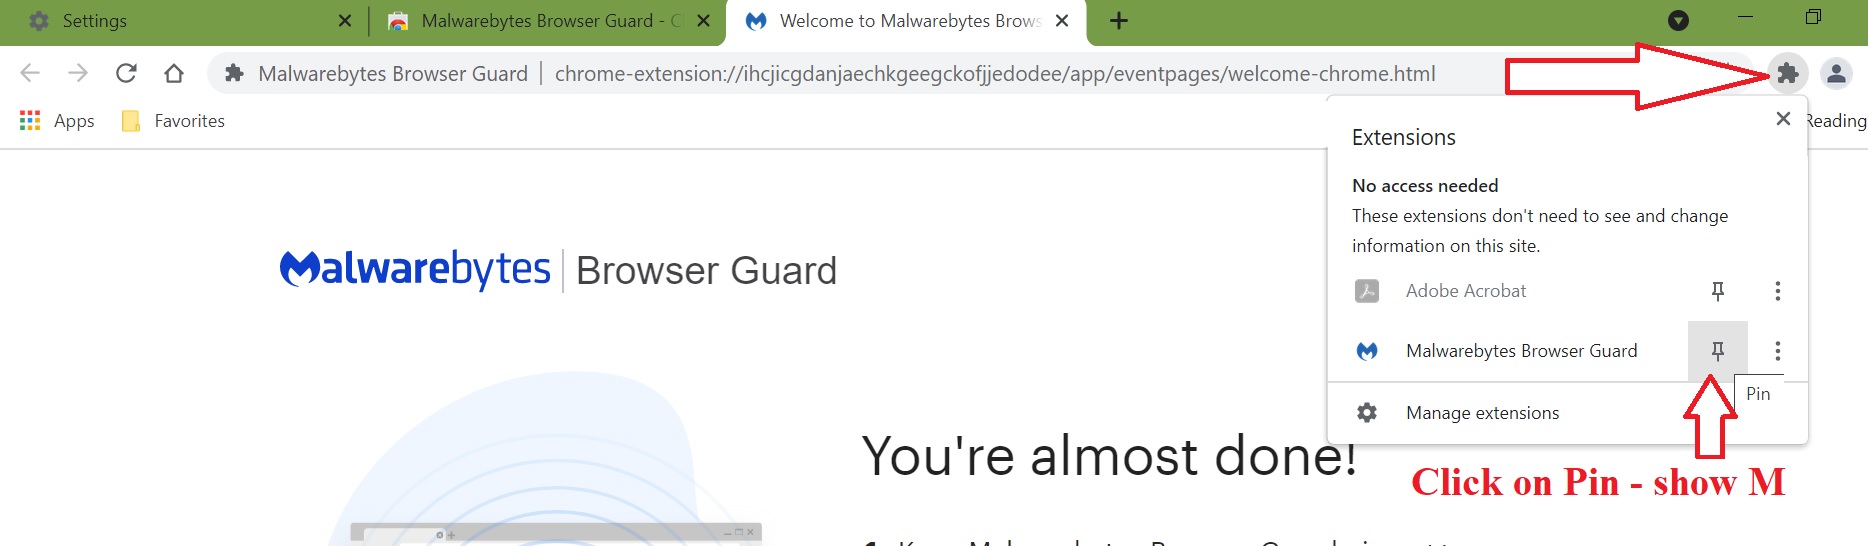
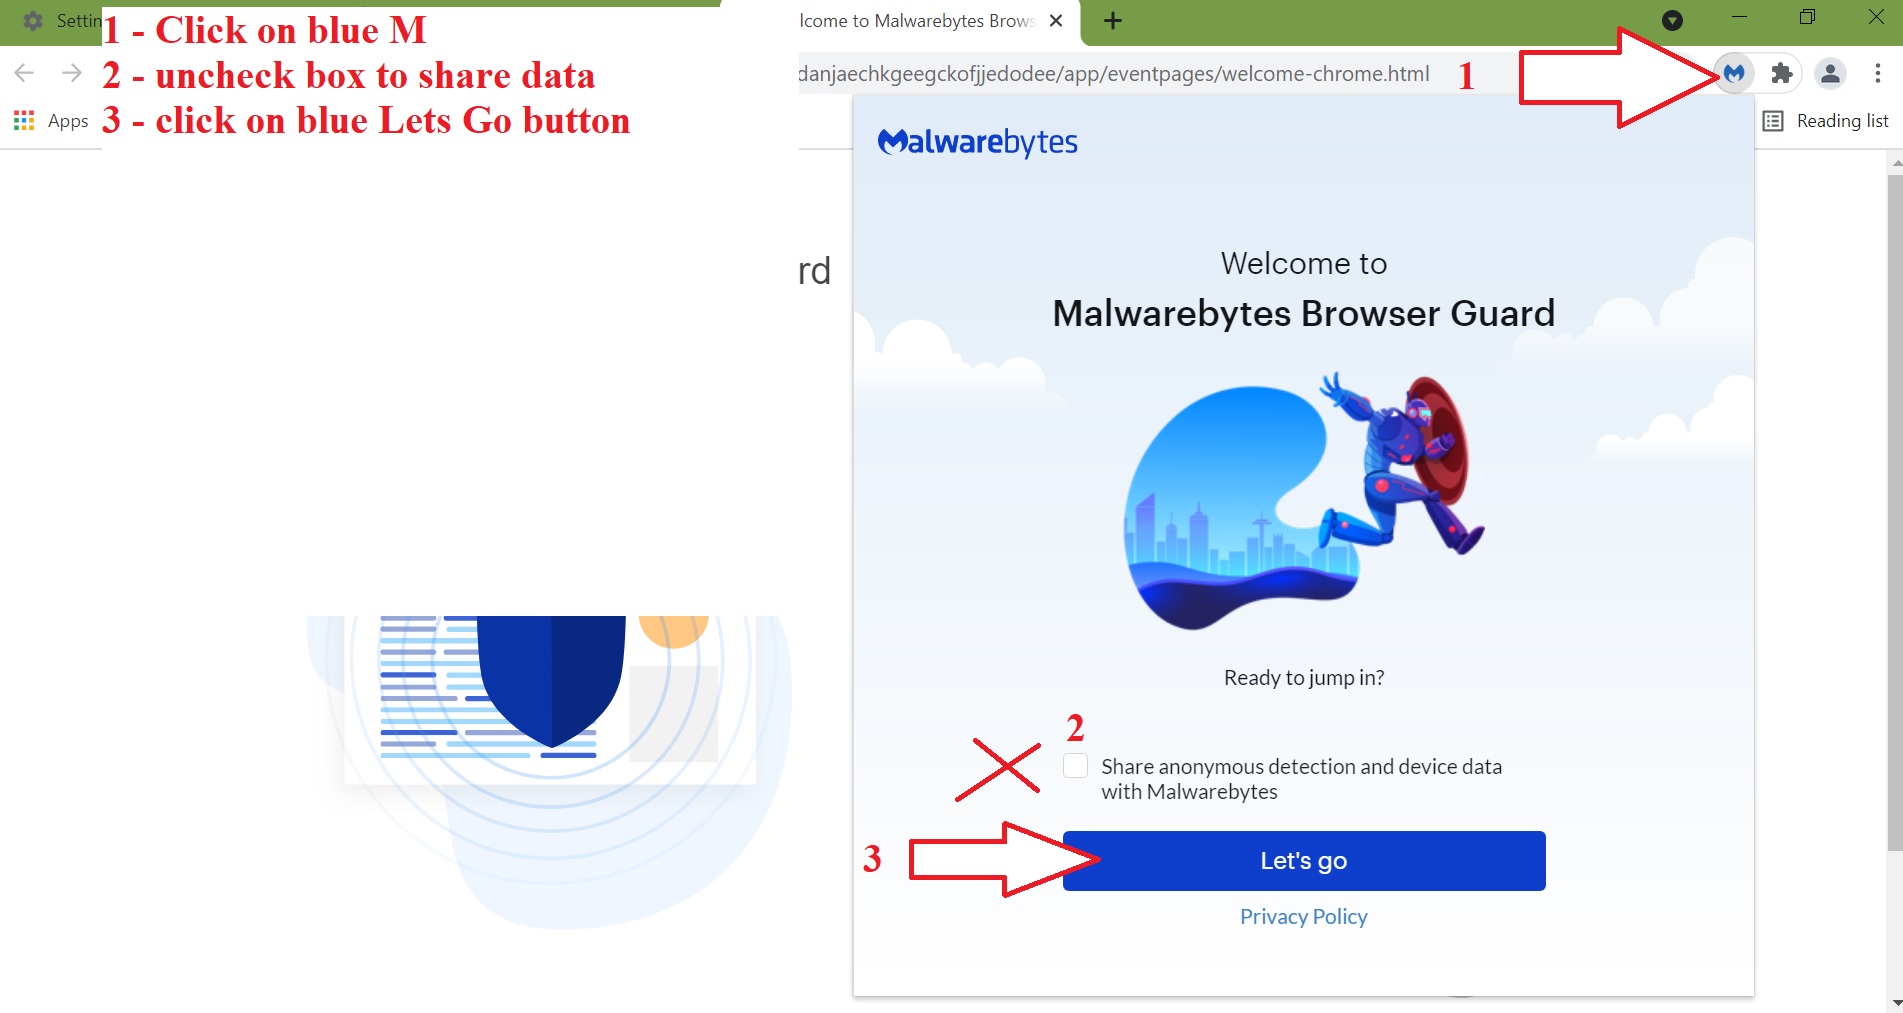
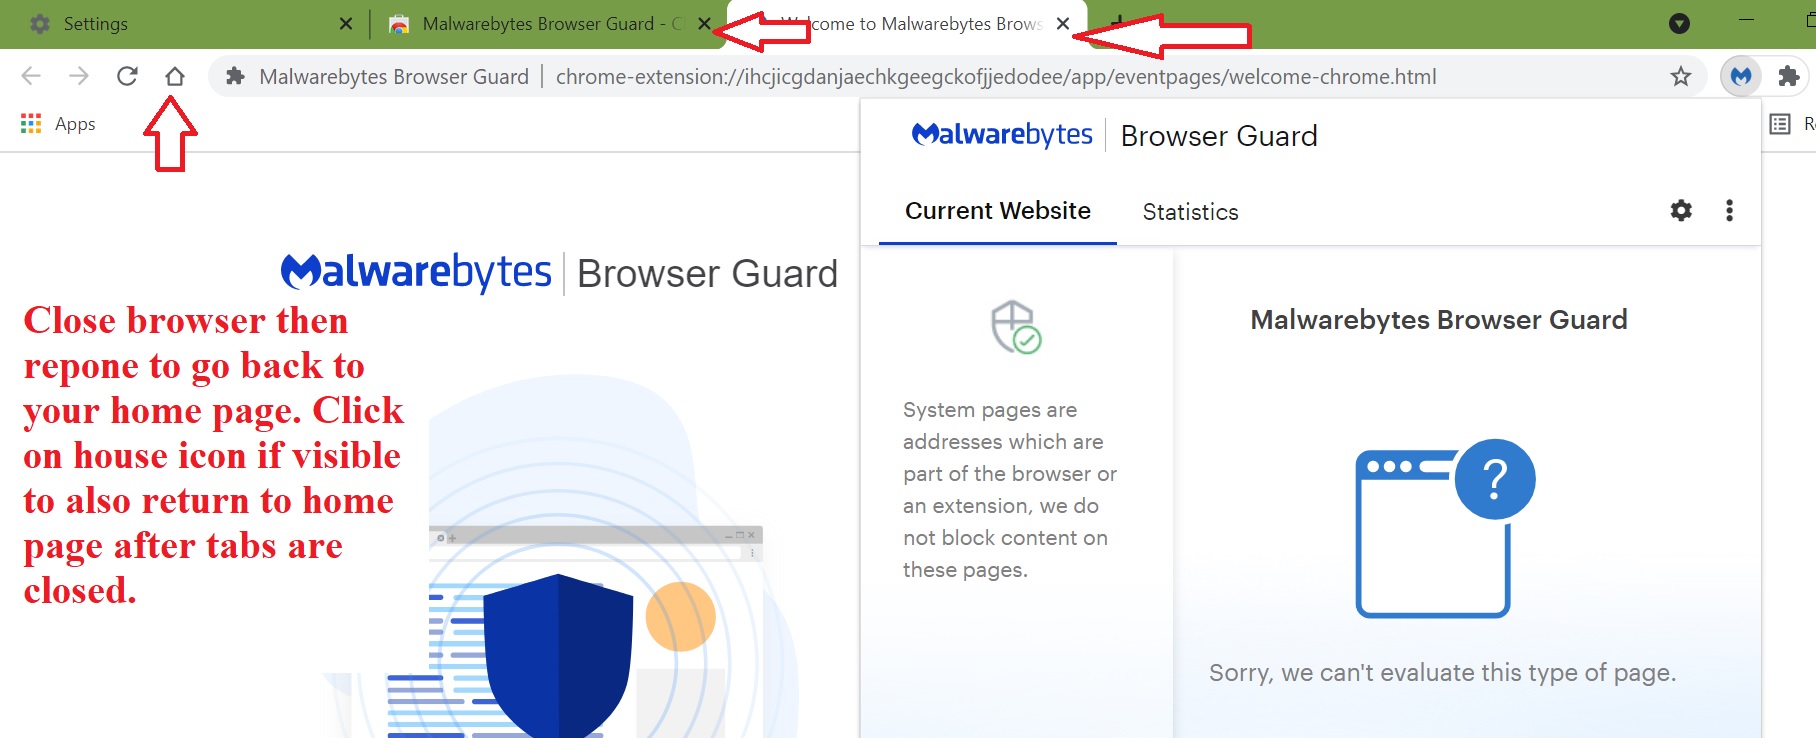
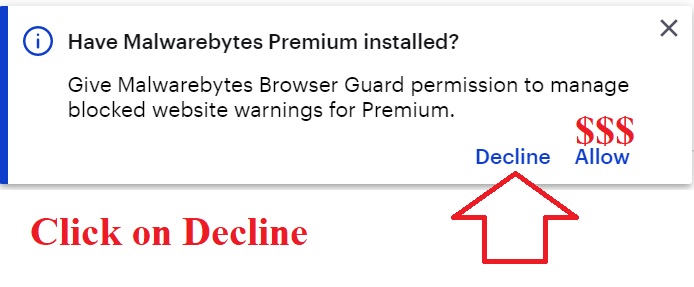
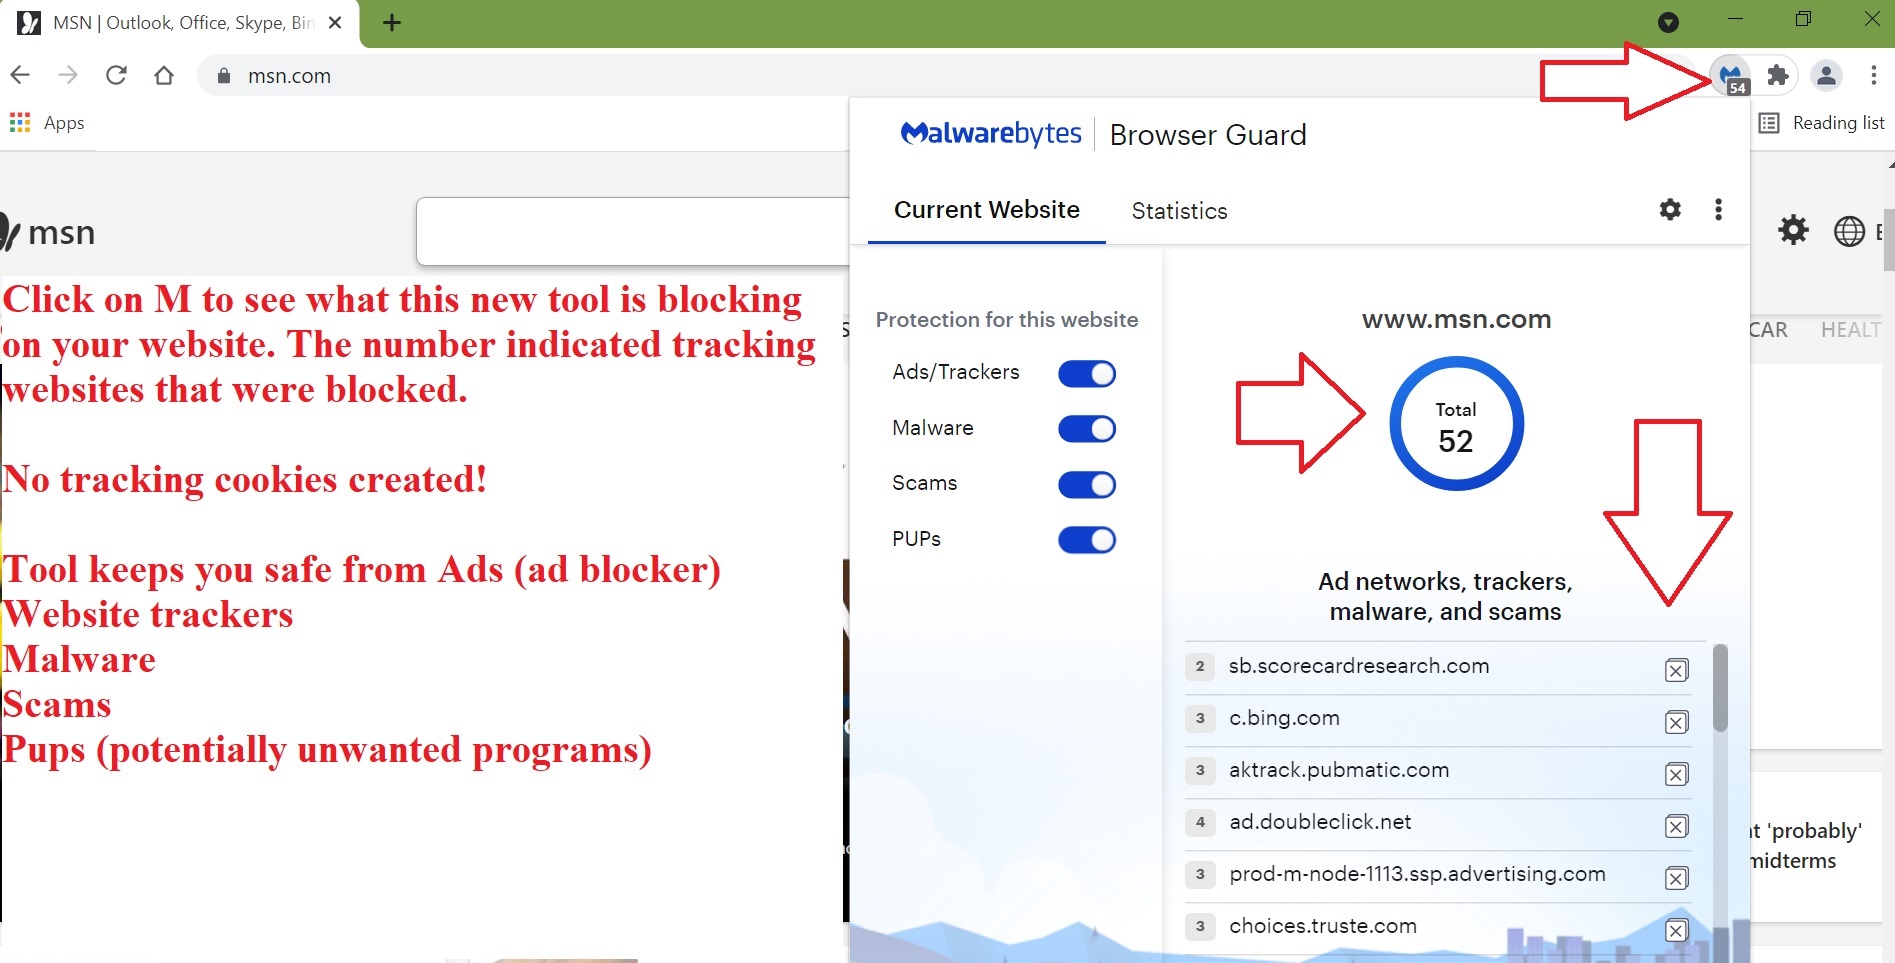
Add Malwarebytes to Google Chrome browser
Open Google Chrome browser
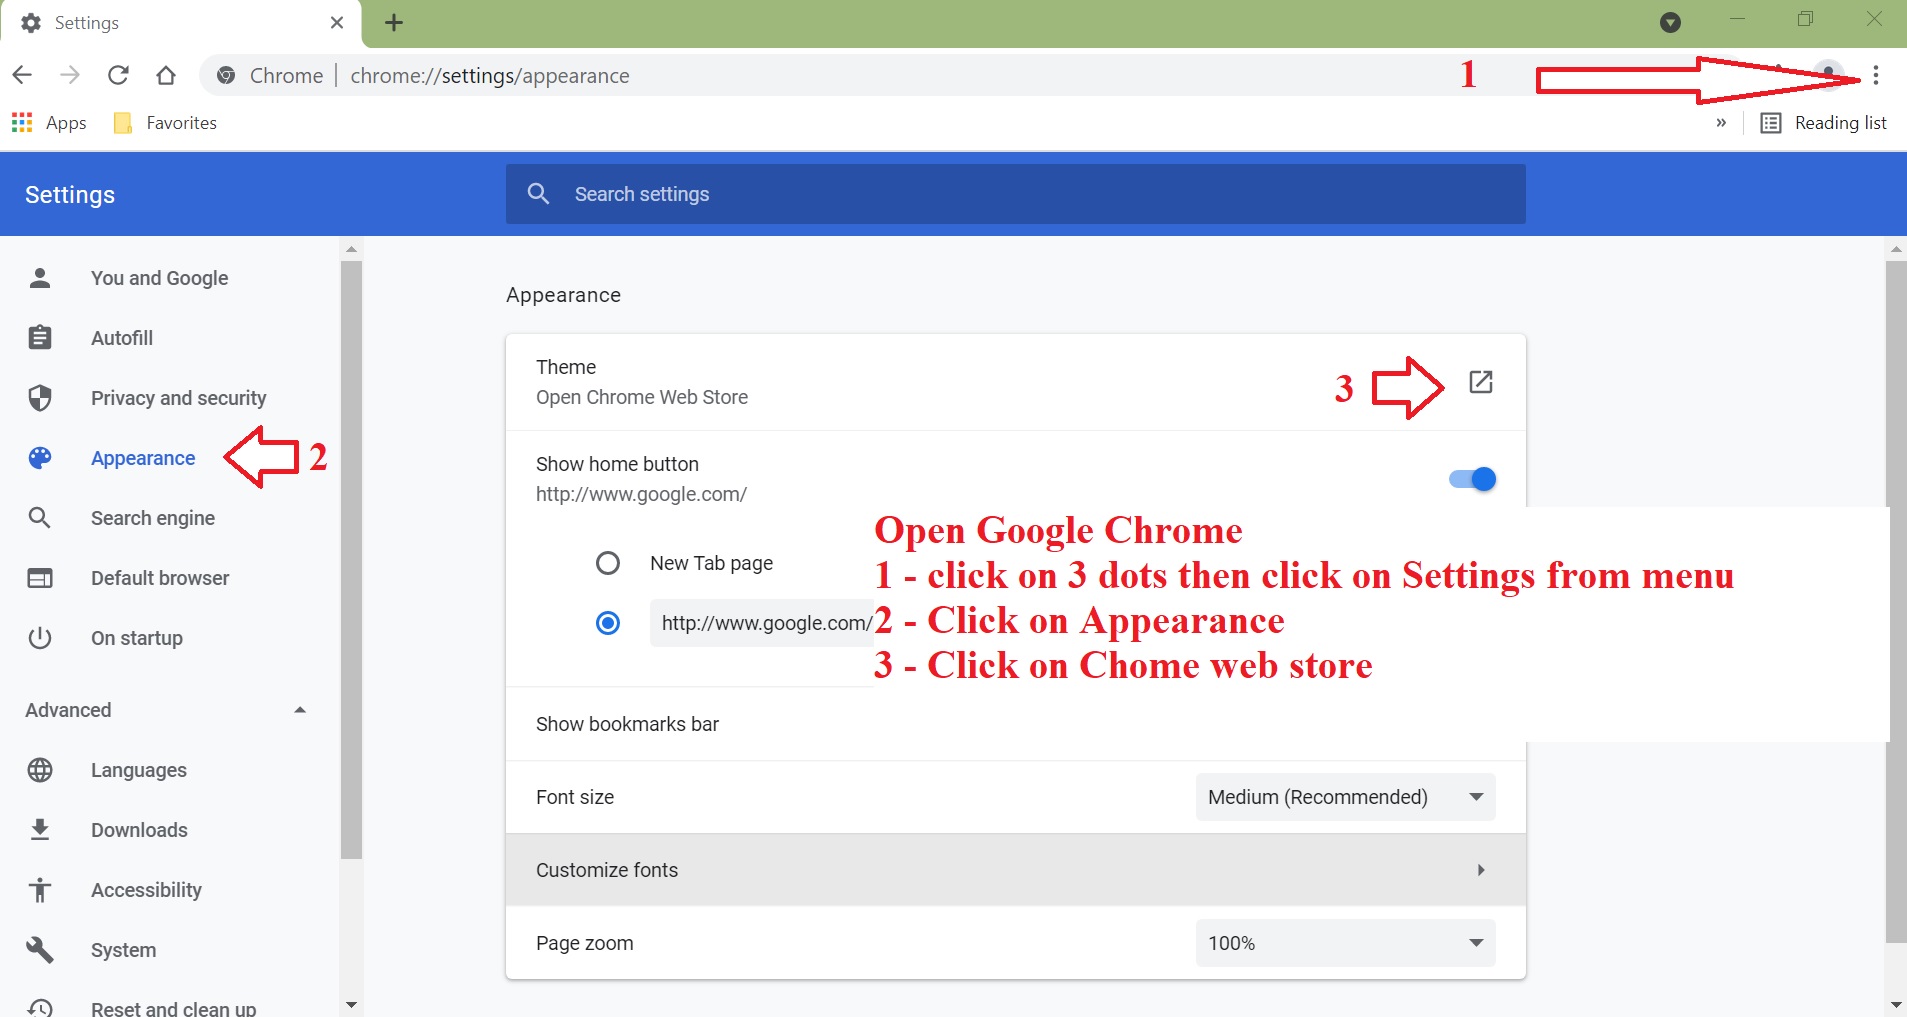
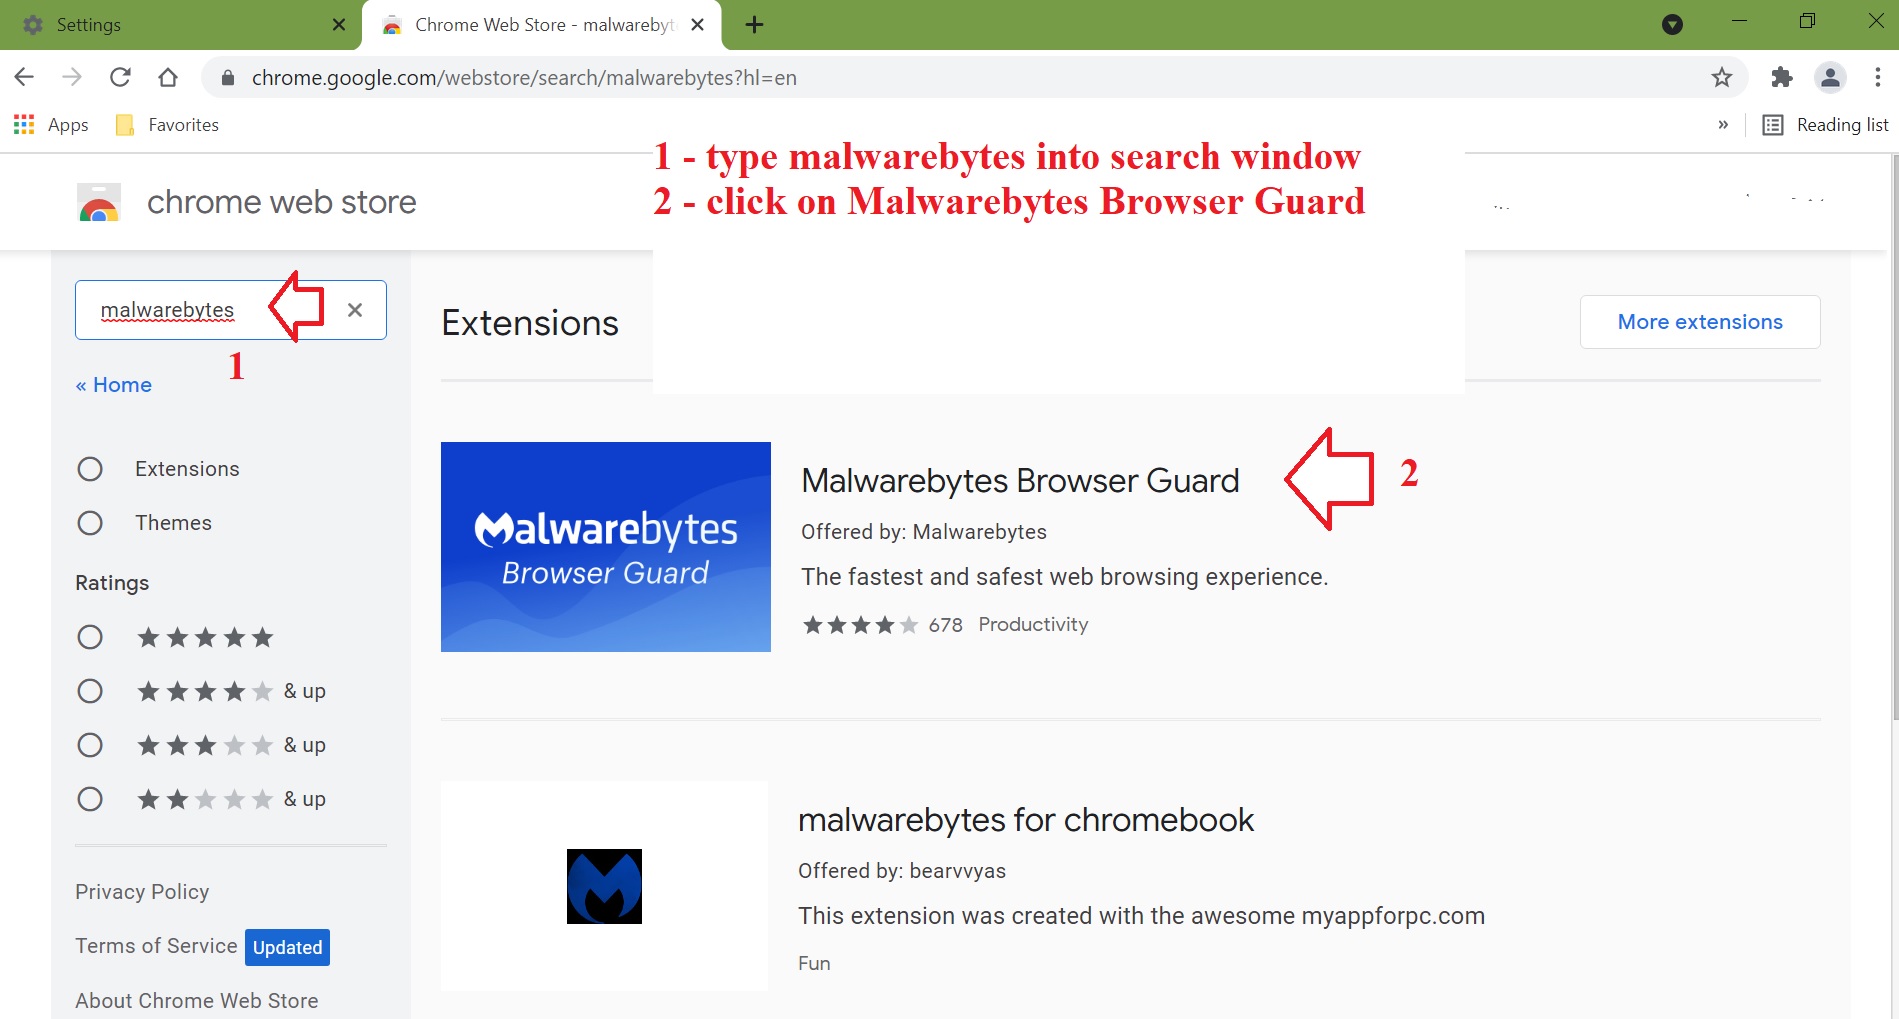
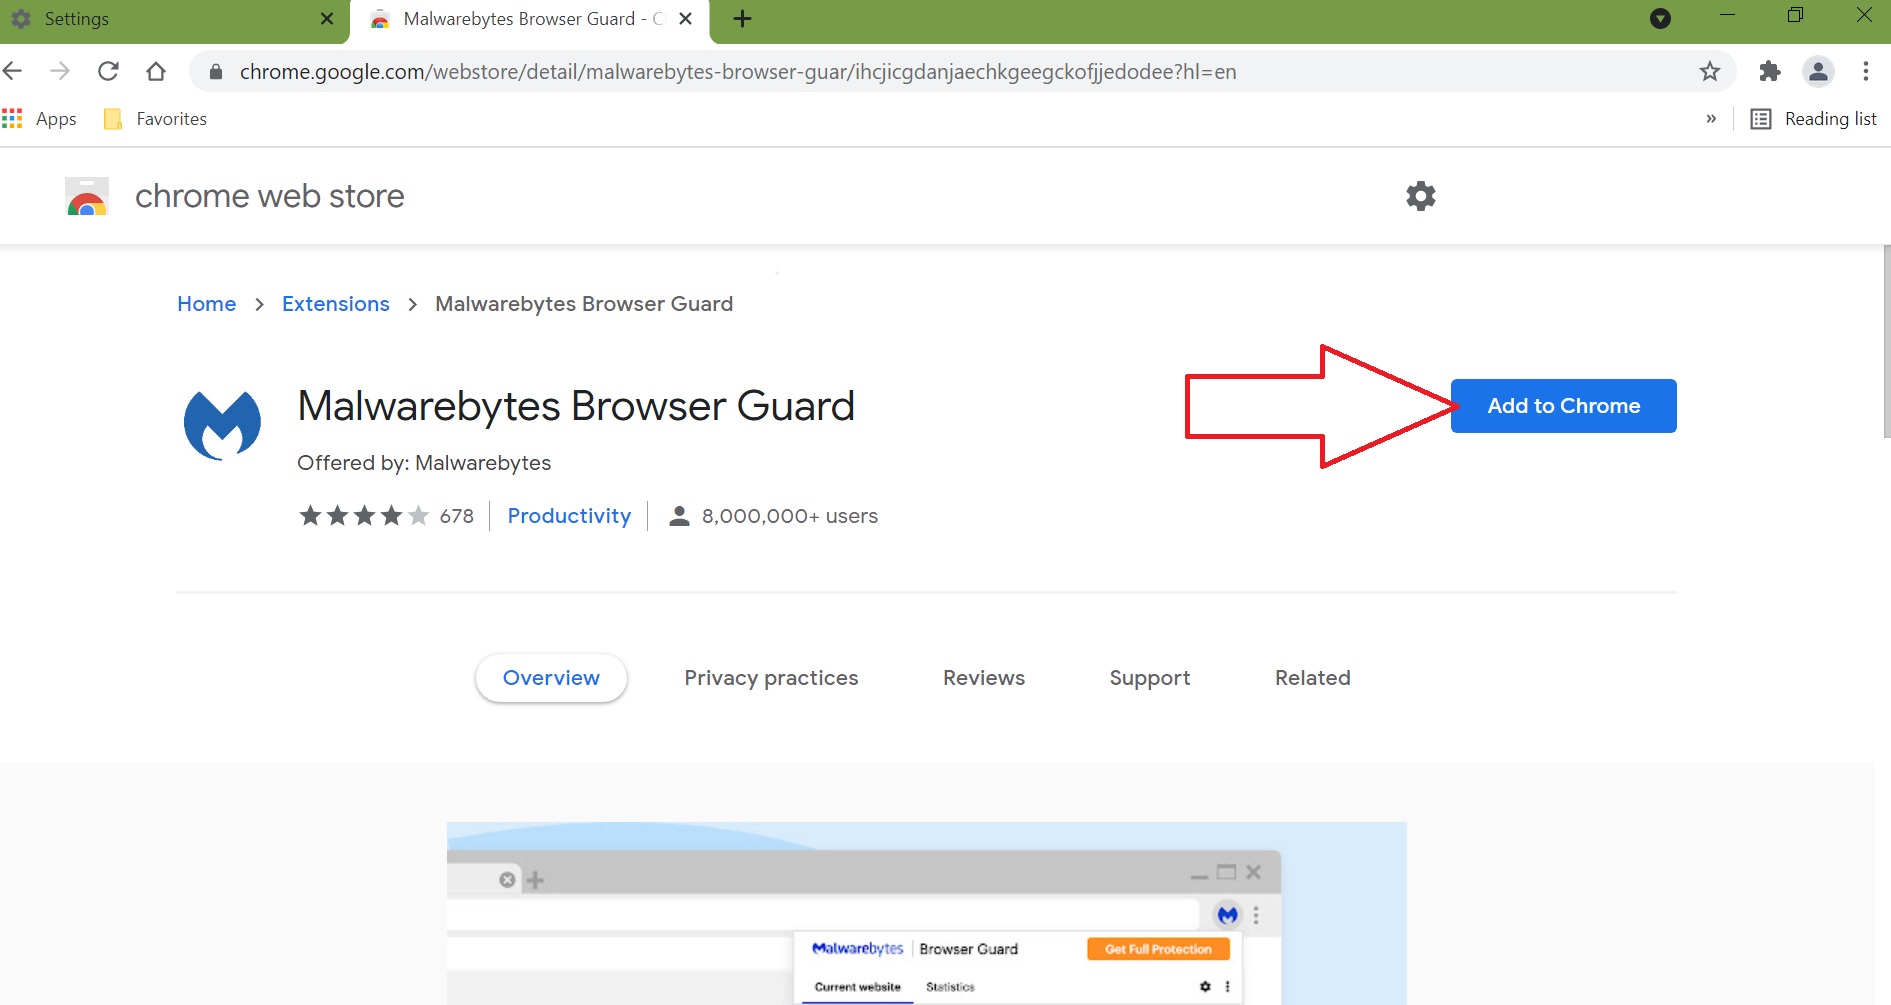
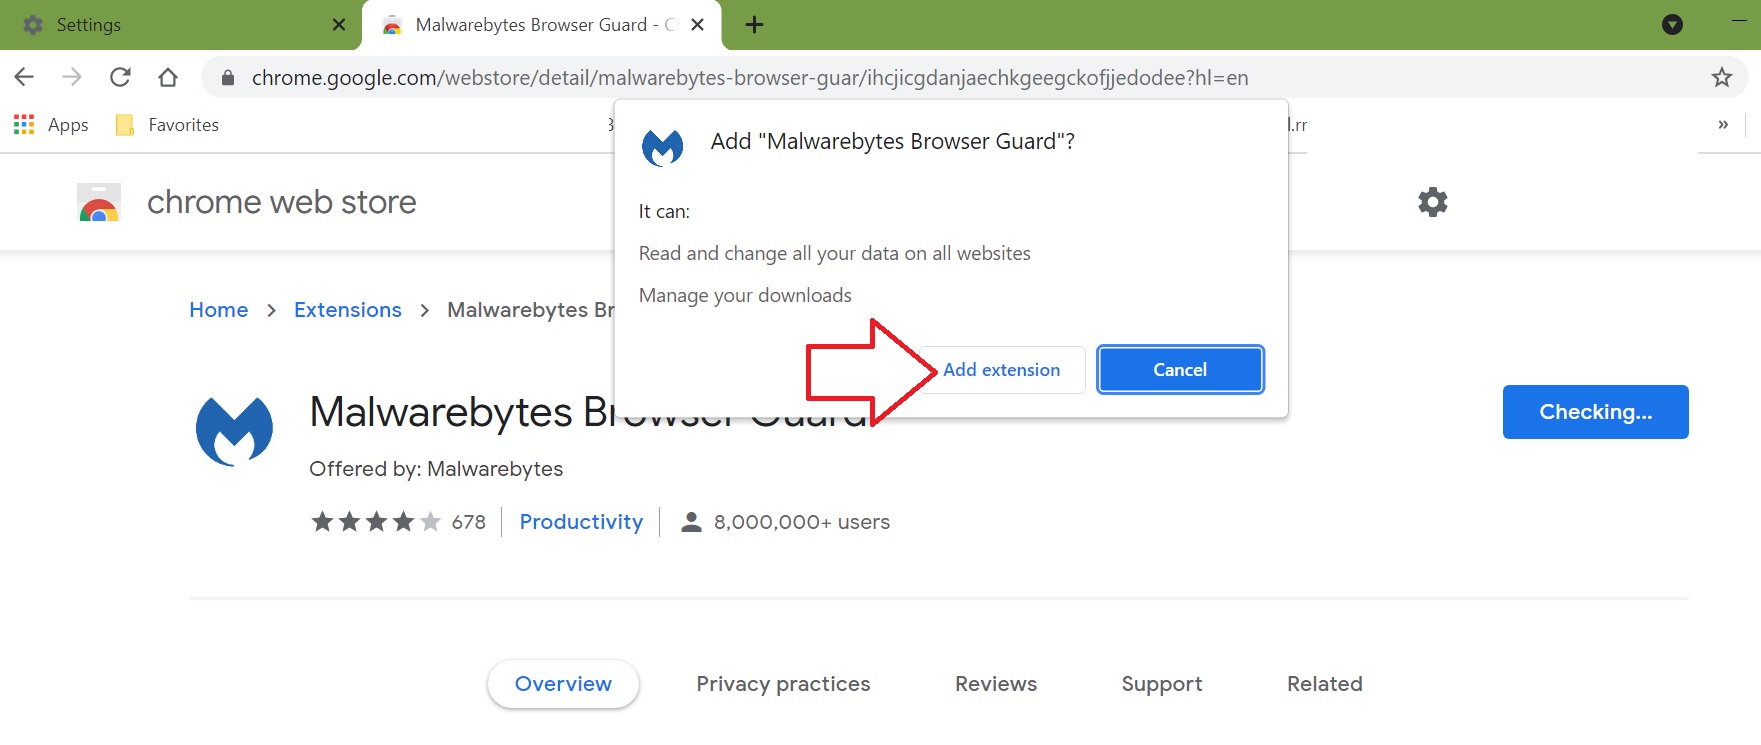

Click here to return to top.
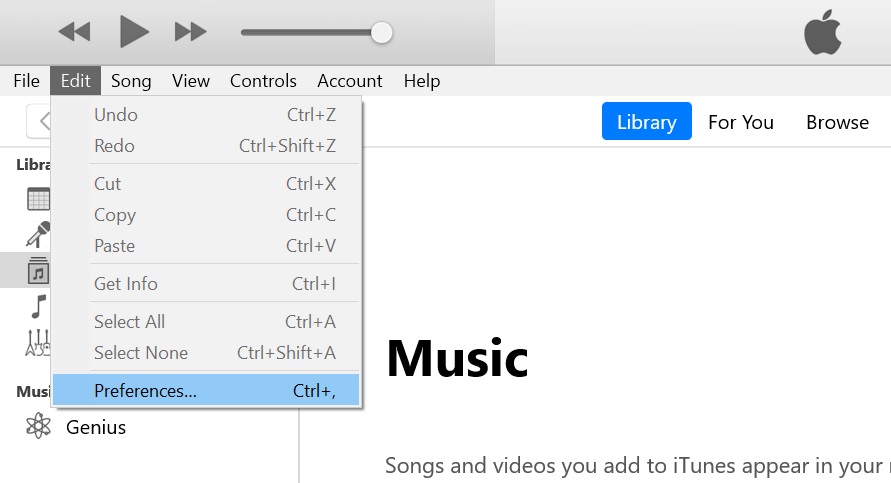
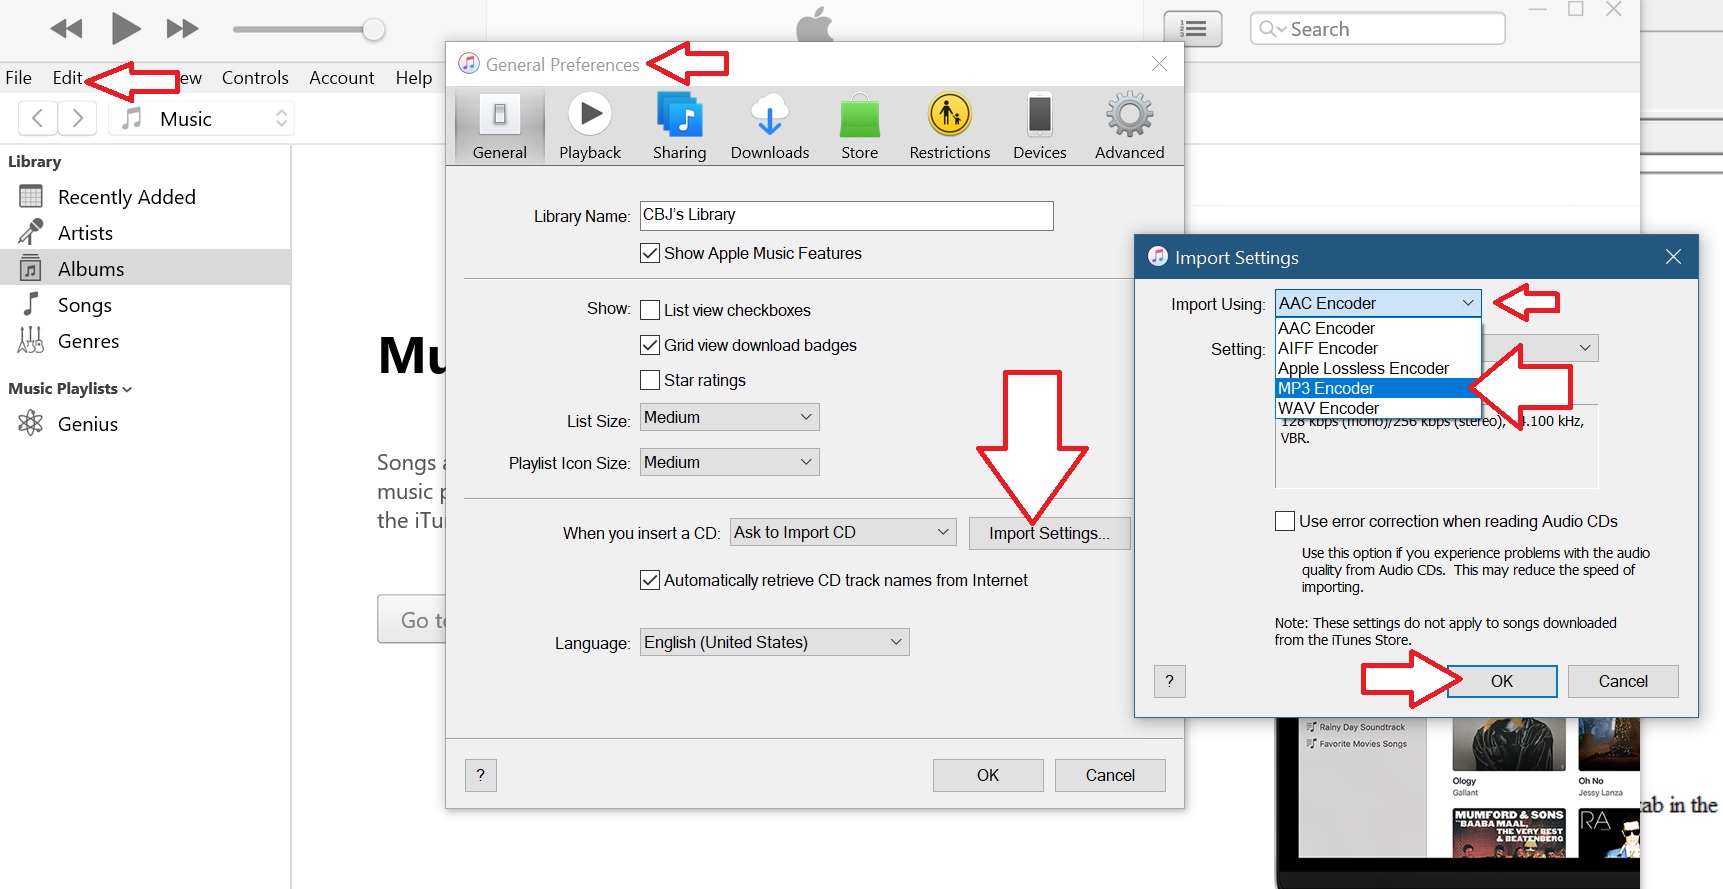
Insert CD into computer disk tray
Select Convert. This option is near the bottom of the File drop-down menu. Selecting it prompts a pop-out window to appear.
website - https://www.wikihow.com/Convert-CDA-to-MP3
Click here to return to top.
Click here to return to top.
Most browsers allow websites to ask you to Allow Notifications. The old days the websites would notify you with important messages. Nowadays, they just give you random pop up ads in the bottom right corner of your screen. Below are the steps to turn off this option in Firefox.
Click here to return to top.
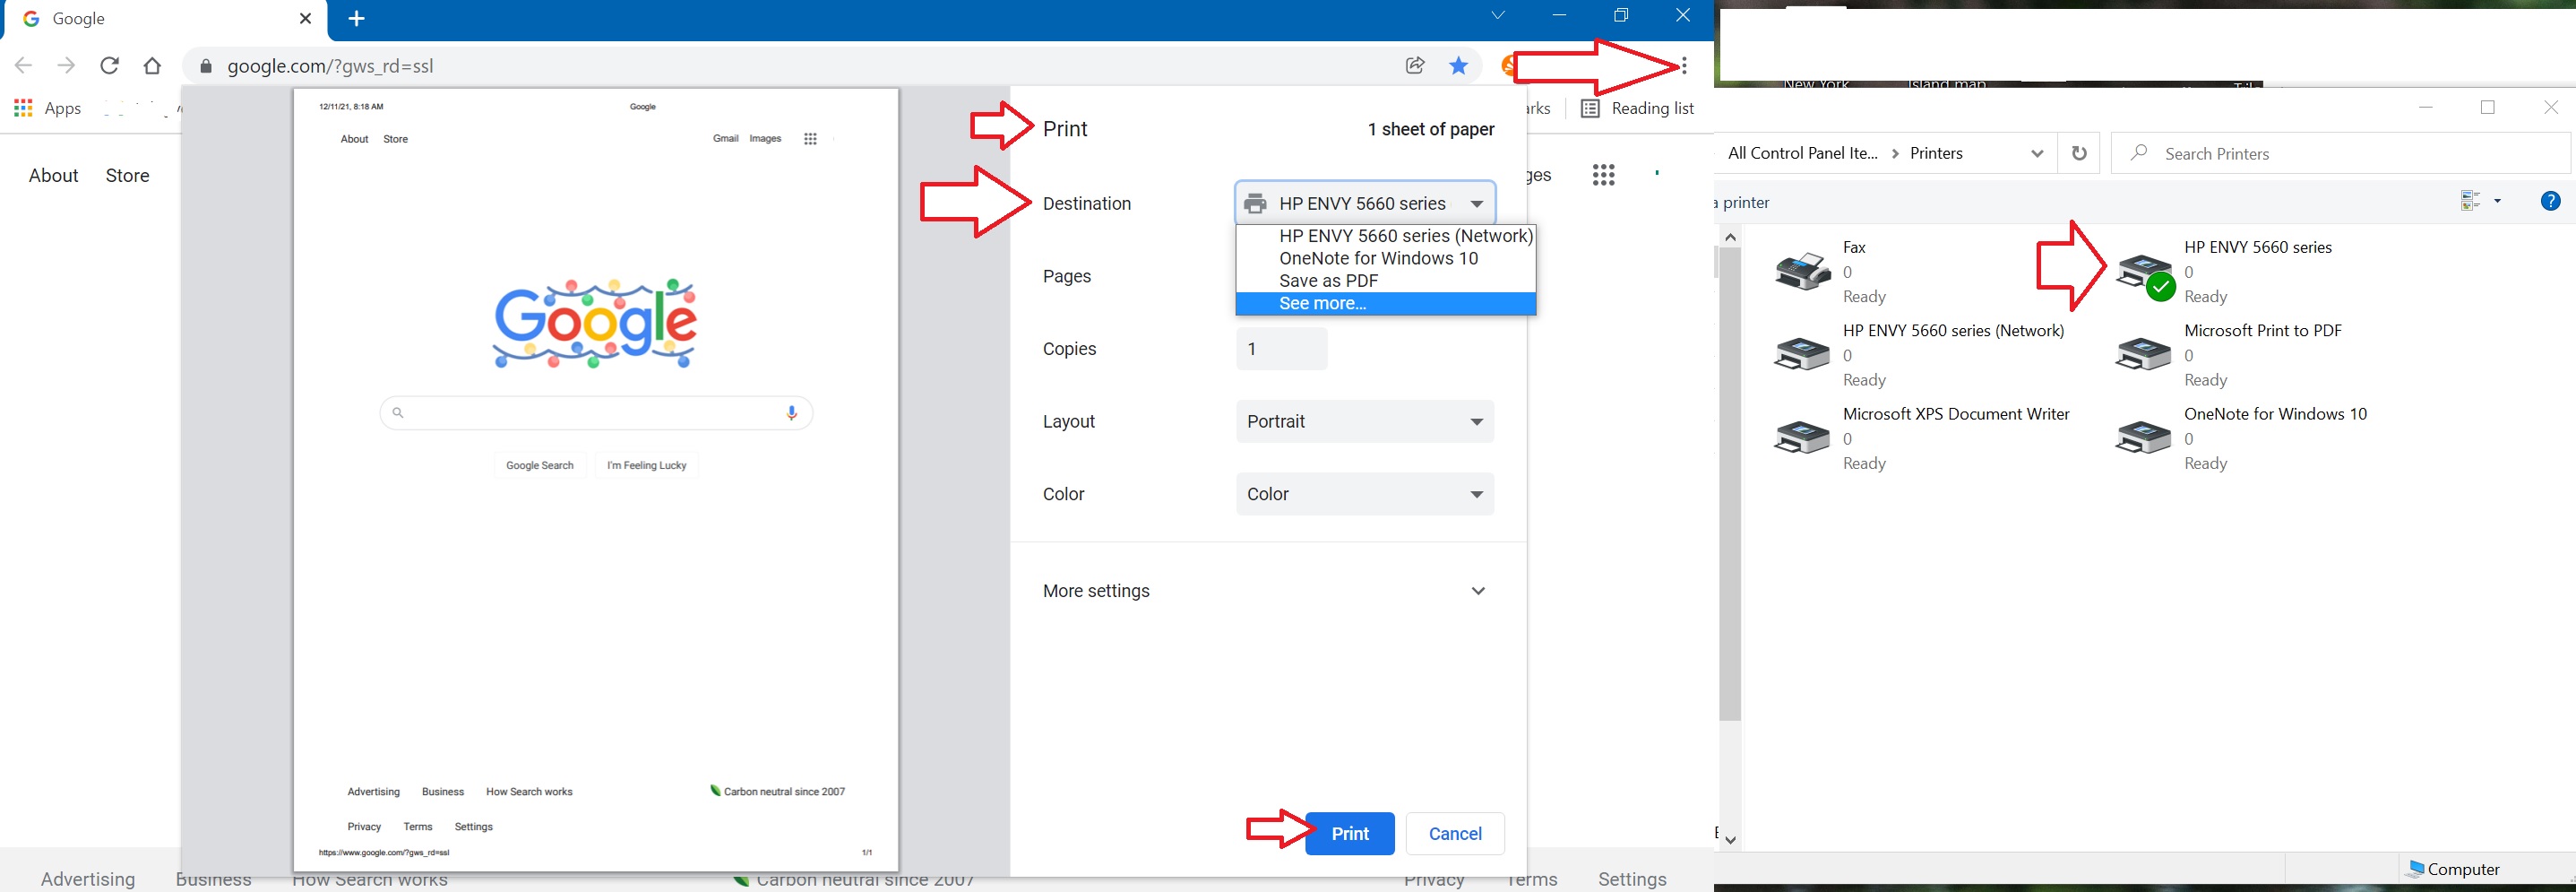
Google Chrome browser is Not a smart browser which causes problems when you change your default printer. When you install a new printer, Google Chrome does not see it. All other browsers will printer automatically to your default printer (green check mark, Devices and printers in Control Panel). If you use Google Chrome browser & you installed a new printer you must redirect Google Chrome to that new printer.
1 - Open Google Chrome
2 - Click on 3 dots in top right corner
3 - Click on Print on menu
4 - in the next window that appears look a Destination printer. If its not correct click on See more... then click on the correct printer name.
5 - click on Print (blue button) to test the printer.
If that page prints out you are all set. If it does not then you picked the wrong printer. Go back to Devices & printers & write down the exact printer name (one with green check mark). Then return to Google Chrome (Step 4) & pick the correct printer from the list.
Click here to return to top.
Click here to download free 30 day trial of the program.
Click here to view videos that will show you how to use the editing tools.
Click here to return to top.
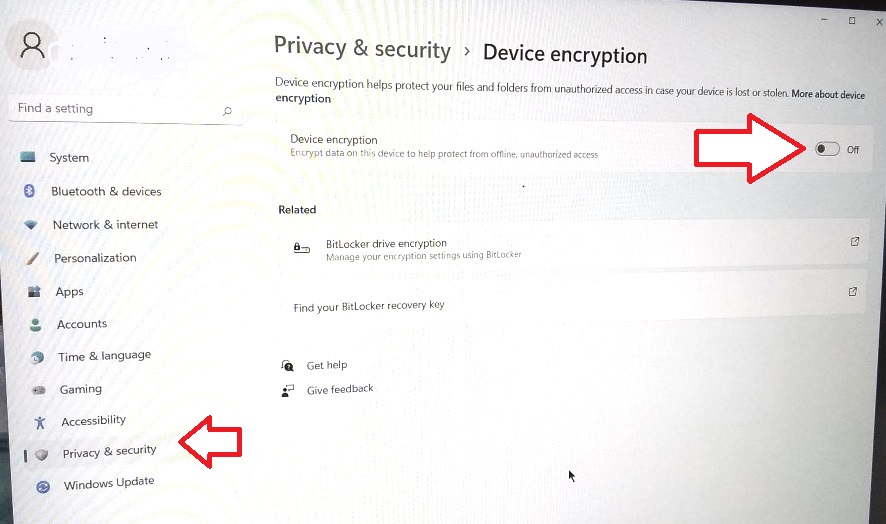
Find my Device - Hard Drive Encryption - When you setup a Windows 11 computer one of the first questions they ask is the Find My Device Setting. The purpose is if your computer is stolen, you could remotely wipe the device. Challenge is the computer must be connected to the Internet. If the profile is setup as a Cloud account, then the bad guys would have to connect the computer to the Internet in order to log into your account. If you activated the remote wipe, once they did your files would disappear from your stolen computer.
The challenge is once it is turned on then if you have a problem & need to go into Safe Mode to fix it you will need to type in your 64 digital encryption key. It is hidden on your computer & must be saved to a flash drive or printed out. If you lose it then you will not be allowed to fix your computer.
When I setup a Windows 11 computer I turn off Find my Device option. That stops the key from being created. If you already setup the computer with the option turned on you can turn it off any anytime (expect when the computer has a problem, its too late then). To turn it off click on Settings then click on Privacy & security then click on left of blue On button to turn off. You will then get a run bar as your hard drive encryption is turned off.
Click here to return to top.
How to wipe an old computer
Windows PC
Step 1 – Make sure your documents & pictures are backed up.
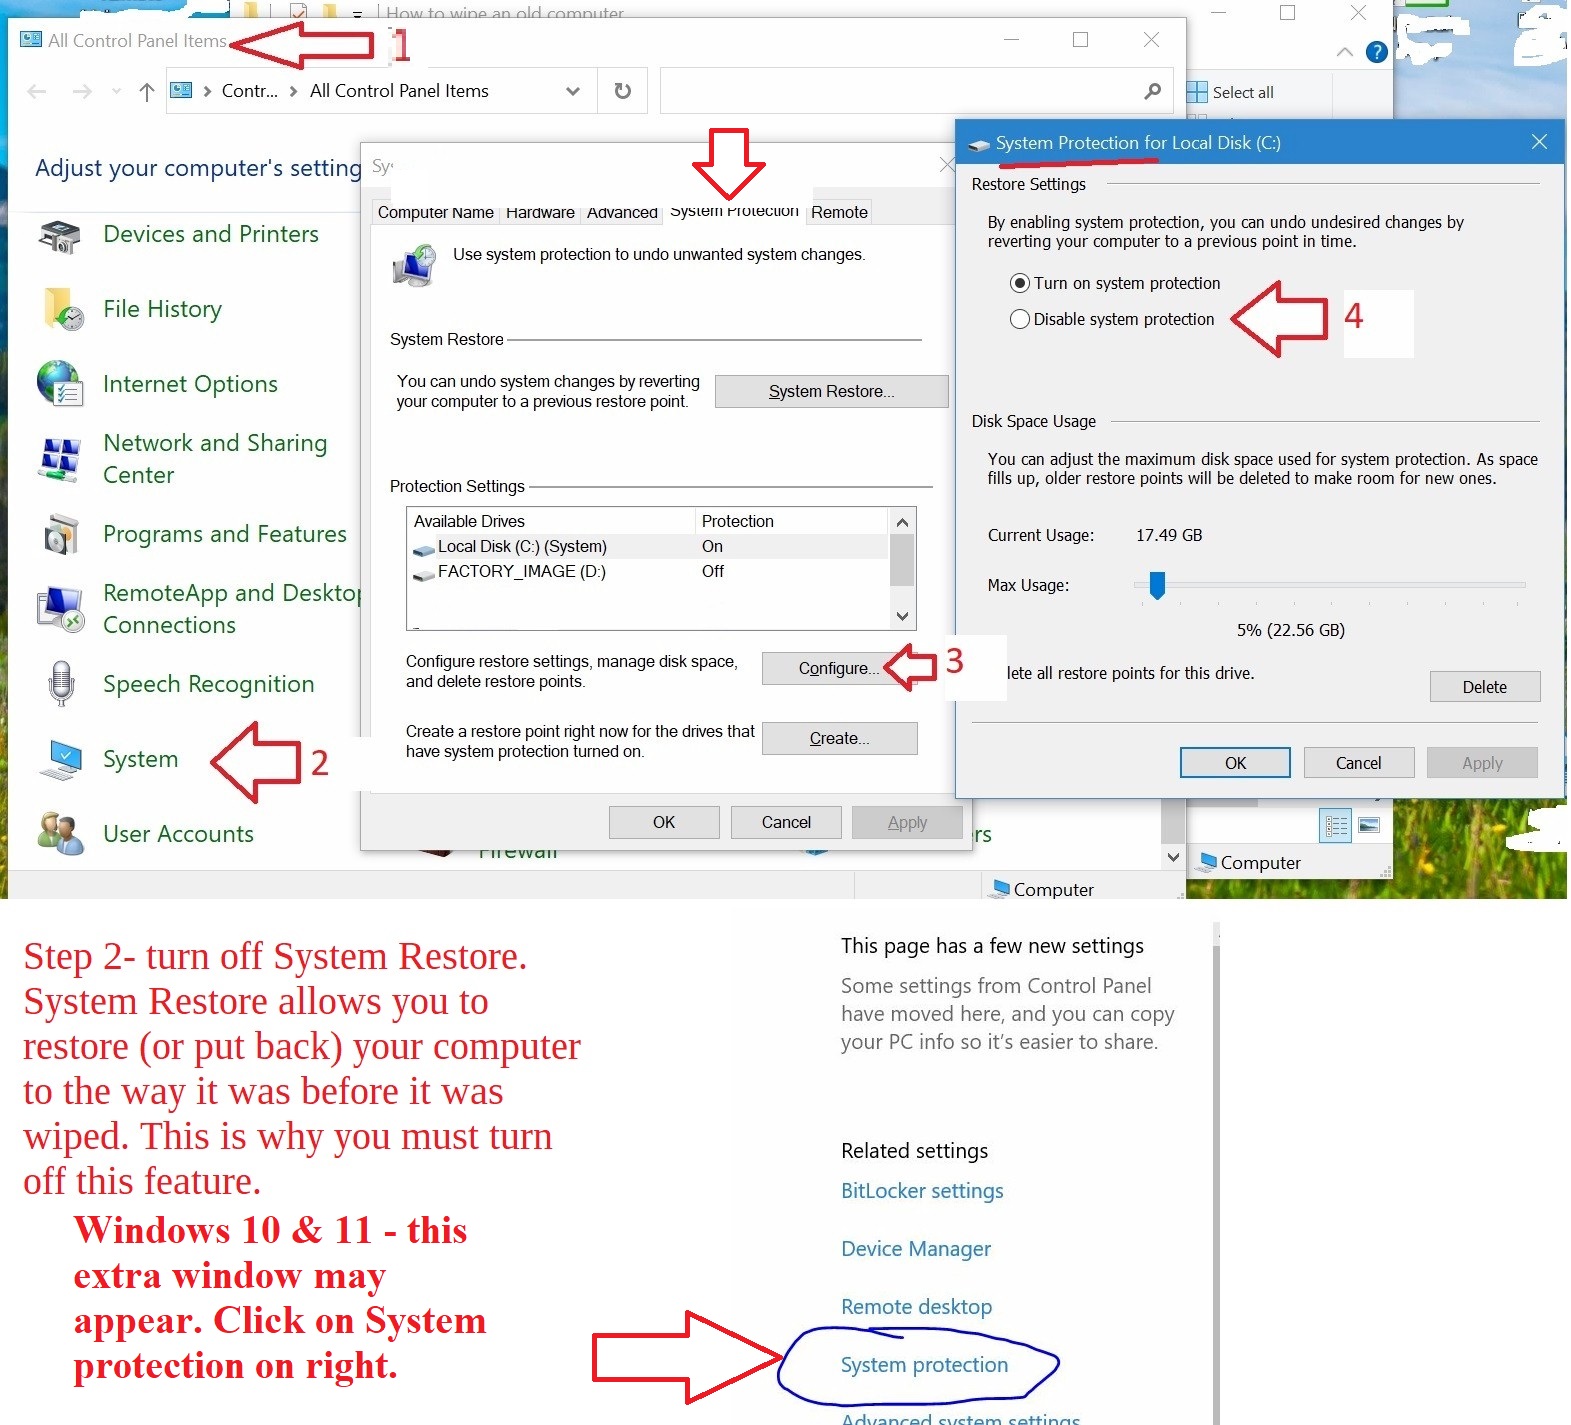
Step 2 - turn off System Restore. System Restore allows you to restore (or put back) your computer to the way it was before it was wiped. This is why you must turn off this feature.
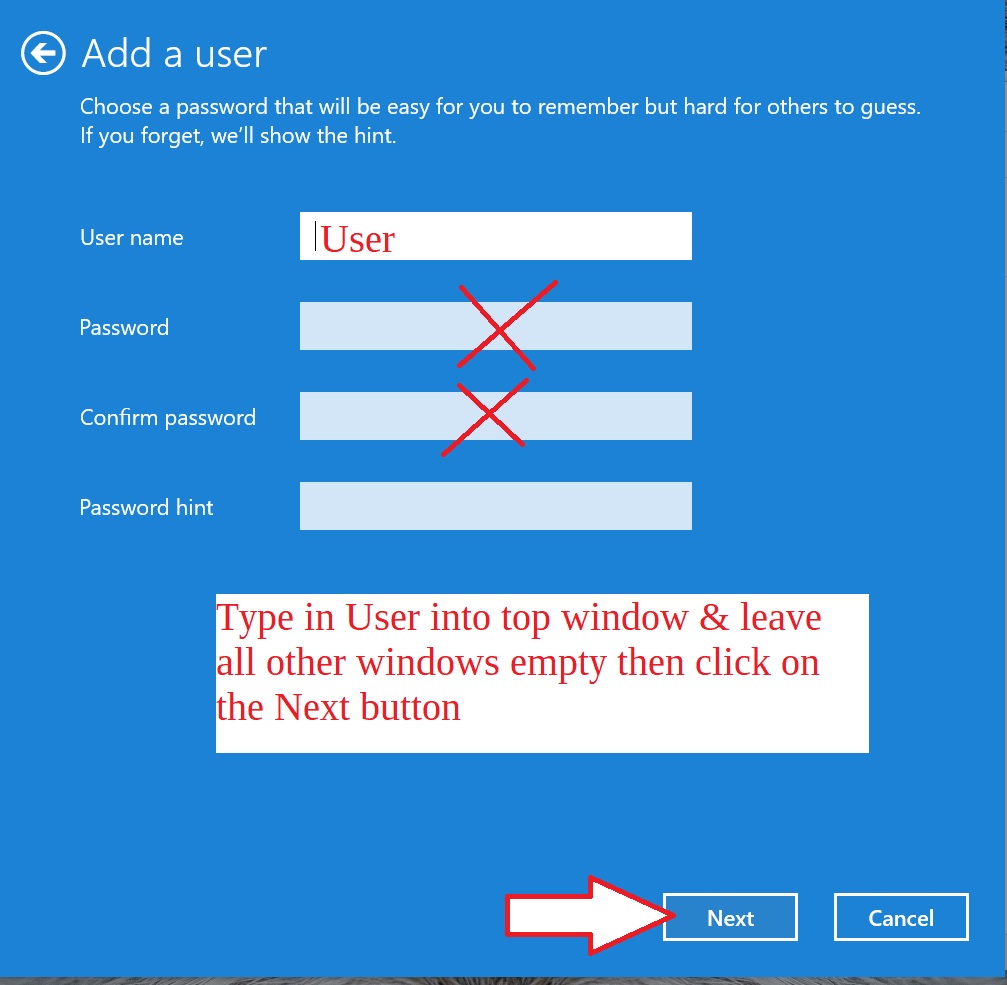
Step 3 – Create a new user – call it "User" – then change account type to Administrator.
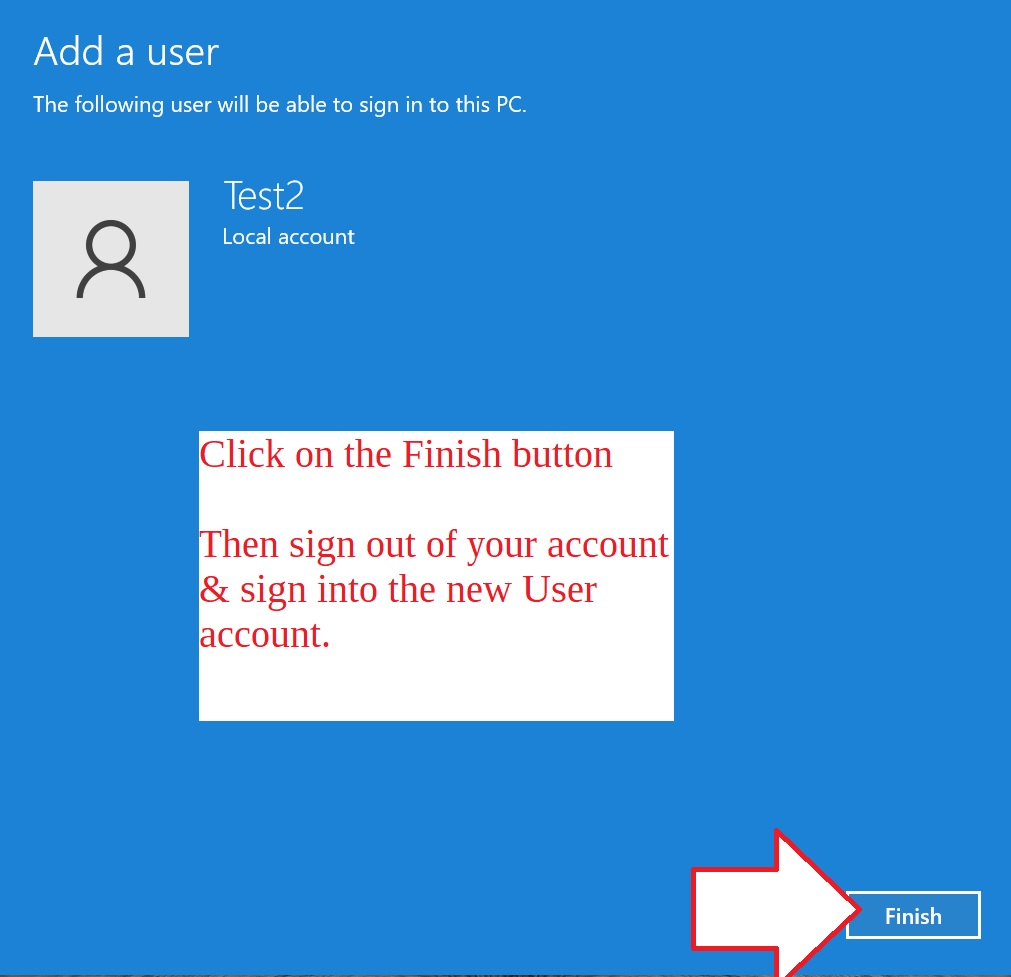
Step 4 – Log off your account then log into the new "User" account.
Step 5 – Delete your user account.
Step 6 – Restart computer then check computer to verify all your stuff is gone.
Below you will find pictures to describe the steps listed above.
Open the Control Panel. If its not on the desktop, search for it on your computer. Once its open click on the icon that says "System". Then click on the "System Protection tab" then click on the "Configure" button then click on the dot to the left of "Disable system protection". Then click on the "Apply" button to save your changes. If you get a pop up stating that "all restore points will be deleted", click on the OK button. Then close all the Control Panel windows.
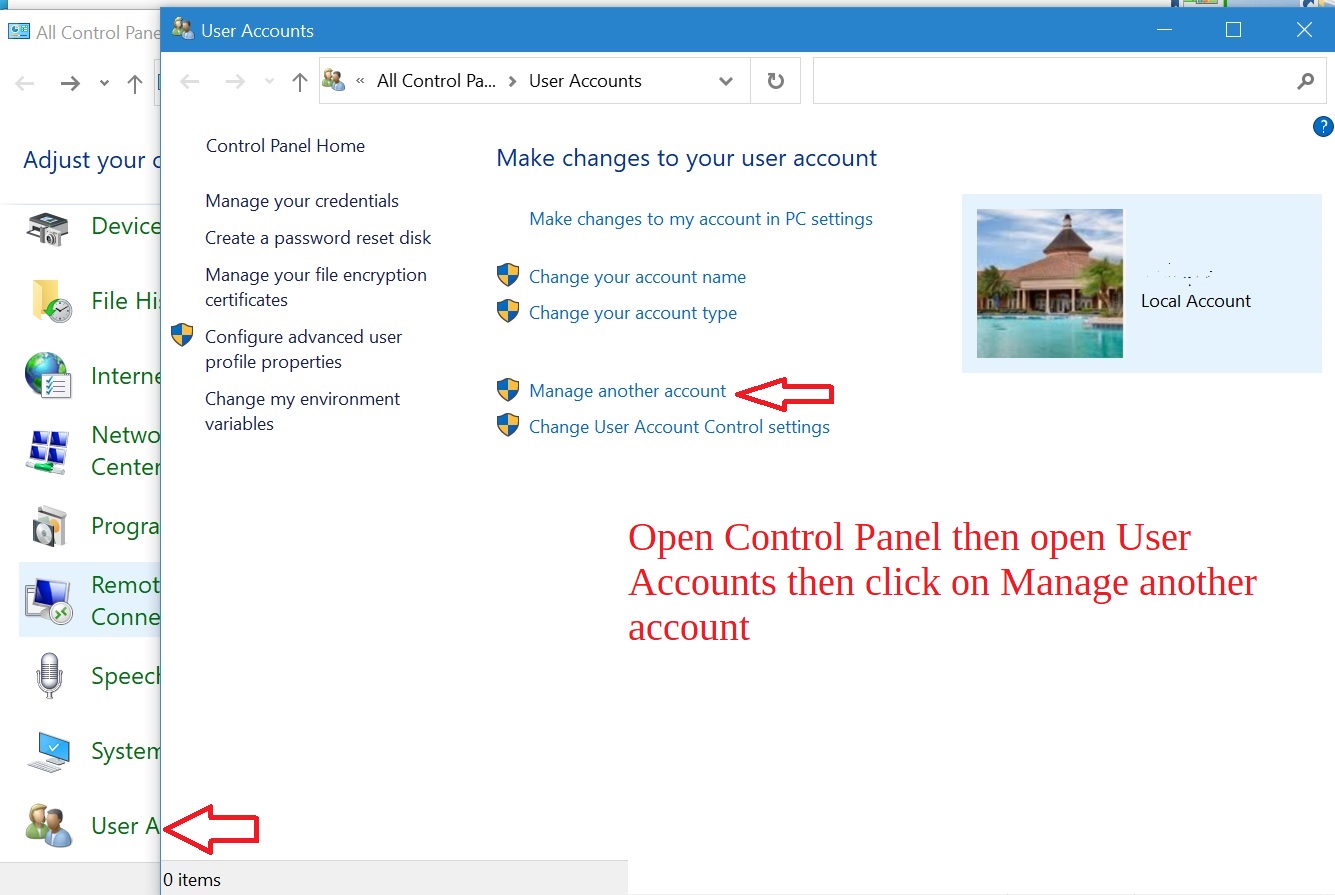
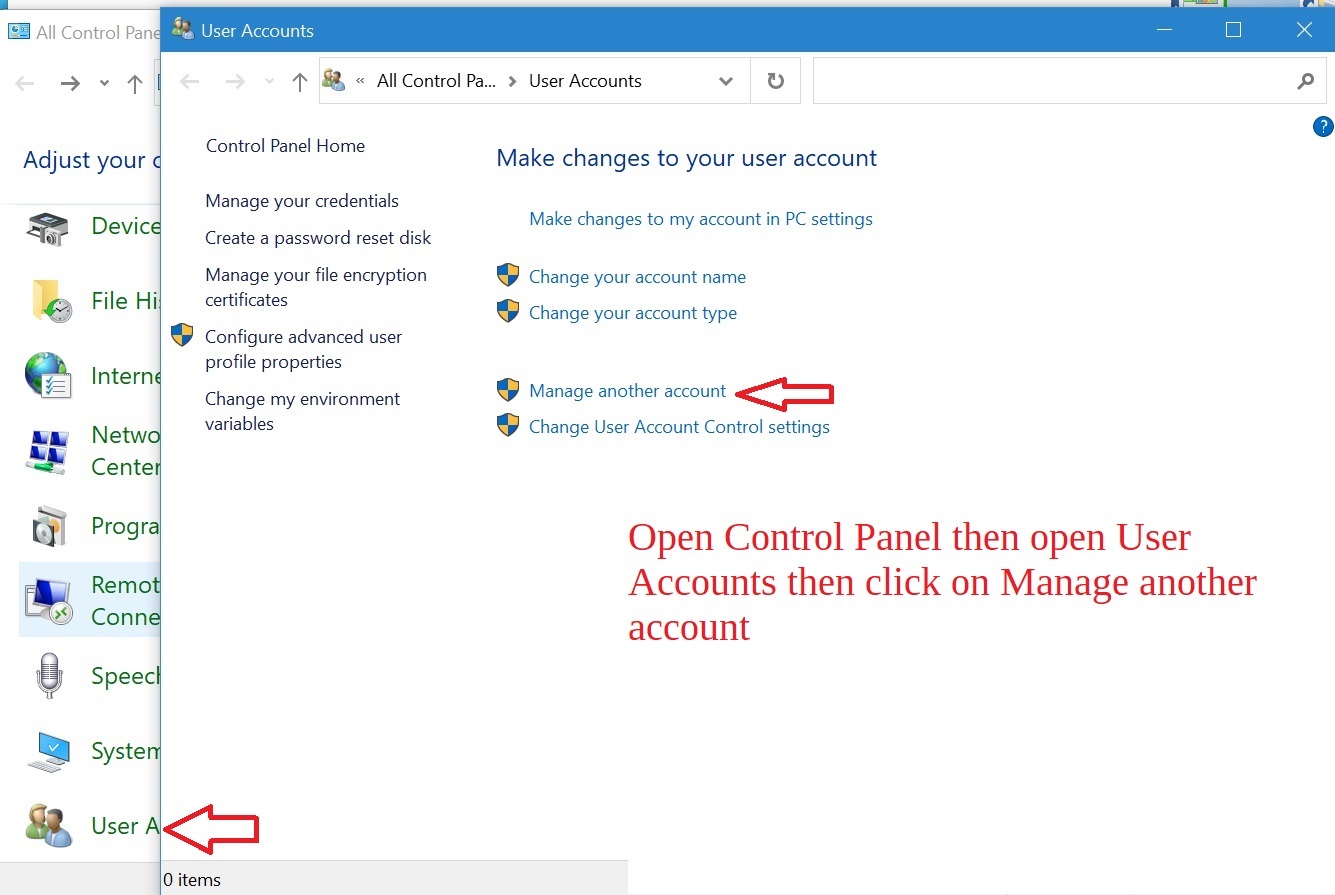
Then open Control Panel again then click on "User Accounts" then click on Manage another account. If the User Account Control window appears click on the "Yes" button.
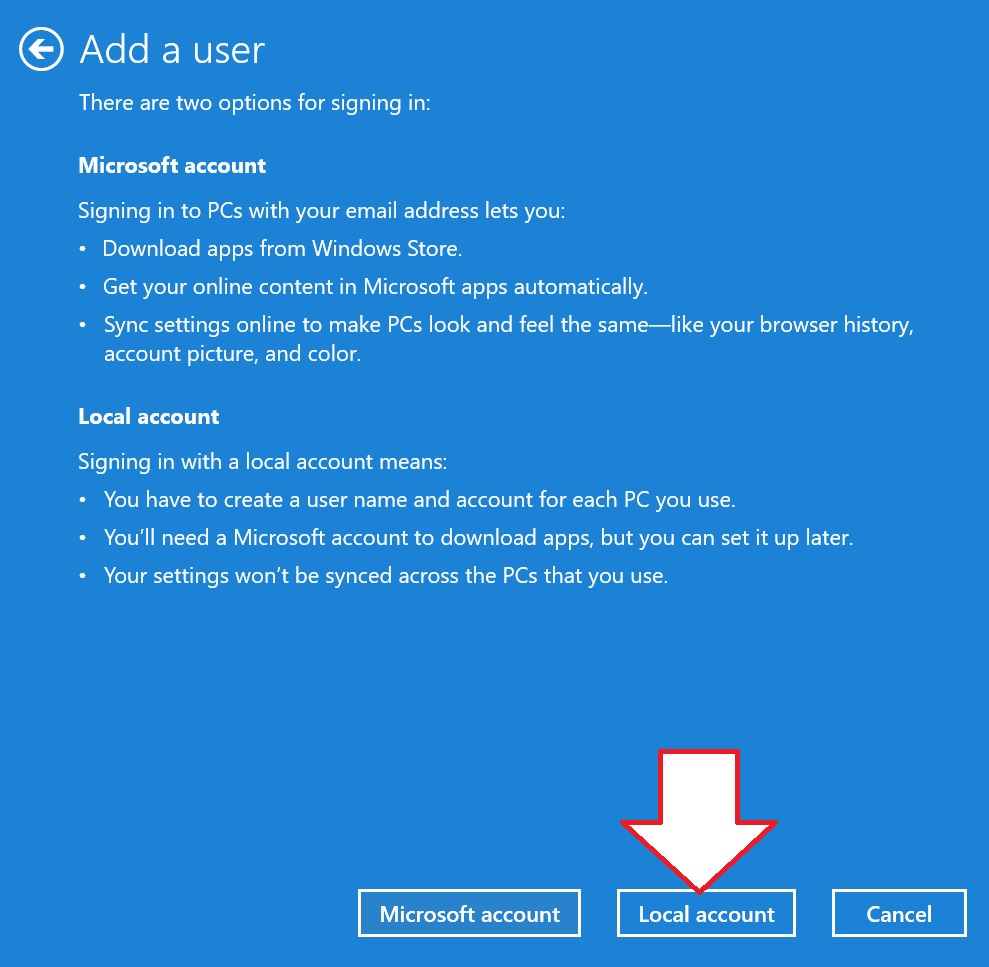
In the bottom of the window click on "Add a user account" then in the next window click on "Sign in without a Microsoft" account then the next window should appear.
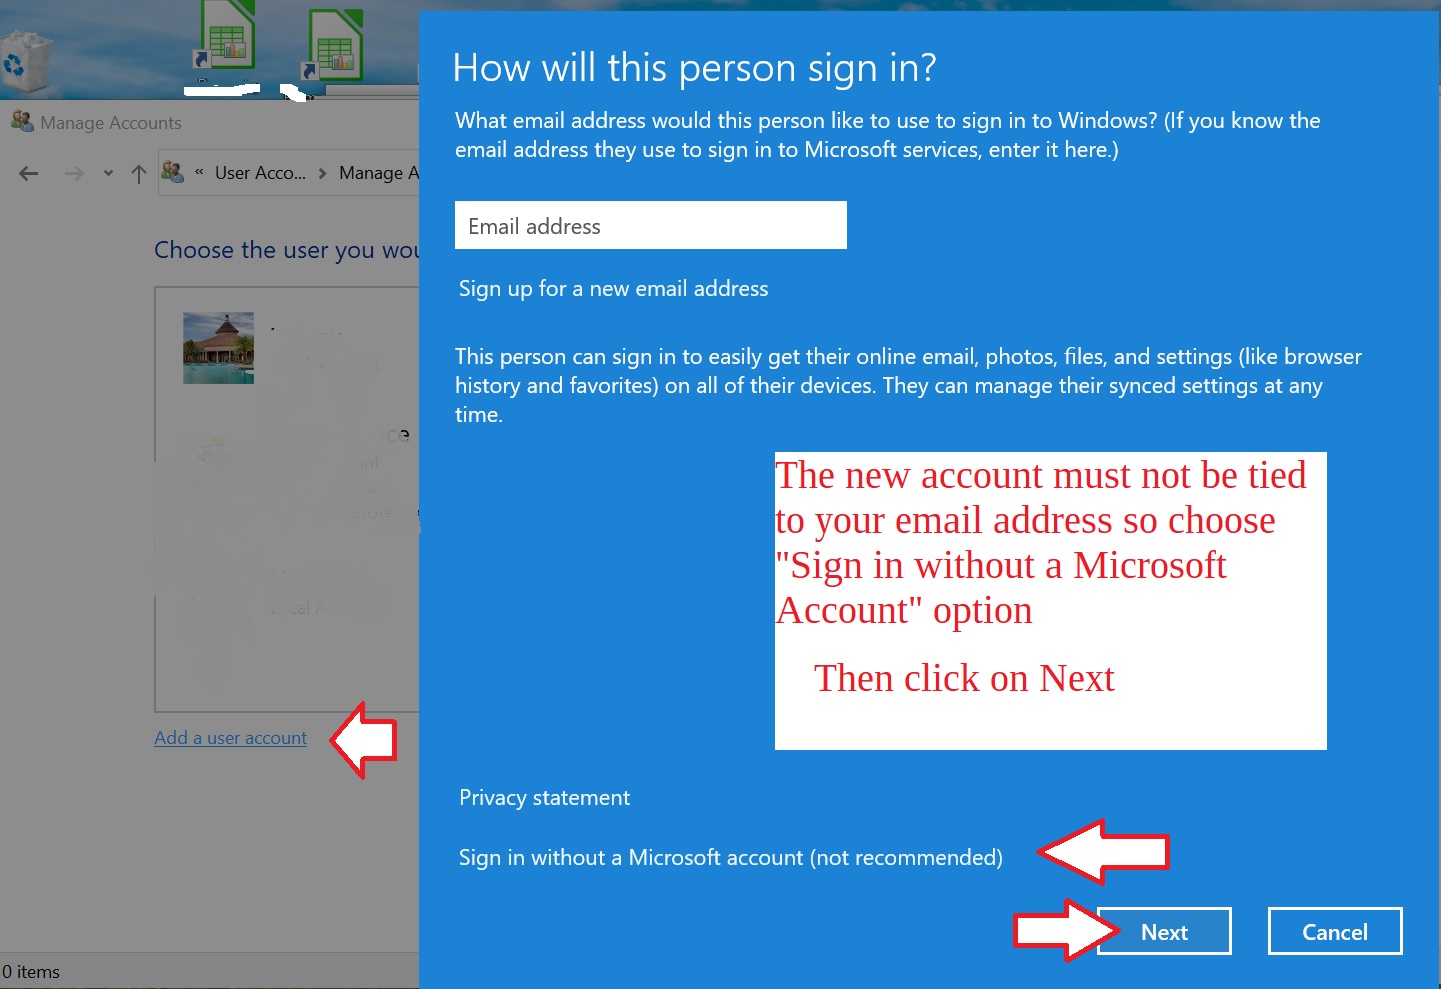
Then click on the Local Account option.
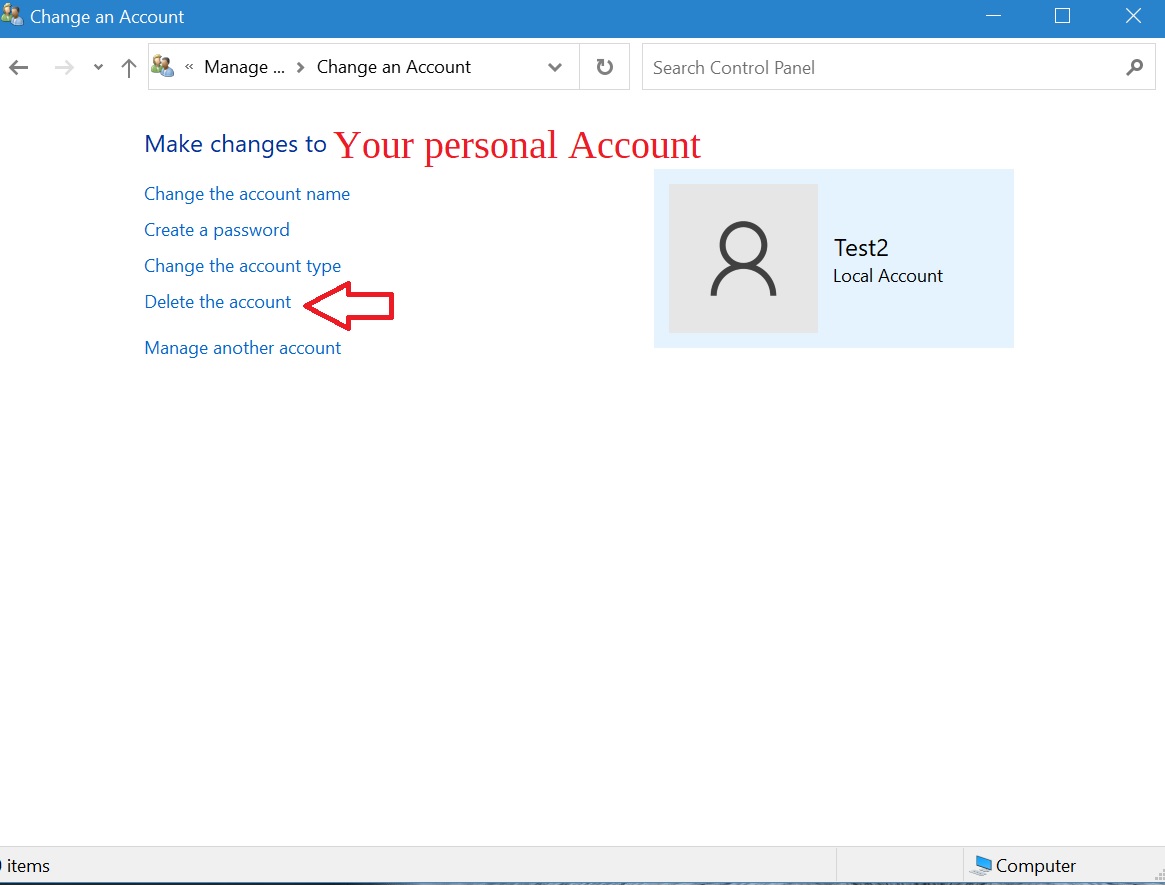
When the new user account loads open the Control Panel then click on User Accounts. Then click on
Then click on your account name then in the next window click on Delete the account then click on Delete the Files then click on Delete the account again. It takes about 10 minutes for the account to be removed from the computer. When its done it will return to the User accounts window. If you have more then 1 additional account, repeat the steps above to delete each additional account until only the User account is left in the window.
Then close the Control Panel window then restart the computer. When it loads all the icons, just check around to confirm that your stuff is no longer there. Then shut down computer & toss it into the trash. Staple used to recycle old computer but they stopped that offer in 2020.
Click here to return to top.
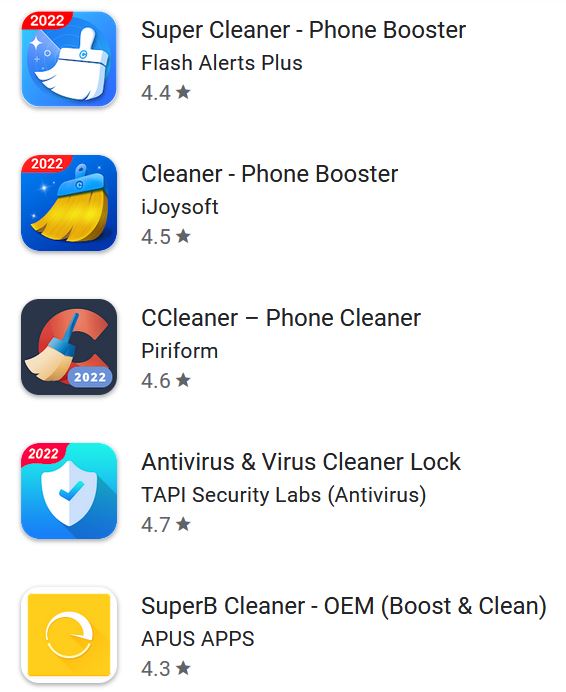
Smart Phones & Tablet users. These devices do not get computer viruses so you do not need to add a computer anti-virus program (app). Users get into trouble when they install bad apps that do bad things.
The best way to keep from getting in trouble is to read the reviews on an App before installing it. Focus on the 1 & 2 star reviews to get a real picture of the bad features in the App. Many of the 5 star reviews are fake, written by the people who created the App to trick more people into installing it. Here are some examples of App reviews:

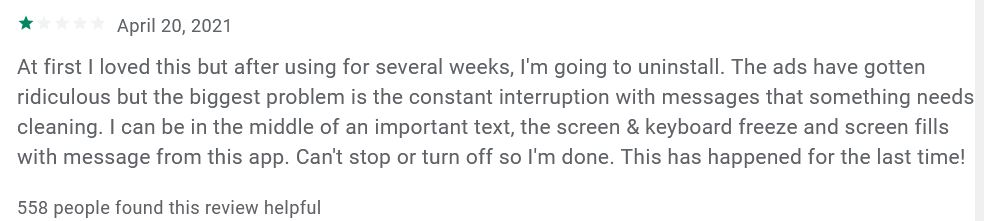
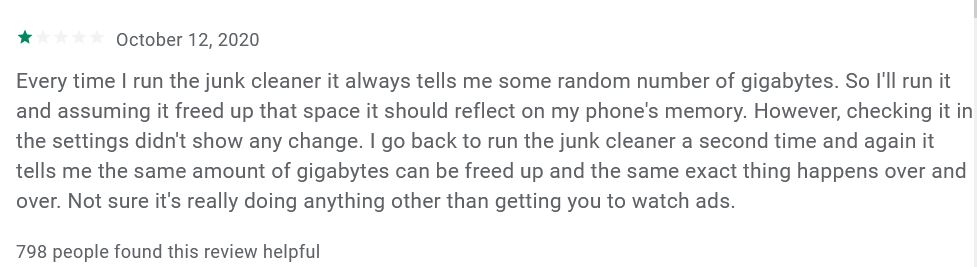
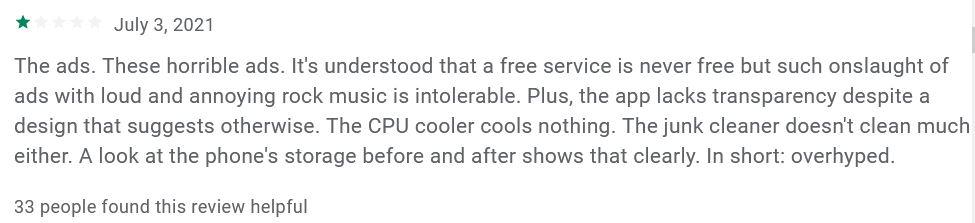
Be very careful with Apps that claim they will “Clean up” your device. The people who created these free apps are making money from the ads that pop up on your device. The old saying is true: "If it ain’t broke don't fix it".
Click here to return to top.
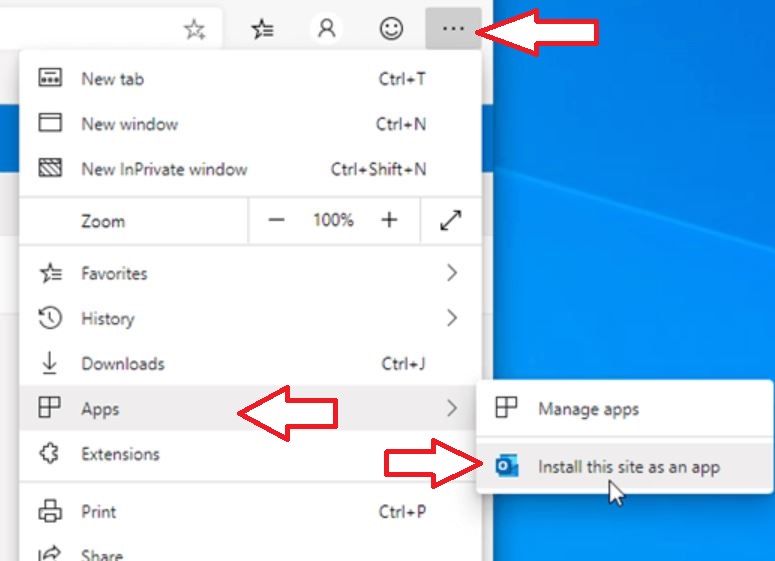
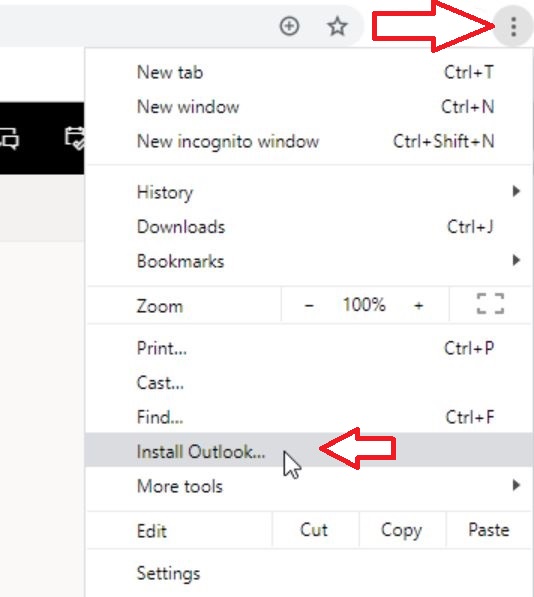
Use the web version of Outlook like a desktop app: This is a cool feature if you have a hotmail or outlook.com email account. You can use either the Edge or Google Chrome browsers to active this "App". When done it adds a shortcut to your Start menu. It works with both Windows 10 and Windows 11. You can then pin it to your taskbar or add a desktop shortcut.
Use Outlook in the Microsoft Edge Internet browser
Use Outlook in Google Chrome
Click here to return to top.
https://idm.xfinity.com/myaccount/reset?execution=e1s1
Click here to return to top.
Microsoft Money Plus Sunset Deluxe
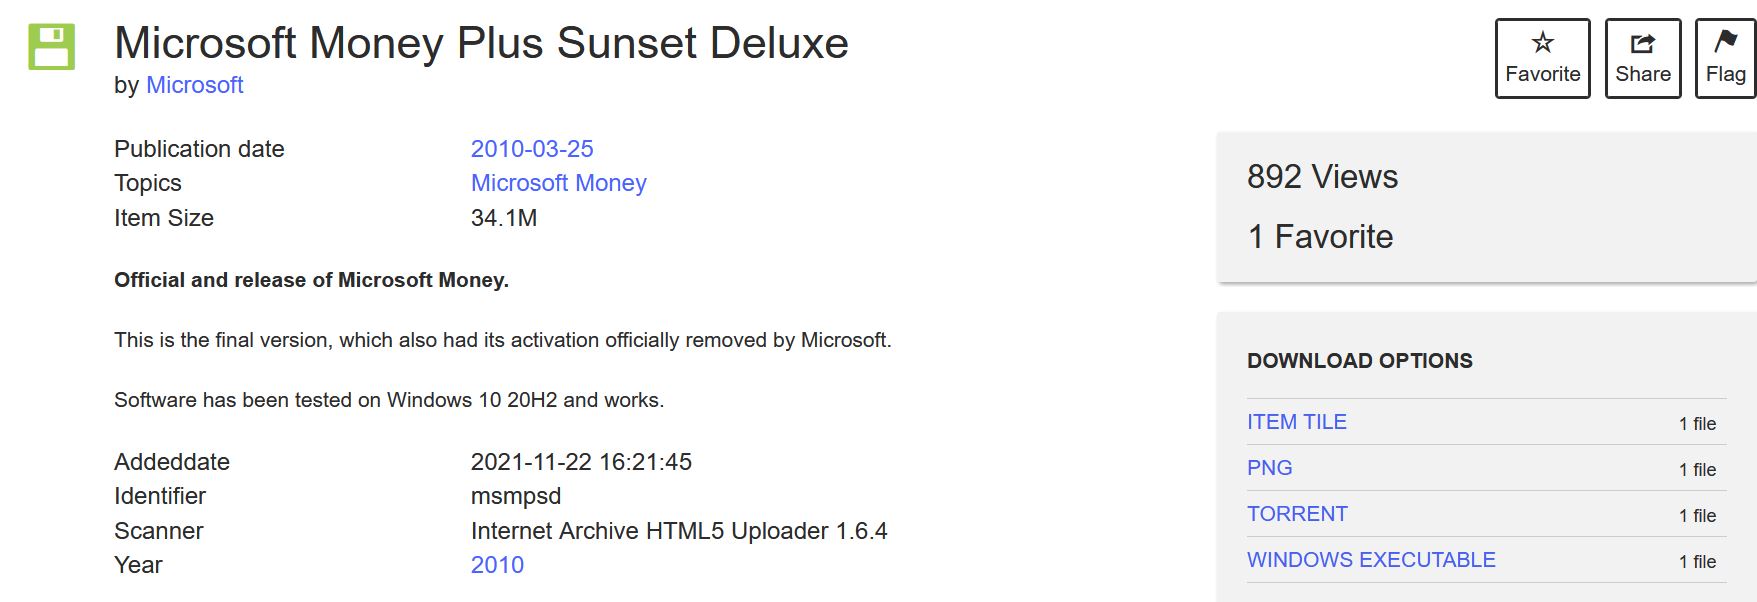
Click here to download installer to your PC computer.
Click here to return to top.
Click here to return to top.